
Instruction Manual
Page 2
...Channel Scan Text Scroll for Satellite Radio source HD Radio control features 31 About HD Radio Tuning Menu system 32 Menu System Activating Security Code Deactivating Security Code Source Select Mode iPod Mode Setting Touch Sensor Tone Manual Clock Adjustment Date Adjustment Date Mode DSI (Disabled System Indicator) Display Illumination Control Dimmer Built-in Auxiliary input Setting CD Read Setting Audio Preset Memory Audio Preset Recall Firmware version display Demonstration mode setting Basic Operations of Audio Control Audio Setup Speaker Setting Subwoofer Output TEL Mute Function...
...Channel Scan Text Scroll for Satellite Radio source HD Radio control features 31 About HD Radio Tuning Menu system 32 Menu System Activating Security Code Deactivating Security Code Source Select Mode iPod Mode Setting Touch Sensor Tone Manual Clock Adjustment Date Adjustment Date Mode DSI (Disabled System Indicator) Display Illumination Control Dimmer Built-in Auxiliary input Setting CD Read Setting Audio Preset Memory Audio Preset Recall Firmware version display Demonstration mode setting Basic Operations of Audio Control Audio Setup Speaker Setting Subwoofer Output TEL Mute Function...

Instruction Manual
Page 3
.... • Mounting and wiring this product requires skills and experience. Therefore, the panel must be attached while the electrical system of the car is a trademark of the unit or faceplate with the prescribed rating. About CD players/disc changers connected to this unit. Note that can be displayed may not be connected to this unit Kenwood disc changers/ CD players released in the U.S. The functions you can use wrong screws...
.... • Mounting and wiring this product requires skills and experience. Therefore, the panel must be attached while the electrical system of the car is a trademark of the unit or faceplate with the prescribed rating. About CD players/disc changers connected to this unit. Note that can be displayed may not be connected to this unit Kenwood disc changers/ CD players released in the U.S. The functions you can use wrong screws...

Instruction Manual
Page 4
... remove the USB device, refer to (page 24). • Press the reset button if the disc auto changer fails to operate properly, press the Reset button. Cleaning the Unit If the faceplate of this manual where lit indicators are described; Cleaning the Faceplate Terminals If the terminals on the unit or faceplate get dirty, wipe them with the USB device installed can damage the data contained in the USB device. Wiping the faceplate...
... remove the USB device, refer to (page 24). • Press the reset button if the disc auto changer fails to operate properly, press the Reset button. Cleaning the Unit If the faceplate of this manual where lit indicators are described; Cleaning the Faceplate Terminals If the terminals on the unit or faceplate get dirty, wipe them with the USB device installed can damage the data contained in the USB device. Wiping the faceplate...

Instruction Manual
Page 5
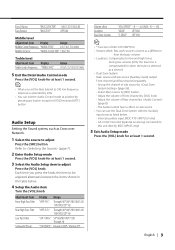
...), WMA (.wma), WAV (.wav) (KDC-X791/MP735U only) • Playable disc media CD-R/RW/ROM • Playable disc file format ISO 9660 Level 1/2, Joliet, Romeo, Long file name. • Playable USB device (KDC-X791/MP735U only) USB mass storage class, iPod with KCA-iP200 • Playable USB device file system (KDC-X791/ MP735U only) FAT16, FAT32 Although the audio files are complied with...
...), WMA (.wma), WAV (.wav) (KDC-X791/MP735U only) • Playable disc media CD-R/RW/ROM • Playable disc file format ISO 9660 Level 1/2, Joliet, Romeo, Long file name. • Playable USB device (KDC-X791/MP735U only) USB mass storage class, iPod with KCA-iP200 • Playable USB device file system (KDC-X791/ MP735U only) FAT16, FAT32 Although the audio files are complied with...

Instruction Manual
Page 8
... [VOL] knob. Audio Control 1 Select the source to adjust Press the [VOL] knob. Right 15 Fader "FADER" Rear 15 - Adjustment Item Display Range Rear Volume "REAR VOLUME" 0 - 35 Subwoofer level "SUB-W LEVEL" -15 - +15 System Q "USER"/"ROCK"/ User/Rock/ "POPS"/"EASY"/ "TOP40"/"JAZZ"/ "NATURAL" Pops/Easy/ Top 40/Jazz/ Natural Bass level* "BASS LEVEL" -8 - +8 Middle level* "MIDDLE LEVEL" -8 - +8 Treble level* "TREBLE LEVEL" -8 - +8 Balance "BALANCE" Left 15 - Each time you press the button, the Attenuator turns ON and OFF. Press the [ATT] button. When the...
... [VOL] knob. Audio Control 1 Select the source to adjust Press the [VOL] knob. Right 15 Fader "FADER" Rear 15 - Adjustment Item Display Range Rear Volume "REAR VOLUME" 0 - 35 Subwoofer level "SUB-W LEVEL" -15 - +15 System Q "USER"/"ROCK"/ User/Rock/ "POPS"/"EASY"/ "TOP40"/"JAZZ"/ "NATURAL" Pops/Easy/ Top 40/Jazz/ Natural Bass level* "BASS LEVEL" -8 - +8 Middle level* "MIDDLE LEVEL" -8 - +8 Treble level* "TREBLE LEVEL" -8 - +8 Balance "BALANCE" Left 15 - Each time you press the button, the Attenuator turns ON and OFF. Press the [ATT] button. When the...
Instruction Manual
Page 9
... Rear channel separately. - English | 9 Adjust the volume of sub source by [SRC] button. - Select Main source by (page 36). - Internal auxiliary input. (KDC-X791/MP735U only) - Bass Q Factor Bass Extend "BASS Q FACTOR" 1.00/1.25/1.50/2.00 "BASS EXT" OFF/ON Middle level Adjustment Item Display Range Middle Center Frequency "MIDDLE FRQ" 0.5/1.0/1.5/2.0 kHz Middle Q Factor "MIDDLE Q FACTOR" 1.00/2.00 Treble level Adjustment Item Display Treble Center Frequency "TREBLE FRQ" Range 10.0/12.5/15.0/17.5 kHz 5 Exit the Detail Audio Control mode...
... Rear channel separately. - English | 9 Adjust the volume of sub source by [SRC] button. - Select Main source by (page 36). - Internal auxiliary input. (KDC-X791/MP735U only) - Bass Q Factor Bass Extend "BASS Q FACTOR" 1.00/1.25/1.50/2.00 "BASS EXT" OFF/ON Middle level Adjustment Item Display Range Middle Center Frequency "MIDDLE FRQ" 0.5/1.0/1.5/2.0 kHz Middle Q Factor "MIDDLE Q FACTOR" 1.00/2.00 Treble level Adjustment Item Display Treble Center Frequency "TREBLE FRQ" Range 10.0/12.5/15.0/17.5 kHz 5 Exit the Detail Audio Control mode...

Instruction Manual
Page 10
Select the "STANDBY" display. 2 Enter Speaker Setting mode Press the [VOL] knob. Speaker type OFF For 5 & 4 in the memory. Subwoofer Output Turning the Subwoofer output ON or OFF. Each time you need to hook up the MUTE wire to your desired setup item Select a setup item using a commercial telephone accessory. The audio system pauses. Refer to (page 26). "Display Select" "DISP" Allows you to set up the phone. The "CALL" display disappears and the audio system comes back ON...
Select the "STANDBY" display. 2 Enter Speaker Setting mode Press the [VOL] knob. Speaker type OFF For 5 & 4 in the memory. Subwoofer Output Turning the Subwoofer output ON or OFF. Each time you need to hook up the MUTE wire to your desired setup item Select a setup item using a commercial telephone accessory. The audio system pauses. Refer to (page 26). "Display Select" "DISP" Allows you to set up the phone. The "CALL" display disappears and the audio system comes back ON...

Instruction Manual
Page 24
... in the USB device starts. Each time you stopped its playback. When the USB device is not connected Connect the USB device Playback of KDC-X791/KDC-MP735U Playing USB (iPod) device When the USB device is connected Select USB source Press the [SRC] button. Removing the USB device 1 Drop open the faceplate Press the Release button. 2 Set the remove mode as it will display a correct title, etc. • When the iPod is connected to indicate that you start playback after switching off the...
... in the USB device starts. Each time you stopped its playback. When the USB device is not connected Connect the USB device Playback of KDC-X791/KDC-MP735U Playing USB (iPod) device When the USB device is connected Select USB source Press the [SRC] button. Removing the USB device 1 Drop open the faceplate Press the Release button. 2 Set the remove mode as it will display a correct title, etc. • When the iPod is connected to indicate that you start playback after switching off the...
Instruction Manual
Page 25
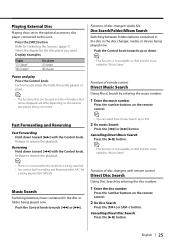
... [¢]. Function of remote control Direct Music Search Doing Music Search by "Music Editor". Press the [SRC] button. Each time you want. Display examples: Display "CD Changer" "MD Changer" Disc player CD changer MD changer Pause and play Press the Control knob. Release to this unit. Cancelling Direct Music Search Press the [38] button. ⁄ • This function is being played. (KDC-MP635) Music Search Switching between folders/albums contained in the disc in the disc changer, media, or device being connected. Reversing Hold...
... [¢]. Function of remote control Direct Music Search Doing Music Search by "Music Editor". Press the [SRC] button. Each time you want. Display examples: Display "CD Changer" "MD Changer" Disc player CD changer MD changer Pause and play Press the Control knob. Release to this unit. Cancelling Direct Music Search Press the [38] button. ⁄ • This function is being played. (KDC-MP635) Music Search Switching between folders/albums contained in the disc in the disc changer, media, or device being connected. Reversing Hold...
Instruction Manual
Page 33
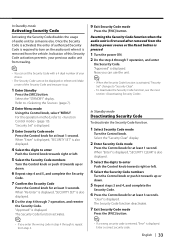
... 1 second. Select the "Security Clear" display. 2 Enter Security Code mode Press the Control knob for at least 3 seconds. For the operation method, refer to (page 7). 2 Enter Menu mode Using the Control knob, select "MENU". English | 33 In Standby mode Activating Security Code Activating the Security Code disables the usage of authorized Security Code is pressed 1 Turn the power ON. 2 Do the step 4 through 6, repeat from the battery power source or the Reset button is required...
... 1 second. Select the "Security Clear" display. 2 Enter Security Code mode Press the Control knob for at least 3 seconds. For the operation method, refer to (page 7). 2 Enter Menu mode Using the Control knob, select "MENU". English | 33 In Standby mode Activating Security Code Activating the Security Code disables the usage of authorized Security Code is pressed 1 Turn the power ON. 2 Do the step 4 through 6, repeat from the battery power source or the Reset button is required...

Instruction Manual
Page 34
... Setting the operation check sound (beep sound) ON/OFF. Display "iPod Mode : ON" "iPod Mode : OFF" Setting Uses the operation method similar to adjust Push the Control knob towards right or left . Function of KDC-X791/KDC-MP735U In USB mode with iPod connected iPod Mode Setting Setting up or down . 5 Exit Clock adjustment mode Press the [FNC] button. The items that are blinking are items that you can adjust. 4 Adjust each item Turn the Control knob or push it towards up the Source Select mode...
... Setting the operation check sound (beep sound) ON/OFF. Display "iPod Mode : ON" "iPod Mode : OFF" Setting Uses the operation method similar to adjust Push the Control knob towards right or left . Function of KDC-X791/KDC-MP735U In USB mode with iPod connected iPod Mode Setting Setting up or down . 5 Exit Clock adjustment mode Press the [FNC] button. The items that are blinking are items that you can adjust. 4 Adjust each item Turn the Control knob or push it towards up the Source Select mode...
Instruction Manual
Page 36
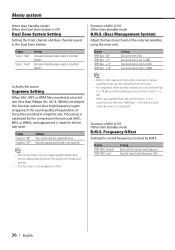
... of equivalents of the external amplifier using the Supreme function. Display "AMP FREQ : Normal" "AMP FREQ : Low" Setting Boost with the normal central frequency. Bass boost level is selected. Display "Zone 2 : Rear" "Zone 2 : Front" Setting Sub source (Auxiliary input source) is ON Dual Zone System Setting Setting the Front channel and Rear channel sound in the audio file. ⁄ • The sound effect may be imperceptible depending on iPod. Menu system Other than Standby mode/ When the Dual Zone System...
... of equivalents of the external amplifier using the Supreme function. Display "AMP FREQ : Normal" "AMP FREQ : Low" Setting Boost with the normal central frequency. Bass boost level is selected. Display "Zone 2 : Rear" "Zone 2 : Front" Setting Sub source (Auxiliary input source) is ON Dual Zone System Setting Setting the Front channel and Rear channel sound in the audio file. ⁄ • The sound effect may be imperceptible depending on iPod. Menu system Other than Standby mode/ When the Dual Zone System...

Instruction Manual
Page 37
... the Instruction manual attached to the unit. 1 Select AMP Control mode Turn the Control knob. In FM reception CRSC (Clean Reception System Circuit) Temporarily have priority. Digital broadcasts only. In Satellite radio source Electronic Serial Number (ESN) display Displaying the Electronic Serial Number. Display "ESN ⁄ • Electronic Serial Number (ESN) It is received, the Receive mode will automatically switch to the FM station. Function of KDC-X791 When LX AMP unit connecting AMP Control You can control the LX AMP connected to...
... the Instruction manual attached to the unit. 1 Select AMP Control mode Turn the Control knob. In FM reception CRSC (Clean Reception System Circuit) Temporarily have priority. Digital broadcasts only. In Satellite radio source Electronic Serial Number (ESN) display Displaying the Electronic Serial Number. Display "ESN ⁄ • Electronic Serial Number (ESN) It is received, the Receive mode will automatically switch to the FM station. Function of KDC-X791 When LX AMP unit connecting AMP Control You can control the LX AMP connected to...

Instruction Manual
Page 39
... the operation method, refer to recall the Audio Preset Press the Control knob. "MENU" is displayed. 3 Select Audio Preset mode Turn the Control knob. Select the "Recall" display. 6 Determine whether to (page 10). "Memory?" is changed to the value which is displayed. 7 Recall the Audio Preset Select "YES" using the Control knob. Volume, Balance, Fader, Loudness, Volume offset, Dual Zone System, Rear Volume Other than Standby mode Audio Preset Memory Registering the value setup by (page 39). 1 Select the source Press the [SRC] button. Refer...
... the operation method, refer to recall the Audio Preset Press the Control knob. "MENU" is displayed. 3 Select Audio Preset mode Turn the Control knob. Select the "Recall" display. 6 Determine whether to (page 10). "Memory?" is changed to the value which is displayed. 7 Recall the Audio Preset Select "YES" using the Control knob. Volume, Balance, Fader, Loudness, Volume offset, Dual Zone System, Rear Volume Other than Standby mode Audio Preset Memory Registering the value setup by (page 39). 1 Select the source Press the [SRC] button. Refer...

Instruction Manual
Page 41
... remove it as on the dashboard. Basic operations [VOL] buttons Adjusts the volume. [SRC] button Each time you press the button, the source alternates. For the source alternating order refer to the instruction manual of Bluetooth HANDS FREE BOX. When the button is connected. For more information, refer to (page 7). [ATT] button Turns the volume down quickly. Contact a doctor immediately if the battery is accidentally swallowed. ¤ • Do not set the remote control...
... remove it as on the dashboard. Basic operations [VOL] buttons Adjusts the volume. [SRC] button Each time you press the button, the source alternates. For the source alternating order refer to the instruction manual of Bluetooth HANDS FREE BOX. When the button is connected. For more information, refer to (page 7). [ATT] button Turns the volume down quickly. Contact a doctor immediately if the battery is accidentally swallowed. ¤ • Do not set the remote control...

Instruction Manual
Page 42
... others operations. • The remote control can only select and adjust the Basic Audio item. Selecting and adjusting of the rear channel. Each time you press the [FM] button, the band alternates between disc/ folders. [38] button Each time you press the button, "2 ZONE" of (page 9) is turned ON or OFF. [5]/ [∞] buttons Adjusts the volume of the Detail Audio item cannot be adjusted. [VOL] buttons Adjusts the Audio item. ⁄ • Refer to recall preset stations. [DIRECT] button...
... others operations. • The remote control can only select and adjust the Basic Audio item. Selecting and adjusting of the rear channel. Each time you press the [FM] button, the band alternates between disc/ folders. [38] button Each time you press the button, "2 ZONE" of (page 9) is turned ON or OFF. [5]/ [∞] buttons Adjusts the volume of the Detail Audio item cannot be adjusted. [VOL] buttons Adjusts the Audio item. ⁄ • Refer to recall preset stations. [DIRECT] button...
Instruction Manual
Page 43
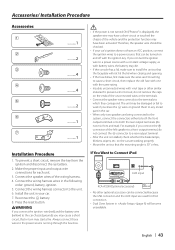
... speaker to a power source that in turn may be checked. • If your car. 7. on and off with vinyl tape or other optional accessory can be connected because the USB connector and the AUX input are used for each unit. 3. Connect the speaker wires of the vehicle and the protection function may die. • If the console has a lid, make sure to install the unit so that the mounting angle is installed...
... speaker to a power source that in turn may be checked. • If your car. 7. on and off with vinyl tape or other optional accessory can be connected because the USB connector and the AUX input are used for each unit. 3. Connect the speaker wires of the vehicle and the protection function may die. • If the console has a lid, make sure to install the unit so that the mounting angle is installed...
Instruction Manual
Page 44
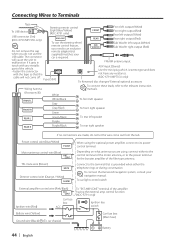
... required. To connect the Kenwood navigation system, consult your USB cable. Connecting Wires to Terminals Tape Steering remote control Front left output (White) To USB device USB connector (1m) (KDC-X791/MP735U only) (Light Blue/Yellow) (KDC-X791 only) REMO.CONT FRONT REAR Front right output (Red) Rear left output (White) Rear right output (Red) To use the steering wheel Sub Woofer left speaker REAR R Purple/Black To rear right speaker If no connections are using the optional power amplifier, connect to the relevant instruction manuals.
... required. To connect the Kenwood navigation system, consult your USB cable. Connecting Wires to Terminals Tape Steering remote control Front left output (White) To USB device USB connector (1m) (KDC-X791/MP735U only) (Light Blue/Yellow) (KDC-X791 only) REMO.CONT FRONT REAR Front right output (Red) Rear left output (White) Rear right output (Red) To use the steering wheel Sub Woofer left speaker REAR R Purple/Black To rear right speaker If no connections are using the optional power amplifier, connect to the relevant instruction manuals.
Instruction Manual
Page 47
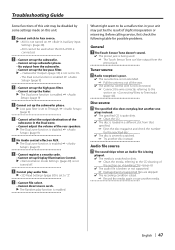
... set up the subwoofer. • Cannot set up subwoofer phase. • No output from that specified. ☞ Eject the disc magazine and check the number for possible problems. General ? Radio reception is poor. ✔ The car antenna is not extended. ☞ Pull the antenna out all the way. ✔ The antenna control wire is not connected. ☞ Connect the wire correctly, referring to the section on (page 6). ✔ The audio...
... set up the subwoofer. • Cannot set up subwoofer phase. • No output from that specified. ☞ Eject the disc magazine and check the number for possible problems. General ? Radio reception is poor. ✔ The car antenna is not extended. ☞ Pull the antenna out all the way. ✔ The antenna control wire is not connected. ☞ Connect the wire correctly, referring to the section on (page 6). ✔ The audio...
Instruction Manual
Page 49
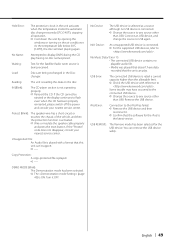
... all operation. ➪ Cool down the unit by opening the windows or turning on the disc. Connect an USB device, and change the source to the iPod has failed. ➪ Remove the USB device and then reconnect it OFF. N/A Device: An unsupported USB device is activated. ➪ Wire or insulate the speaker cable properly and press the reset button. English | 49 Waiting: Text for the Satellite Radio tuner source is connected. ➪ Change the source to . Protect (Blink): The speaker wire has...
... all operation. ➪ Cool down the unit by opening the windows or turning on the disc. Connect an USB device, and change the source to the iPod has failed. ➪ Remove the USB device and then reconnect it OFF. N/A Device: An unsupported USB device is activated. ➪ Wire or insulate the speaker cable properly and press the reset button. English | 49 Waiting: Text for the Satellite Radio tuner source is connected. ➪ Change the source to . Protect (Blink): The speaker wire has...


