Instruction Manual
Page 2
... Scroll HD Radio control features 20 About HD Radio Tuning Menu system 21 Menu System Activating Security Code Deactivating Security Code Touch Sensor Tone Manual Clock Adjustment DSI (Disabled System Indicator) Display Illumination Control Dimmer Dual Zone System Setting Supreme Setting CRSC (Clean Reception System Circuit) Receive Mode Setting Electronic Serial...
... Scroll HD Radio control features 20 About HD Radio Tuning Menu system 21 Menu System Activating Security Code Deactivating Security Code Touch Sensor Tone Manual Clock Adjustment DSI (Disabled System Indicator) Display Illumination Control Dimmer Dual Zone System Setting Supreme Setting CRSC (Clean Reception System Circuit) Receive Mode Setting Electronic Serial...
Instruction Manual
Page 7
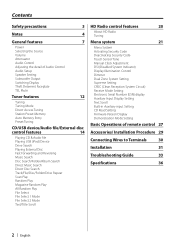
... on the connected unit. Decreasing Volume Turn the [VOL] knob counterclockwise. General features Release button VOL/Control knob "55 %*41 43$ LOUD indicator ATT indicator Clock display Power Turning ON the Power Press the [SRC] button. Turning OFF the Power Press the [SRC] button for at least 1 second.
... on the connected unit. Decreasing Volume Turn the [VOL] knob counterclockwise. General features Release button VOL/Control knob "55 %*41 43$ LOUD indicator ATT indicator Clock display Power Turning ON the Power Press the [SRC] button. Turning OFF the Power Press the [SRC] button for at least 1 second.
Instruction Manual
Page 10
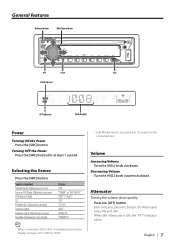
...Artist name Composer name Category name Label name Comment Band & Channel number Clock Display "CH NAME" "SONG" "ARTIST" "COMPOSER" "CATEGORY" "LABEL" "COMMENT" "CH NUM" "CLOCK" In Standby/ Auxiliary input source Information Source name Clock Display "SRC NAME" "CLOCK" 3 Exit Switching Display mode Press the [DISP] button. ⁄... 1000, only the last 3 digits of its number are displayed. • When you select the clock display, the display setting of each source will be changed to the clock display. • Music title, Artist name, and Album name cannot be displayed in WAV file. ...
...Artist name Composer name Category name Label name Comment Band & Channel number Clock Display "CH NAME" "SONG" "ARTIST" "COMPOSER" "CATEGORY" "LABEL" "COMMENT" "CH NUM" "CLOCK" In Standby/ Auxiliary input source Information Source name Clock Display "SRC NAME" "CLOCK" 3 Exit Switching Display mode Press the [DISP] button. ⁄... 1000, only the last 3 digits of its number are displayed. • When you select the clock display, the display setting of each source will be changed to the clock display. • Music title, Artist name, and Album name cannot be displayed in WAV file. ...
Instruction Manual
Page 21
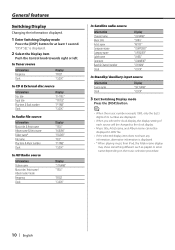
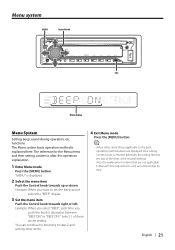
The reference for items that are not applicable ( etc.) are entered step by returning to step 2 and setting other items. 4 Exit Menu mode Press the [MENU] button. ⁄ • When other items those applicable to set the beep sound select the "BEEP" display. 3 Set the menu item Push the Control knob towards up or down. Example: When you select "BEEP", each time you want to the basic operation method above are displayed, their setting content is entered. (Normally the setting listed at the top of them as the setting. English | 21 Select 1 of the chart is the original ...
The reference for items that are not applicable ( etc.) are entered step by returning to step 2 and setting other items. 4 Exit Menu mode Press the [MENU] button. ⁄ • When other items those applicable to set the beep sound select the "BEEP" display. 3 Set the menu item Push the Control knob towards up or down. Example: When you select "BEEP", each time you want to the basic operation method above are displayed, their setting content is entered. (Normally the setting listed at the top of them as the setting. English | 21 Select 1 of the chart is the original ...
Instruction Manual
Page 23
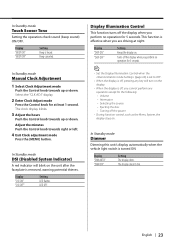
...display is effective when you perform no operation for at night. LED OFF. In Standby mode Manual Clock Adjustment 1 Select Clock Adjustment mode Push the Control knob towards right or left. 4 Exit Clock adjustment mode Press the [MENU] button. Display "DIM AUTO" "DIM OFF" Setting The display...the power • During function control, such as the Menu System, the display stays on . Select the "CLK ADJ" display. 2 Enter Clock Adjust mode Press the Control knob for 5 seconds. Adjust the minutes Push the Control knob towards up or down . Beep canceled. In Standby...
...display is effective when you perform no operation for at night. LED OFF. In Standby mode Manual Clock Adjustment 1 Select Clock Adjustment mode Push the Control knob towards right or left. 4 Exit Clock adjustment mode Press the [MENU] button. Display "DIM AUTO" "DIM OFF" Setting The display...the power • During function control, such as the Menu System, the display stays on . Select the "CLK ADJ" display. 2 Enter Clock Adjust mode Press the Control knob for 5 seconds. Adjust the minutes Push the Control knob towards up or down . Beep canceled. In Standby...


