Instruction Manual
Page 4
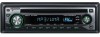
...in this unit is initially set on the Demonstration mode. Normal operation should be inapplicable. If the faceplate is pressed. • Press the reset button if the disc auto changer fails to explain more clearly how the controls are A-Z 0-9 • The illustrations of (page 18) to ...volatile liquid such as a silicon cloth. Notes • If you experience problems during installation, consult your Kenwood dealer. • When you purchase optional accessories, check with your Kenwood dealer to make sure that they work with your model and in your unit • If the unit ...
...in this unit is initially set on the Demonstration mode. Normal operation should be inapplicable. If the faceplate is pressed. • Press the reset button if the disc auto changer fails to explain more clearly how the controls are A-Z 0-9 • The illustrations of (page 18) to ...volatile liquid such as a silicon cloth. Notes • If you experience problems during installation, consult your Kenwood dealer. • When you purchase optional accessories, check with your Kenwood dealer to make sure that they work with your model and in your unit • If the unit ...
Instruction Manual
Page 19
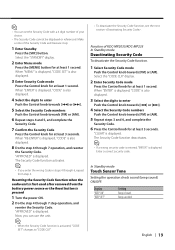
...Press the [MENU] button for at least 3 seconds. Display "BEEP ON" "BEEP OFF" Setting Beep is displayed. Beep canceled. English | 19 Resetting the Security Code function when the audio unit is first used after removed from step 4. Function of KDC-MP2035/KDC-MP235 In Standby mode ...Code cannot be displayed or referenced. "APPROVED" is also displayed. 8 Do the step 4 through 6, repeat from the battery power source or the Reset button is displayed. When "ENTER" is displayed, "CODE" is also displayed. 3 Select the digits to enter Push the Control knob towards [4] or...
...Press the [MENU] button for at least 3 seconds. Display "BEEP ON" "BEEP OFF" Setting Beep is displayed. Beep canceled. English | 19 Resetting the Security Code function when the audio unit is first used after removed from step 4. Function of KDC-MP2035/KDC-MP235 In Standby mode ...Code cannot be displayed or referenced. "APPROVED" is also displayed. 8 Do the step 4 through 6, repeat from the battery power source or the Reset button is displayed. When "ENTER" is displayed, "CODE" is also displayed. 3 Select the digits to enter Push the Control knob towards [4] or...
Instruction Manual
Page 25
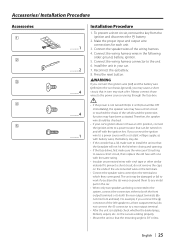
... the car. • When only two speakers are working properly. • Mount the unit so that can be checked. • If your car. 7. Press the reset button. 2WARNING If you connect the ignition wire to a power source with a constant voltage supply, as with battery wires, the battery may die. • If the...
... the car. • When only two speakers are working properly. • Mount the unit so that can be checked. • If your car. 7. Press the reset button. 2WARNING If you connect the ignition wire to a power source with a constant voltage supply, as with battery wires, the battery may die. • If the...
Instruction Manual
Page 30
...was played that doesn't have data recorded that this unit has been removed. Or the unit is malfunctioning for some reason. ➪ Press the reset button on the unit. LOAD: Discs are recorded on the disc. Turn it has a title. TOC ERR: • No disc has been loaded ...in the disc magazine. E-77: The unit is malfunctioning for some reason. ➪ Check the disc magazine. And then press the reset button on the MD. A copy-protected file is not operating properly. ➪ Reinsert the CD. NO PANEL: The faceplate of the vehicle, and ...
...was played that doesn't have data recorded that this unit has been removed. Or the unit is malfunctioning for some reason. ➪ Press the reset button on the unit. LOAD: Discs are recorded on the disc. Turn it has a title. TOC ERR: • No disc has been loaded ...in the disc magazine. E-77: The unit is malfunctioning for some reason. ➪ Check the disc magazine. And then press the reset button on the MD. A copy-protected file is not operating properly. ➪ Reinsert the CD. NO PANEL: The faceplate of the vehicle, and ...


