
Instruction Manual
Page 2
... (such as sunshine, fire or the like. • Keep battery out of reach of children and in original package until ready to avoid damaging the speakers by the sudden increase of explosion if replaced incorrectly. Caution Volume setting: • Adjust the volume so that takes your attention away from safe driving...
... (such as sunshine, fire or the like. • Keep battery out of reach of children and in original package until ready to avoid damaging the speakers by the sudden increase of explosion if replaced incorrectly. Caution Volume setting: • Adjust the volume so that takes your attention away from safe driving...
Instruction Manual
Page 4
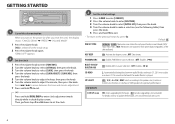
... turn on how to update the firmware, see the following table), then press the knob. 5 Press and hold SCRL DISP to make a selection (see : www.kenwood.com/cs/ce/ 4 Then, perform steps 5 and 6 above to set the clock. 3 Set the initial settings 1 Press SRC to enter [STANDBY]. 2 Press... adjustment. 7 Press and hold to exit. (or) Press and hold to exit. • To return to the speaker size (5 inches or 4 inches, 6×9 inches or 6 inches) or OEM speakers for each preset button in clock display screen. GETTING STARTED 1 Cancel the demonstration When you reset the unit), the display...
... turn on how to update the firmware, see the following table), then press the knob. 5 Press and hold SCRL DISP to make a selection (see : www.kenwood.com/cs/ce/ 4 Then, perform steps 5 and 6 above to set the clock. 3 Set the initial settings 1 Press SRC to enter [STANDBY]. 2 Press... adjustment. 7 Press and hold to exit. (or) Press and hold to exit. • To return to the speaker size (5 inches or 4 inches, 6×9 inches or 6 inches) or OEM speakers for each preset button in clock display screen. GETTING STARTED 1 Cancel the demonstration When you reset the unit), the display...
Instruction Manual
Page 9
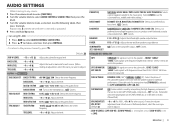
...: Adjusts the quality factor. 10.0K/ 12.5K/ 15.0K/ 17.5K: Selects the center frequency. -8 to R15 (0): Adjusts the left and right speaker output balance. BALANCE L15 to +8 (0): Adjusts the level. Default: XX Adjusts the level to memorize for optimum performance. (Selectable only if a setting other sources...Cancels. SUBWOOFER ON: Turns on the extended bass. ; OFF: Cancels. ENGLISH | 9 Repeat step 3 until the desired item is selected for KDC-X497 ) BASS ADJUST BASS CTR FRQ BASS LEVEL BASS Q FACTOR BASS EXTEND MID ADJUST MID CTR FRQ MID LEVEL MID Q FACTOR TRE ADJUST ...
...: Adjusts the quality factor. 10.0K/ 12.5K/ 15.0K/ 17.5K: Selects the center frequency. -8 to R15 (0): Adjusts the left and right speaker output balance. BALANCE L15 to +8 (0): Adjusts the level. Default: XX Adjusts the level to memorize for optimum performance. (Selectable only if a setting other sources...Cancels. SUBWOOFER ON: Turns on the extended bass. ; OFF: Cancels. ENGLISH | 9 Repeat step 3 until the desired item is selected for KDC-X497 ) BASS ADJUST BASS CTR FRQ BASS LEVEL BASS Q FACTOR BASS EXTEND MID ADJUST MID CTR FRQ MID LEVEL MID Q FACTOR TRE ADJUST ...
Instruction Manual
Page 11
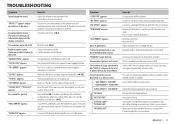
... device. "TOC ERROR" appears. "NO DEVICE" appears. "NO MUSIC" appears. Correct characters are recorded. "TAG ERROR" appears. "STATION LIMIT"/ "STATION LIM" The number of the speaker wires are recorded. Playback order is unable to complete transferring the tagged information to the radio. Retry after deleting an unnecessary station on your device...
... device. "TOC ERROR" appears. "NO DEVICE" appears. "NO MUSIC" appears. Correct characters are recorded. "TAG ERROR" appears. "STATION LIMIT"/ "STATION LIM" The number of the speaker wires are recorded. Playback order is unable to complete transferring the tagged information to the radio. Retry after deleting an unnecessary station on your device...
Instruction Manual
Page 12
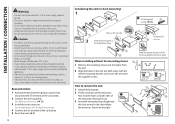
... the unit with the supplied screws. Metal parts such as the heat sink and enclosure become hot. • Do not connect the · wires of speaker to the car chassis, Ground wire (black), or in the console of the trim plate, then pull it out. 3 Insert the extraction keys deeply into...
... the unit with the supplied screws. Metal parts such as the heat sink and enclosure become hot. • Do not connect the · wires of speaker to the car chassis, Ground wire (black), or in the console of the trim plate, then pull it out. 3 Insert the extraction keys deeply into...
Instruction Manual
Page 13
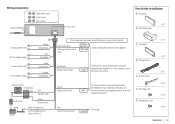
...) Blue (Antenna control wire) To the terminal that is grounded when either the telephone rings or during conversation. (To F Flat head screw MUTE connect the Kenwood navigation system, refer your navigation manual.) G Round head screw (Not used) ANT CONT ( ×1 ) ( ×1 ) ( ×1 ) ( ×2 ) ( ... Fuse (10 A) Part list for installation A Faceplate B Mounting sleeve ( ×1 ) To front speaker (left) To front speaker (right) To rear speaker (left) To rear speaker (right) White White/Black Gray Gray/Black Green Green/Black Purple Purple/Black Ignition switch Car fuse box...
...) Blue (Antenna control wire) To the terminal that is grounded when either the telephone rings or during conversation. (To F Flat head screw MUTE connect the Kenwood navigation system, refer your navigation manual.) G Round head screw (Not used) ANT CONT ( ×1 ) ( ×1 ) ( ×1 ) ( ×2 ) ( ... Fuse (10 A) Part list for installation A Faceplate B Mounting sleeve ( ×1 ) To front speaker (left) To front speaker (right) To rear speaker (left) To rear speaker (right) White White/Black Gray Gray/Black Green Green/Black Purple Purple/Black Ignition switch Car fuse box...


