
Instruction Manual
Page 2
... your attention away from the center hole and disc edge before playing digital sources to avoid damaging the speakers by the sudden increase of the faceplate) Replace it only with a dry silicon or soft cloth. CONTENTS BEFORE USE 2 BASICS 3 GETTING STARTED 4 CD / USB / iPod 5 AUX 6 HD ...the book) How to read this unit, pull them out horizontally. • Remove burrs from safe driving. General: • Avoid using buttons on the faceplate. • [XX] indicates the selected items. • (➜ XX) indicates references are available on it. • Do not use a disc ...
... your attention away from the center hole and disc edge before playing digital sources to avoid damaging the speakers by the sudden increase of the faceplate) Replace it only with a dry silicon or soft cloth. CONTENTS BEFORE USE 2 BASICS 3 GETTING STARTED 4 CD / USB / iPod 5 AUX 6 HD ...the book) How to read this unit, pull them out horizontally. • Remove burrs from safe driving. General: • Avoid using buttons on the faceplate. • [XX] indicates the selected items. • (➜ XX) indicates references are available on it. • Do not use a disc ...
Instruction Manual
Page 3
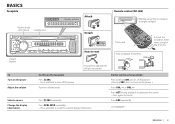
...; Press and hold to turn off the power. ( Pressing SRC does not turn on the faceplate) Press L SRC. • Press and hold to bright sunlight.) * Not used. Do this (on the power. ) Press VOL or VOL . BASICS Faceplate KDC-HD455U Display window Attach Volume knob (turn/press) Loading slot Detach Remote control (RC-406...
...; Press and hold to turn off the power. ( Pressing SRC does not turn on the faceplate) Press L SRC. • Press and hold to bright sunlight.) * Not used. Do this (on the power. ) Press VOL or VOL . BASICS Faceplate KDC-HD455U Display window Attach Volume knob (turn/press) Loading slot Detach Remote control (RC-406...
Instruction Manual
Page 12
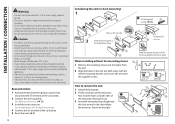
... heat sink and enclosure become hot. • Do not connect the · wires of speaker to your vehicle. How to remove the unit 1 Detach the faceplate. 2 Fit the catch pin on the extraction keys into the slots on the top side Orientate the trim plate as illustrated before wiring and mounting...
... heat sink and enclosure become hot. • Do not connect the · wires of speaker to your vehicle. How to remove the unit 1 Detach the faceplate. 2 Fit the catch pin on the extraction keys into the slots on the top side Orientate the trim plate as illustrated before wiring and mounting...
Instruction Manual
Page 13
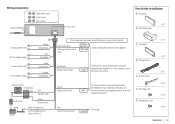
...the vehicle. Wiring connection SW FRONT REAR Subwoofer output Front output R L Rear output Antenna terminal Fuse (10 A) Part list for installation A Faceplate B Mounting sleeve ( ×1 ) To front speaker (left) To front speaker (right) To rear speaker (left) To rear speaker ... (Antenna control wire) To the terminal that is grounded when either the telephone rings or during conversation. (To F Flat head screw MUTE connect the Kenwood navigation system, refer your navigation manual.) G Round head screw (Not used) ANT CONT ( ×1 ) ( ×1 ) ( ×1 ) ( ×2 )...
...the vehicle. Wiring connection SW FRONT REAR Subwoofer output Front output R L Rear output Antenna terminal Fuse (10 A) Part list for installation A Faceplate B Mounting sleeve ( ×1 ) To front speaker (left) To front speaker (right) To rear speaker (left) To rear speaker ... (Antenna control wire) To the terminal that is grounded when either the telephone rings or during conversation. (To F Flat head screw MUTE connect the Kenwood navigation system, refer your navigation manual.) G Round head screw (Not used) ANT CONT ( ×1 ) ( ×1 ) ( ×1 ) ( ×2 )...

