User Manual
Page 16
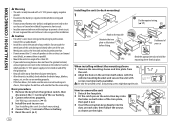
... prevent a short circuit. • Be sure to ground this unit to the car's chassis again after use of the car battery. 2 Connect the wires properly. See Wiring connection. ( 17) 3 Install the unit to your car Bend the appropriate tabs to hold the mounting sleeve firmly in parallel. • Mount the...mounting to professionals. Do not touch the metal parts of this unit in the unit (on both sides of your vehicle wiring harness does not have the ignition terminal, connect Ignition wire (red) to the terminal on the vehicle's fuse box which provides 12 V DC power supply and is turned on ...
... prevent a short circuit. • Be sure to ground this unit to the car's chassis again after use of the car battery. 2 Connect the wires properly. See Wiring connection. ( 17) 3 Install the unit to your car Bend the appropriate tabs to hold the mounting sleeve firmly in parallel. • Mount the...mounting to professionals. Do not touch the metal parts of this unit in the unit (on both sides of your vehicle wiring harness does not have the ignition terminal, connect Ignition wire (red) to the terminal on the vehicle's fuse box which provides 12 V DC power supply and is turned on ...
User Manual
Page 17
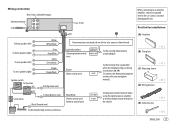
... telephone rings or during conversation ( 14) (To connect the Kenwood navigation system, refer your navigation manual.) (C) Mounting sleeve (D) Wiring harness Car fuse box Battery Yellow (Battery wire) Black (Ground wire) To the metallic body or chassis of the car Blue/White (Power control wire/ Antenna control wire) To the power control terminal when using the optional power...
... telephone rings or during conversation ( 14) (To connect the Kenwood navigation system, refer your navigation manual.) (C) Mounting sleeve (D) Wiring harness Car fuse box Battery Yellow (Battery wire) Black (Ground wire) To the metallic body or chassis of the car Blue/White (Power control wire/ Antenna control wire) To the power control terminal when using the optional power...


