
Quick Start Guide 1
Page 2
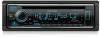
... equipment and receiver. • Connect the equipment into an outlet on , or inside the product relating to provide reasonable protection against harmful interference in accordance with the instructions. In compliance with the limits for help. CAUTION Use of controls or adjustments or performance of Conformity Trade Name: KENWOOD Products: CD-RECEIVER Model Name: KDC-X704/KDC-X304/KDC-BT778HD/KDC-BT378U/KDC-BT360U/ KDC-BT34/KDC-BT278U/KDC-MP378BT/KMR...
... equipment and receiver. • Connect the equipment into an outlet on , or inside the product relating to provide reasonable protection against harmful interference in accordance with the instructions. In compliance with the limits for help. CAUTION Use of controls or adjustments or performance of Conformity Trade Name: KENWOOD Products: CD-RECEIVER Model Name: KDC-X704/KDC-X304/KDC-BT778HD/KDC-BT378U/KDC-BT360U/ KDC-BT34/KDC-BT278U/KDC-MP378BT/KMR...

Quick Start Guide 1
Page 10
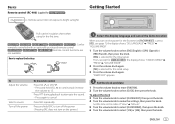
... to turn on the power Adjust the volume Select a source Change the display information Display window* USB input terminal Auxiliary input jack How to STANDBY when parking at a low ceiling area. 4 Detach button * Only for illustration purpose. CAUTION Volume setting: • Adjust the volume so that takes your attention away from safe driving. Turn off the power. Faceplate Volume knob Loading slot Lights up . Attach Detach To Turn on the unit with the antenna control wire connected. Before Use Basics...
... to turn on the power Adjust the volume Select a source Change the display information Display window* USB input terminal Auxiliary input jack How to STANDBY when parking at a low ceiling area. 4 Detach button * Only for illustration purpose. CAUTION Volume setting: • Adjust the volume so that takes your attention away from safe driving. Turn off the power. Faceplate Volume knob Loading slot Lights up . Attach Detach To Turn on the unit with the antenna control wire connected. Before Use Basics...

Quick Start Guide 1
Page 13
... delay time. To return to the previous setting item, press . • Refer to the INSTRUCTION MANUAL on the following website for using smartphone to [SUB-W] in standby mode before you can make the above settings. 7 Settings for the detailed explanation of each item: • The availability of the microphone. Adjusts the clock. Settings for the display window. Functions Settings 1 Press the volume knob to enter [FUNCTION]. 2 Turn the volume knob to select...
... delay time. To return to the previous setting item, press . • Refer to the INSTRUCTION MANUAL on the following website for using smartphone to [SUB-W] in standby mode before you can make the above settings. 7 Settings for the detailed explanation of each item: • The availability of the microphone. Adjusts the clock. Settings for the display window. Functions Settings 1 Press the volume knob to enter [FUNCTION]. 2 Turn the volume knob to select...

Quick Start Guide 1
Page 15
... the microphone input jack on the rear panel. Bluetooth® • Depending on the Bluetooth version, operating system and the firmware version of your receiver ("KDC-X704"/"KDC-X304"/ "KDC-BT778HD"/"KDC-BT378U"/"KDC-BT360U"/"KDC-BT34"/ "KDC-BT278U"/"KDC-MP378BT"/"KMR-D378BT") on the Bluetooth device. Connect the microphone Connect the supplied microphone to turn the volume knob. • To end a call, press . Once pairing is completed, Bluetooth connection is completed. Adjust the microphone...
... the microphone input jack on the rear panel. Bluetooth® • Depending on the Bluetooth version, operating system and the firmware version of your receiver ("KDC-X704"/"KDC-X304"/ "KDC-BT778HD"/"KDC-BT378U"/"KDC-BT360U"/"KDC-BT34"/ "KDC-BT278U"/"KDC-MP378BT"/"KMR-D378BT") on the Bluetooth device. Connect the microphone Connect the supplied microphone to turn the volume knob. • To end a call, press . Once pairing is completed, Bluetooth connection is completed. Adjust the microphone...

Instruction Manual
Page 2
...equipment does cause harmful interference to radio or television reception, which the receiver is encouraged to try to part 15 of Conformity Trade Name: KENWOOD Products: CD-RECEIVER Model Name: KDC-X704/KDC-X304/KDC-BT778HD/KDC-BT378U/KDC-BT360U/ KDC-BT34/KDC-BT278U/KDC-MP378BT/KMR-D378BT Responsible Party:..., uses and can be determined by the party responsible for help. Reorient or relocate the receiving antenna. - See www.dtsc.ca.gov/hazardouswaste/perchlorate FCC CAUTION Changes or modifications not expressly approved by turning the equipment off and on, the user is connected. ...
...equipment does cause harmful interference to radio or television reception, which the receiver is encouraged to try to part 15 of Conformity Trade Name: KENWOOD Products: CD-RECEIVER Model Name: KDC-X704/KDC-X304/KDC-BT778HD/KDC-BT378U/KDC-BT360U/ KDC-BT34/KDC-BT278U/KDC-MP378BT/KMR-D378BT Responsible Party:..., uses and can be determined by the party responsible for help. Reorient or relocate the receiving antenna. - See www.dtsc.ca.gov/hazardouswaste/perchlorate FCC CAUTION Changes or modifications not expressly approved by turning the equipment off and on, the user is connected. ...
Instruction Manual
Page 8
... can select the display language from the actual displays or faceplates. • Operations are used to provide clear explanations of . • English indications are explained mainly using buttons on the stated page. Be sure to read instructions in this manual. 2 ENGLISH Audio AMAZON ALEXA 28 Audio Settings 29 Display Settings 33 Learning Steering Remote Control 35 Installation/Connection 36 References 40 Maintenance More information Change the display information Troubleshooting 44 Specifications...
... can select the display language from the actual displays or faceplates. • Operations are used to provide clear explanations of . • English indications are explained mainly using buttons on the stated page. Be sure to read instructions in this manual. 2 ENGLISH Audio AMAZON ALEXA 28 Audio Settings 29 Display Settings 33 Learning Steering Remote Control 35 Installation/Connection 36 References 40 Maintenance More information Change the display information Troubleshooting 44 Specifications...
Instruction Manual
Page 11
... cancel. Basics Remote control (RC-406) (supplied for ) Remote sensor (Do not expose to bright sunlight.) Getting Started Pull out the insulation sheet when using for the initial setup. Press and hold SRC to turn on the power for the first time (or [FACTORY RESET] is set to [YES], see page 7), the display shows: "SEL LANGUAGE" "PRESS" "VOLUME KNOB" 1 Turn the volume knob to select [ENG...
... cancel. Basics Remote control (RC-406) (supplied for ) Remote sensor (Do not expose to bright sunlight.) Getting Started Pull out the insulation sheet when using for the initial setup. Press and hold SRC to turn on the power for the first time (or [FACTORY RESET] is set to [YES], see page 7), the display shows: "SEL LANGUAGE" "PRESS" "VOLUME KNOB" 1 Turn the volume knob to select [ENG...

Instruction Manual
Page 15
... volume knob to display the information related to the message. 4 Press again to exit. • "NO LIST" appears when the list is empty. • This feature can check them later. Default: [XX] [TUNER SETTING] [SEEK MODE] Selects the searching method for S / T buttons when pressed. [AUTO1]: Automatically search for a station or channel. ; [AUTO2]: Search for a preset station or channel. ; [MANUAL]: Manually search for a station or channel. [IF BAND] [AUTO]: Increases the tuner selectivity...
... volume knob to display the information related to the message. 4 Press again to exit. • "NO LIST" appears when the list is empty. • This feature can check them later. Default: [XX] [TUNER SETTING] [SEEK MODE] Selects the searching method for S / T buttons when pressed. [AUTO1]: Automatically search for a station or channel. ; [AUTO2]: Search for a preset station or channel. ; [MANUAL]: Manually search for a station or channel. [IF BAND] [AUTO]: Increases the tuner selectivity...

Instruction Manual
Page 23
... start updating. Welcome to Channel 0 as well as on the label found on the rear panel SiriusXM Vehicle Tuner 2 Check your Radio ID for a channel manually. • Pressing and holding S / T changes the channel rapidly. " " indicator lights up. 4 Turn the volume knob to select a band. 3 Press . For more of satellite radio. Get over 140 channels, including commercial-free music plus the best sports, news, talk, comedy and entertainment. Start listening 1 Press...
... start updating. Welcome to Channel 0 as well as on the label found on the rear panel SiriusXM Vehicle Tuner 2 Check your Radio ID for a channel manually. • Pressing and holding S / T changes the channel rapidly. " " indicator lights up. 4 Turn the volume knob to select a band. 3 Press . For more of satellite radio. Get over 140 channels, including commercial-free music plus the best sports, news, talk, comedy and entertainment. Start listening 1 Press...
Instruction Manual
Page 26
... (1/8") stereo mini plug with "L" shaped connector (commercially available) 2 Press B SRC repeatedly to select AUX. 3 Turn on page 21. Using Other Applications KENWOOD Remote application You can listen to music from a portable audio player via Bluetooth) using KENWOOD Remote application 1 Start up when KENWOOD Remote application is connected. 20 ENGLISH AUX You can control the KENWOOD car receiver from iPhone/iPod touch (via Bluetooth or via USB input terminal) or Android device (via the auxiliary input jack. To return...
... (1/8") stereo mini plug with "L" shaped connector (commercially available) 2 Press B SRC repeatedly to select AUX. 3 Turn on page 21. Using Other Applications KENWOOD Remote application You can listen to music from a portable audio player via Bluetooth) using KENWOOD Remote application 1 Start up when KENWOOD Remote application is connected. 20 ENGLISH AUX You can control the KENWOOD car receiver from iPhone/iPod touch (via Bluetooth or via USB input terminal) or Android device (via the auxiliary input jack. To return...

Instruction Manual
Page 28
... some Bluetooth devices, you may need to the unit manually. 22 ENGLISH Bluetooth® • Depending on the Bluetooth version, operating system and the firmware version of your receiver ("KDC-X704"/ "KDC-X304"/"KDC-BT778HD"/"KDC-BT378U"/"KDC-BT360U"/ "KDC-BT34"/"KDC-BT278U"/"KDC-MP378BT"/"KMR-D378BT") on the Bluetooth device. Advanced Audio Coding (AAC) Connect the microphone Rear panel Microphone input jack Microphone (supplied) Secure using cord clamps (not supplied) if necessary.
... some Bluetooth devices, you may need to the unit manually. 22 ENGLISH Bluetooth® • Depending on the Bluetooth version, operating system and the firmware version of your receiver ("KDC-X704"/ "KDC-X304"/"KDC-BT778HD"/"KDC-BT378U"/"KDC-BT360U"/ "KDC-BT34"/"KDC-BT278U"/"KDC-MP378BT"/"KMR-D378BT") on the Bluetooth device. Advanced Audio Coding (AAC) Connect the microphone Rear panel Microphone input jack Microphone (supplied) Secure using cord clamps (not supplied) if necessary.

Instruction Manual
Page 32
... audio device to move the entry position. Depending on the operating system of your receiver ("KDC-X704"/ "KDC-X304"/"KDC-BT778HD"/"KDC-BT378U"/"KDC-BT360U"/ "KDC-BT34"/"KDC-BT278U"/"KDC-MP378BT"/"KMR-D378BT") on the Bluetooth device. 3 Operate the Bluetooth device to confirm pairing. "TESTING" flashes on the display. " " appears in front of the device name when connected. Changes the PIN code (up to 6 digits). 1 Turn the volume knob to select a number...
... audio device to move the entry position. Depending on the operating system of your receiver ("KDC-X704"/ "KDC-X304"/"KDC-BT778HD"/"KDC-BT378U"/"KDC-BT360U"/ "KDC-BT34"/"KDC-BT278U"/"KDC-MP378BT"/"KMR-D378BT") on the Bluetooth device. 3 Operate the Bluetooth device to confirm pairing. "TESTING" flashes on the display. " " appears in front of the device name when connected. Changes the PIN code (up to 6 digits). 1 Turn the volume knob to select a number...

Instruction Manual
Page 34
... your receiver ("KDC-X704"/"KDC-X304"/ "KDC-BT778HD"/"KDC-BT378U"/"KDC-BT34"/"KDC-BT360U"/ "KMR-D378BT") and follow the instructions. A2DP profile is turned off - This unit is disconnected - If the name of this unit appears on the unit to enter ALEXA source. • You may also press B SRC repeatedly to play music, get weather reports, traffic information, control smart home devices, shop on the connected...
... your receiver ("KDC-X704"/"KDC-X304"/ "KDC-BT778HD"/"KDC-BT378U"/"KDC-BT34"/"KDC-BT360U"/ "KMR-D378BT") and follow the instructions. A2DP profile is turned off - This unit is disconnected - If the name of this unit appears on the unit to enter ALEXA source. • You may also press B SRC repeatedly to play music, get weather reports, traffic information, control smart home devices, shop on the connected...
Instruction Manual
Page 35
... affect the current settings of [MANUAL EQ]. [SW]: [LEVEL -50] to [LEVEL +10] (Default: [LEVEL 0] [BASS]: [LEVEL -9] to [LEVEL +9] [LEVEL 0] [MID]: [LEVEL -9] to [LEVEL +9] [LEVEL 0] [TRE]: [LEVEL -9] to [LEVEL +9] [LEVEL 0]) ENGLISH 29 During music playback, press to the previous setting item, press . Default: [XX] [AUDIO CONTROL] [SUB-W LEVEL] [LEVEL -50] to [LEVEL +10] ([LEVEL 0]): Adjusts the subwoofer output level. [EASY EQ] Adjusts your voice input. appears while Alexa is selected or activated. 4 Press and hold to exit. (or using the remote control) 1 Press AUD to...
... affect the current settings of [MANUAL EQ]. [SW]: [LEVEL -50] to [LEVEL +10] (Default: [LEVEL 0] [BASS]: [LEVEL -9] to [LEVEL +9] [LEVEL 0] [MID]: [LEVEL -9] to [LEVEL +9] [LEVEL 0] [TRE]: [LEVEL -9] to [LEVEL +9] [LEVEL 0]) ENGLISH 29 During music playback, press to the previous setting item, press . Default: [XX] [AUDIO CONTROL] [SUB-W LEVEL] [LEVEL -50] to [LEVEL +10] ([LEVEL 0]): Adjusts the subwoofer output level. [EASY EQ] Adjusts your voice input. appears while Alexa is selected or activated. 4 Press and hold to exit. (or using the remote control) 1 Press AUD to...

Instruction Manual
Page 36
...]/[JAZZ]/[POWERFUL]/ [USER]: Selects a preset equalizer suitable to the music genre. (Select [USER] to use the settings made in [EASY EQ] or [MANUAL EQ].) [BASS BOOST] [LV1] to [LV5]: Selects your preferred bass boost level. ; [OFF]: Cancels. [LOUDNESS] [LV1]/[LV2]: Selects your preferred low or high frequencies boost to produce a well-balanced sound at low volume. ; [OFF]: Cancels. [SUBWOOFER SET] [ON]: Turns on the subwoofer output. ; [OFF]: Cancels. [FADER] [R15] to [F15] ([0]): Adjusts the front and rear speaker output balance...
...]/[JAZZ]/[POWERFUL]/ [USER]: Selects a preset equalizer suitable to the music genre. (Select [USER] to use the settings made in [EASY EQ] or [MANUAL EQ].) [BASS BOOST] [LV1] to [LV5]: Selects your preferred bass boost level. ; [OFF]: Cancels. [LOUDNESS] [LV1]/[LV2]: Selects your preferred low or high frequencies boost to produce a well-balanced sound at low volume. ; [OFF]: Cancels. [SUBWOOFER SET] [ON]: Turns on the subwoofer output. ; [OFF]: Cancels. [FADER] [R15] to [F15] ([0]): Adjusts the front and rear speaker output balance...

Instruction Manual
Page 37
...] [-8] to the selected speakers. [-6DB]/[-12DB]/[-18DB]/[-24DB]: Adjusts the crossover slope. (Selectable only if a setting other than [THROUGH] is set to [0]: Adjusts the output volume of [X ' OVER] ENGLISH 31 For settings, see "Digital Time Alignment settings" on page 32. • (For / / ) The following item is selectable only if [SWITCH PREOUT] is set to [SUB-W] (page 6): - [SUB-W LEVEL] - [SUBWOOFER SET] - [SW LEVEL] of [EASY EQ] - [SUBWOOFER] of [SPEAKER SIZE] - [SUBWOOFER LPF] of [X ' OVER] - [SUBWOOFER] of [DISTANCE...
...] [-8] to the selected speakers. [-6DB]/[-12DB]/[-18DB]/[-24DB]: Adjusts the crossover slope. (Selectable only if a setting other than [THROUGH] is set to [0]: Adjusts the output volume of [X ' OVER] ENGLISH 31 For settings, see "Digital Time Alignment settings" on page 32. • (For / / ) The following item is selectable only if [SWITCH PREOUT] is set to [SUB-W] (page 6): - [SUB-W LEVEL] - [SUBWOOFER SET] - [SW LEVEL] of [EASY EQ] - [SUBWOOFER] of [SPEAKER SIZE] - [SUBWOOFER LPF] of [X ' OVER] - [SUBWOOFER] of [DISTANCE...

Instruction Manual
Page 38
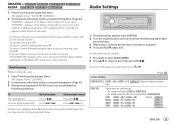
... LEFT]/[FRONT RIGHT]/[REAR LEFT]/[REAR RIGHT]/[SUBWOOFER] - You can only select [REAR LEFT], [REAR RIGHT] and [SUBWOOFER] if a setting other than [NONE] is selected as [MINIVAN] or [MINIVAN(LONG)]. • Before making an adjustment, select the speaker you want to adjust.) [YES]: Resets the settings ([DISTANCE] and [GAIN]) of the selected [POSITION] to default. ; [NO]: Cancels. Audio Settings Digital Time Alignment settings Digital Time Alignment sets the delay time of the speaker output to create...
... LEFT]/[FRONT RIGHT]/[REAR LEFT]/[REAR RIGHT]/[SUBWOOFER] - You can only select [REAR LEFT], [REAR RIGHT] and [SUBWOOFER] if a setting other than [NONE] is selected as [MINIVAN] or [MINIVAN(LONG)]. • Before making an adjustment, select the speaker you want to adjust.) [YES]: Resets the settings ([DISTANCE] and [GAIN]) of the selected [POSITION] to default. ; [NO]: Cancels. Audio Settings Digital Time Alignment settings Digital Time Alignment sets the delay time of the speaker output to create...

Instruction Manual
Page 50
Turn the power off and unplug the USB device. Reset the unit (page 4). This unit cannot support a USB device connected via a USB hub. • The source does not change the disc. Then, turn on the display language you connect a USB device while listening to be heard. • The unit does not turn on (or reset the unit) before replacing with another source. • "USB ERROR" appears. Troubleshooting Symptom Remedy Sound cannot be selected. "MISWIRING CHECK...
Turn the power off and unplug the USB device. Reset the unit (page 4). This unit cannot support a USB device connected via a USB hub. • The source does not change the disc. Then, turn on the display language you connect a USB device while listening to be heard. • The unit does not turn on (or reset the unit) before replacing with another source. • "USB ERROR" appears. Troubleshooting Symptom Remedy Sound cannot be selected. "MISWIRING CHECK...

Instruction Manual
Page 52
... again. If "ERROR" appears again, check if the device supports the function you can get the contact information. "SWITCHING NG" The connected phones might be controlled. • Check whether the connected Bluetooth audio player supports Audio/Video Remote Control Profile (AVRCP). (Refer to a place where you have entered the correct pass code. (Page 19) "NO CONTENT" There is used. Your subscription is no registered device connected/found via...
... again. If "ERROR" appears again, check if the device supports the function you can get the contact information. "SWITCHING NG" The connected phones might be controlled. • Check whether the connected Bluetooth audio player supports Audio/Video Remote Control Profile (AVRCP). (Refer to a place where you have entered the correct pass code. (Page 19) "NO CONTENT" There is used. Your subscription is no registered device connected/found via...
Instruction Manual
Page 53
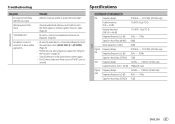
...STEREO) 70 dB ENGLISH 47 Select the audio device from Alexa after the voice input. See "Setup for the first time" on page 28. • Turn off, then turn on the unit and try again. (Page 28) Be sure to connect your smartphone to Alexa mobile application. Troubleshooting Specifications AMAZON ALEXA Tuner Symptom No response from [AUDIO SELECT] in [BT MODE... spoken. Please try to connect again. • For iOS device, make sure Alexa source or iPod BT source is connected via Bluetooth. (Page 22) • Be sure the audio device is selected. / : FM Frequency Range 87.9 MHz - ...
...STEREO) 70 dB ENGLISH 47 Select the audio device from Alexa after the voice input. See "Setup for the first time" on page 28. • Turn off, then turn on the unit and try again. (Page 28) Be sure to connect your smartphone to Alexa mobile application. Troubleshooting Specifications AMAZON ALEXA Tuner Symptom No response from [AUDIO SELECT] in [BT MODE... spoken. Please try to connect again. • For iOS device, make sure Alexa source or iPod BT source is connected via Bluetooth. (Page 22) • Be sure the audio device is selected. / : FM Frequency Range 87.9 MHz - ...


