User Manual
Page 20
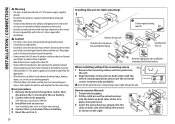
... Align the holes in the console of the car battery. 2 Connect the wires properly. Use only the specified screws. See Wiring connection. ( 21) 3 Install the unit to your vehicle wiring harness does not have the ignition terminal, connect Ignition wire (red) to the terminal on the vehicle's fuse box which provides 12 ... battery's negative terminal before fitting. Metal parts such as the heat sink and enclosure become hot. • Do not connect the · wires of the trim plate, then pull it out. 3 Insert the extraction keys deeply into the holes on each side, then follow the arrows as...
... Align the holes in the console of the car battery. 2 Connect the wires properly. Use only the specified screws. See Wiring connection. ( 21) 3 Install the unit to your vehicle wiring harness does not have the ignition terminal, connect Ignition wire (red) to the terminal on the vehicle's fuse box which provides 12 ... battery's negative terminal before fitting. Metal parts such as the heat sink and enclosure become hot. • Do not connect the · wires of the trim plate, then pull it out. 3 Insert the extraction keys deeply into the holes on each side, then follow the arrows as...
User Manual
Page 21
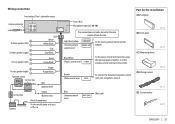
... terminal in the vehicle. Part list for installation (A) Faceplate (B) Trim plate (C) Mounting sleeve Brown (Mute control wire) To connect the Kenwood navigation system, refer your navigations manual. (D) Wiring harness Blue (Antenna control wire) (Not used) (E) Extraction key ENGLISH | 21 Wiring connection Front output, Rear/ subwoofer output Antenna terminal To front speaker (left) White White/Black To...
... terminal in the vehicle. Part list for installation (A) Faceplate (B) Trim plate (C) Mounting sleeve Brown (Mute control wire) To connect the Kenwood navigation system, refer your navigations manual. (D) Wiring harness Blue (Antenna control wire) (Not used) (E) Extraction key ENGLISH | 21 Wiring connection Front output, Rear/ subwoofer output Antenna terminal To front speaker (left) White White/Black To...


