
User Manual
Page 2
...; (for KDC-BT318U ) 8 iHeartRadio® (for the moisture to evaporate. Remote control (RC-406): • Do not leave the remote control in hot places such as sunshine, fire or the like. • Keep the battery out of reach of children and in its original packaging when not in danger of the faceplate) Replace...
...; (for KDC-BT318U ) 8 iHeartRadio® (for the moisture to evaporate. Remote control (RC-406): • Do not leave the remote control in hot places such as sunshine, fire or the like. • Keep the battery out of reach of children and in its original packaging when not in danger of the faceplate) Replace...

User Manual
Page 3
...; Press again to replace the battery Your preset adjustments will also be erased. Select a source Press B SRC repeatedly. To Do this (on the faceplate) Do this (on the remote control) Turn on the power Press B SRC. • Press and hold to scroll the current display information. (...turn /press) Loading slot Display window Attach Detach Remote control (RC-406) Remote sensor (Do not expose to bright sunlight.) Detach button KDC-BT318U How to turn on the power. ) Adjust the volume Turn the volume knob. Press SRC repeatedly. Change the display information* Press DISP...
...; Press again to replace the battery Your preset adjustments will also be erased. Select a source Press B SRC repeatedly. To Do this (on the faceplate) Do this (on the remote control) Turn on the power Press B SRC. • Press and hold to scroll the current display information. (...turn /press) Loading slot Display window Attach Detach Remote control (RC-406) Remote sensor (Do not expose to bright sunlight.) Detach button KDC-BT318U How to turn on the power. ) Adjust the volume Turn the volume knob. Press SRC repeatedly. Change the display information* Press DISP...
User Manual
Page 20
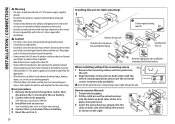
... · terminal of less than 30º. • If your vehicle. Using wrong screws might damage the unit. How to remove the unit 1 Detach the faceplate. 2 Fit the catch pin on the extraction keys into the slots on each side, then follow the arrows as illustrated before wiring and mounting. •...
... · terminal of less than 30º. • If your vehicle. Using wrong screws might damage the unit. How to remove the unit 1 Detach the faceplate. 2 Fit the catch pin on the extraction keys into the slots on each side, then follow the arrows as illustrated before wiring and mounting. •...
User Manual
Page 21
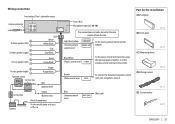
Part list for installation (A) Faceplate (B) Trim plate (C) Mounting sleeve Brown (Mute control wire) To connect the Kenwood navigation system, refer your navigations manual. (D) Wiring harness Blue (Antenna control wire) (Not used) (E) Extraction key ENGLISH | 21 Wiring connection Front output, Rear/ subwoofer output ...
Part list for installation (A) Faceplate (B) Trim plate (C) Mounting sleeve Brown (Mute control wire) To connect the Kenwood navigation system, refer your navigations manual. (D) Wiring harness Blue (Antenna control wire) (Not used) (E) Extraction key ENGLISH | 21 Wiring connection Front output, Rear/ subwoofer output ...