Instruction Manual
Page 2
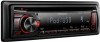
...with your model and in this manual are examples used . In this unit with KDC-248U/ KDC-MP248U. The word "iPod" appearing in an online manual on the following site: www.kenwood.com/cs/ce/audiofile/ 2 How to attach/detach the faceplate To prevent a short... Music Search using the remote controller (RC-405) Functions of KDC-248U/ KDC-MP248U with your Kenwood dealer. This may cause an Getting started 6 Canceling the display demonstration Setting the demonstration mode Adjusting the clock Initial settings before operating the unit. Detailed information and notes about...
...with your model and in this manual are examples used . In this unit with KDC-248U/ KDC-MP248U. The word "iPod" appearing in an online manual on the following site: www.kenwood.com/cs/ce/audiofile/ 2 How to attach/detach the faceplate To prevent a short... Music Search using the remote controller (RC-405) Functions of KDC-248U/ KDC-MP248U with your Kenwood dealer. This may cause an Getting started 6 Canceling the display demonstration Setting the demonstration mode Adjusting the clock Initial settings before operating the unit. Detailed information and notes about...
Instruction Manual
Page 5
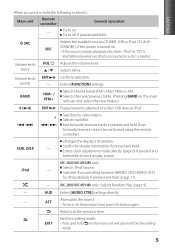
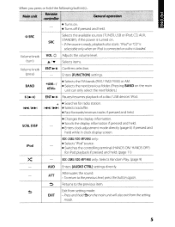
... to the previous item. Returns to the previous level, press the button again. Fast-forwards/reverses tracks if pressed and held . (page 11) - SCRL DISP - KDC-248U/ KDC-MP248U only: iPod - Switches the controlling terminal (HANDS ON/ HANDS OFF) for radio station. Volume knob (turn) Volume knob (press) VOL 5 / ∞ ENT - ENGLISH...the remote controller.) Changes the display information. Selects items. Confirms selection. BAND *AM- / #FM+ Selects the FM bands (FM1/ FM2/ FM3) or AM. Enters clock adjustment mode directly (page 6) if pressed and held while in...
... to the previous item. Returns to the previous level, press the button again. Fast-forwards/reverses tracks if pressed and held . (page 11) - SCRL DISP - KDC-248U/ KDC-MP248U only: iPod - Switches the controlling terminal (HANDS ON/ HANDS OFF) for radio station. Volume knob (turn) Volume knob (press) VOL 5 / ∞ ENT - ENGLISH...the remote controller.) Changes the display information. Selects items. Confirms selection. BAND *AM- / #FM+ Selects the FM bands (FM1/ FM2/ FM3) or AM. Enters clock adjustment mode directly (page 6) if pressed and held while in...
Instruction Manual
Page 6
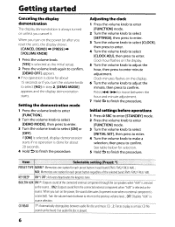
... it. OFF: Disables "AUX" in each preset button regardless of the connected external component through the car speakers when "AUX" is connected). Clock hour flashes on the display. 6 Turn the volume knob to adjust the minute, then press to confirm. See table below for selection. 5...to make a selection, then press to finish the procedure. CD READ 1*: Automatically distinguishes between the hour and minute adjustment. 7 Hold to confirm. Clock minutes flashes on the display. 5 Turn the volume knob to adjust the hour, then press to confirm. [DEMO OFF] appears. MIX: Memorizes ...
... it. OFF: Disables "AUX" in each preset button regardless of the connected external component through the car speakers when "AUX" is connected). Clock hour flashes on the display. 6 Turn the volume knob to adjust the minute, then press to confirm. See table below for selection. 5...to make a selection, then press to finish the procedure. CD READ 1*: Automatically distinguishes between the hour and minute adjustment. 7 Hold to confirm. Clock minutes flashes on the display. 5 Turn the volume knob to adjust the hour, then press to confirm. [DEMO OFF] appears. MIX: Memorizes ...
Instruction Manual
Page 13
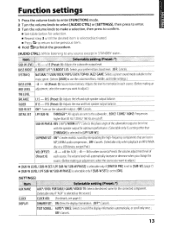
... to select [AUDIO CTRL] or [SETTINGS], then press to enter. 3 Turn the volume knob to make a selection, then press to [ON]. [SETTINGS] Item AUX NAME CLOCK DISPLAY Selectable setting (Preset: *) AUX*/ DVD/ PORTABLE/ GAME/ VIDEO/ TV: Selects the desired name for the connected component. (Selectable only if "AUX" is selected as...
... to select [AUDIO CTRL] or [SETTINGS], then press to enter. 3 Turn the volume knob to make a selection, then press to [ON]. [SETTINGS] Item AUX NAME CLOCK DISPLAY Selectable setting (Preset: *) AUX*/ DVD/ PORTABLE/ GAME/ VIDEO/ TV: Selects the desired name for the connected component. (Selectable only if "AUX" is selected as...
Owners Manual
Page 2
... Listening to prepare the remote controller (RC-405) Basic operations 4 - Driving with KDC-248U/ KDC-MP248U. Canceling the display demonstration Setting the demonstration mode Adjusting the clock Initial settings before operating the unit. The word "iPod" appearing in this manual indicates...2 Preparation 3 - How to attach/detach the faceplate How to reset your Kenwood dealer to the radio 7 - Start playing a disc Connecting a USB device Connecting an iPod (KDC-248U/ KDC-MP248U only) Selecting Repeat Play Selecting Random Play Selecting Scan Play Selecting a ...
... Listening to prepare the remote controller (RC-405) Basic operations 4 - Driving with KDC-248U/ KDC-MP248U. Canceling the display demonstration Setting the demonstration mode Adjusting the clock Initial settings before operating the unit. The word "iPod" appearing in this manual indicates...2 Preparation 3 - How to attach/detach the faceplate How to reset your Kenwood dealer to the radio 7 - Start playing a disc Connecting a USB device Connecting an iPod (KDC-248U/ KDC-MP248U only) Selecting Repeat Play Selecting Random Play Selecting Scan Play Selecting a ...
Owners Manual
Page 5
... source is loaded. KDC-248UI KDC-MP248U only: • Selects "iPod" source. • Switches the controlling terminal (HANDS ON/ HANDS OFF) for radio station. ~/~ • Selects track/file. • Fast-forwards/reverses tracks if pressed and held while in clock display screen. Attenuates ...items. Confirms selection. SCRL DISP iPod • Changes the display information. • Scrolls the display information if pressed and held. • Enters clock adjustment mode directly (page 6) if pressed and held . SRC SRC Volume knob (turn) VOL 0 • /T Volume knob (press) ----...
... source is loaded. KDC-248UI KDC-MP248U only: • Selects "iPod" source. • Switches the controlling terminal (HANDS ON/ HANDS OFF) for radio station. ~/~ • Selects track/file. • Fast-forwards/reverses tracks if pressed and held while in clock display screen. Attenuates ...items. Confirms selection. SCRL DISP iPod • Changes the display information. • Scrolls the display information if pressed and held. • Enters clock adjustment mode directly (page 6) if pressed and held . SRC SRC Volume knob (turn) VOL 0 • /T Volume knob (press) ----...
Owners Manual
Page 6
.... disc -is always turned on unless you turn on the display. 6 Turn the volume knob to adjust the minute, then press to confirm. Adjusting the clock 1 Press the volume knob to enter [FUNCTION] mode. 2 Turn the volume knob to select [SETTINGS], then press to enter. 3 Turn the volume knob to... select [CLOCK], then press to enter. 4 Turn the volume knob to select [CLOCK ADJ], then press to enter minute adjustment. Clock hour flashes on the power (or after you turn the volume knob to prevent noise when no...
.... disc -is always turned on unless you turn on the display. 6 Turn the volume knob to adjust the minute, then press to confirm. Adjusting the clock 1 Press the volume knob to enter [FUNCTION] mode. 2 Turn the volume knob to select [SETTINGS], then press to enter. 3 Turn the volume knob to... select [CLOCK], then press to enter. 4 Turn the volume knob to select [CLOCK ADJ], then press to enter minute adjustment. Clock hour flashes on the power (or after you turn the volume knob to prevent noise when no...
Owners Manual
Page 13
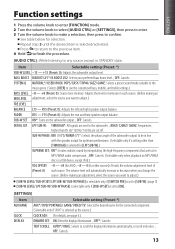
Function settings 1 Press the volume knob to enter [FUNCTION] mode. 2 Turn the volume knob to select [AUDIO CTRL] or [SETTINGS], then press to enter. 3 Turn the volume knob to make a selection, then press to confirm. • See table below for selection. • Repeat step 3 until the desired item is selected/activated. • Press ~ to return to the previous item. 4 Hold ~ to finish the procedure. [AUDIO CTRL] : While listening to any source except in STANDBY state... " ~~?~fitj':'" ":eli~t(~~:~
Function settings 1 Press the volume knob to enter [FUNCTION] mode. 2 Turn the volume knob to select [AUDIO CTRL] or [SETTINGS], then press to enter. 3 Turn the volume knob to make a selection, then press to confirm. • See table below for selection. • Repeat step 3 until the desired item is selected/activated. • Press ~ to return to the previous item. 4 Hold ~ to finish the procedure. [AUDIO CTRL] : While listening to any source except in STANDBY state... " ~~?~fitj':'" ":eli~t(~~:~


