Instruction Manual
Page 2
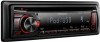
... an online manual on the illustrations may cause an Getting started 6 Canceling the display demonstration Setting the demonstration mode Adjusting the clock Initial settings before operating the unit. You can hear sounds outside the car. If you Basic operations 4 can connect an ...to make sure that you experience problems during installation, consult your Kenwood dealer to prepare the remote controller metal tools) inside the unit. (RC-405) Caution: Adjust the volume so that they work with KDC-248U/ KDC-MP248U. Condensation: When the car is required for the moisture...
... an online manual on the illustrations may cause an Getting started 6 Canceling the display demonstration Setting the demonstration mode Adjusting the clock Initial settings before operating the unit. You can hear sounds outside the car. If you Basic operations 4 can connect an ...to make sure that you experience problems during installation, consult your Kenwood dealer to prepare the remote controller metal tools) inside the unit. (RC-405) Caution: Adjust the volume so that they work with KDC-248U/ KDC-MP248U. Condensation: When the car is required for the moisture...
Instruction Manual
Page 5
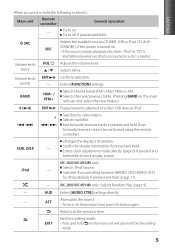
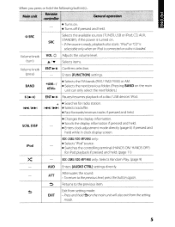
... FM2/ FM3) or AM. "iPod" or "CD" is selectable only when an iPod is connected or a disc is ready, playback also starts. KDC-248U/ KDC-MP248U only: iPod - Volume knob (turn) Volume knob (press) VOL 5 / ∞ ENT - Enters [FUNCTION] settings. Selects the next/previous ...folder. (Pressing BAND on . Fast-forwards/reverses tracks if pressed and held while in clock display screen. SCRL DISP - Switches the controlling terminal (HANDS ON/ HANDS OFF) for radio station. ATT Attenuates the sound. • To...
... FM2/ FM3) or AM. "iPod" or "CD" is selectable only when an iPod is connected or a disc is ready, playback also starts. KDC-248U/ KDC-MP248U only: iPod - Volume knob (turn) Volume knob (press) VOL 5 / ∞ ENT - Enters [FUNCTION] settings. Selects the next/previous ...folder. (Pressing BAND on . Fast-forwards/reverses tracks if pressed and held while in clock display screen. SCRL DISP - Switches the controlling terminal (HANDS ON/ HANDS OFF) for radio station. ATT Attenuates the sound. • To...
Instruction Manual
Page 6
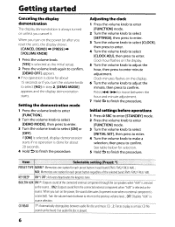
... 15 seconds or if you turn on the display. 6 Turn the volume knob to adjust the minute, then press to finish the procedure. Adjusting the clock 1 Press the volume knob to enter [FUNCTION] mode. 2 Turn the volume knob to select [SETTINGS], then press to enter. 3 Turn the volume ... [DEMO MODE], then press to enter. 3 Turn the volume knob to select [NO] in step 2, [DEMO MODE] appears and the display demonstration starts. Clock hour flashes on unless you turn the volume knob to select [ON] or [OFF]. CD READ 1*: Automatically distinguishes between the hour and minute adjustment. 7 Hold...
... 15 seconds or if you turn on the display. 6 Turn the volume knob to adjust the minute, then press to finish the procedure. Adjusting the clock 1 Press the volume knob to enter [FUNCTION] mode. 2 Turn the volume knob to select [SETTINGS], then press to enter. 3 Turn the volume ... [DEMO MODE], then press to enter. 3 Turn the volume knob to select [NO] in step 2, [DEMO MODE] appears and the display demonstration starts. Clock hour flashes on unless you turn the volume knob to select [ON] or [OFF]. CD READ 1*: Automatically distinguishes between the hour and minute adjustment. 7 Hold...
Instruction Manual
Page 13
...or decrease when you change the source. (Before making an MID LEVEL adjustment, select the source you want to [ON]. [SETTINGS] Item AUX NAME CLOCK DISPLAY Selectable setting (Preset: *) AUX*/ DVD/ PORTABLE/ GAME/ VIDEO/ TV: Selects the desired name for [LPF SUB-W].) SUPREME SET: ON*:... ; 85HZ/ 120HZ/ 160HZ: Frequencies higher than [THROUGH] is selected for the connected component. (Selectable only if "AUX" is selected as the source.) CLOCK ADJ: (For details, see page 6.) DIMMER SET: ON: Dims the display illumination. ; OFF: Cancels. 13 Repeat step 3 until the desired item ...
...or decrease when you change the source. (Before making an MID LEVEL adjustment, select the source you want to [ON]. [SETTINGS] Item AUX NAME CLOCK DISPLAY Selectable setting (Preset: *) AUX*/ DVD/ PORTABLE/ GAME/ VIDEO/ TV: Selects the desired name for [LPF SUB-W].) SUPREME SET: ON*:... ; 85HZ/ 120HZ/ 160HZ: Frequencies higher than [THROUGH] is selected for the connected component. (Selectable only if "AUX" is selected as the source.) CLOCK ADJ: (For details, see page 6.) DIMMER SET: ON: Dims the display illumination. ; OFF: Cancels. 13 Repeat step 3 until the desired item ...
Owners Manual
Page 2
...sounds outside the car. Start playing a disc Connecting a USB device Connecting an iPod (KDC-248U/ KDC-MP248U only) Selecting Repeat Play Selecting Random Play Selecting Scan Play Selecting a folder/track/...; If you experience problems during installation, consult your Kenwood dealer. • When you purchase external components, check with your Kenwood dealer to make sure that you can only play ... 7 - Canceling the display demonstration Setting the demonstration mode Adjusting the clock Initial settings before operating the unit. Therefore, what appears on the illustrations...
...sounds outside the car. Start playing a disc Connecting a USB device Connecting an iPod (KDC-248U/ KDC-MP248U only) Selecting Repeat Play Selecting Random Play Selecting Scan Play Selecting a folder/track/...; If you experience problems during installation, consult your Kenwood dealer. • When you purchase external components, check with your Kenwood dealer to make sure that you can only play ... 7 - Canceling the display demonstration Setting the demonstration mode Adjusting the clock Initial settings before operating the unit. Therefore, what appears on the illustrations...
Owners Manual
Page 5
... (page 6) if pressed and held . BAND *AM-/ #FM+ • Turns on. • Turns off if pressed and held while in clock display screen. KDC-248UI KDC-MP248U only: • Selects "iPod" source. • Switches the controlling terminal (HANDS ON/ HANDS OFF) for radio station. ~/~ • Selects... track/file. • Fast-forwards/reverses tracks if pressed and held . (page 11) KDC-208UI KDC-MP148U only: Selects Random Play. (page 9) AUD An Enters [AUDIO CTRL] settings directly. EXIT Returns to the previous level, press the button ...
... (page 6) if pressed and held . BAND *AM-/ #FM+ • Turns on. • Turns off if pressed and held while in clock display screen. KDC-248UI KDC-MP248U only: • Selects "iPod" source. • Switches the controlling terminal (HANDS ON/ HANDS OFF) for radio station. ~/~ • Selects... track/file. • Fast-forwards/reverses tracks if pressed and held . (page 11) KDC-208UI KDC-MP148U only: Selects Random Play. (page 9) AUD An Enters [AUDIO CTRL] settings directly. EXIT Returns to the previous level, press the button ...
Owners Manual
Page 6
...] in step 2, [DEMO MODE] appears and the display demonstration starts. No _ _ sound can be heard if an audio file . Adjusting the clock 1 Press the volume knob to enter [FUNCTION] mode. 2 Turn the volume knob to select [SETTINGS], then press to enter. 3 Turn the ... to enter. BUilTIN AUX ONl *: Outputs sound of the selected band (FMl / FM2/ F~.~L~~_ KEY BEEP ON*/ OFF: Activates/deactivates the keypress tone. Clock minutes flashes on unless you turn on the display. CD READ 1*: Automatically distinguishes between the hour and minute adjustment. 7 Hold ~ to select [ON] ...
...] in step 2, [DEMO MODE] appears and the display demonstration starts. No _ _ sound can be heard if an audio file . Adjusting the clock 1 Press the volume knob to enter [FUNCTION] mode. 2 Turn the volume knob to select [SETTINGS], then press to enter. 3 Turn the ... to enter. BUilTIN AUX ONl *: Outputs sound of the selected band (FMl / FM2/ F~.~L~~_ KEY BEEP ON*/ OFF: Activates/deactivates the keypress tone. Clock minutes flashes on unless you turn on the display. CD READ 1*: Automatically distinguishes between the hour and minute adjustment. 7 Hold ~ to select [ON] ...
Owners Manual
Page 13
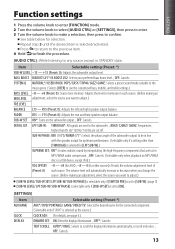
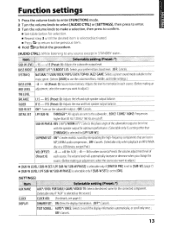
Function settings 1 Press the volume knob to enter [FUNCTION] mode. 2 Turn the volume knob to select [AUDIO CTRL] or [SETTINGS], then press to enter. 3 Turn the volume knob to make a selection, then press to confirm. • See table below for selection. • Repeat step 3 until the desired item is selected/activated. • Press ~ to return to the previous item. 4 Hold ~ to finish the procedure. [AUDIO CTRL] : While listening to any source except in STANDBY state... " ~~?~fitj':'" ":eli~t(~~:~
Function settings 1 Press the volume knob to enter [FUNCTION] mode. 2 Turn the volume knob to select [AUDIO CTRL] or [SETTINGS], then press to enter. 3 Turn the volume knob to make a selection, then press to confirm. • See table below for selection. • Repeat step 3 until the desired item is selected/activated. • Press ~ to return to the previous item. 4 Hold ~ to finish the procedure. [AUDIO CTRL] : While listening to any source except in STANDBY state... " ~~?~fitj':'" ":eli~t(~~:~


