Instruction Manual
Page 2
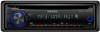
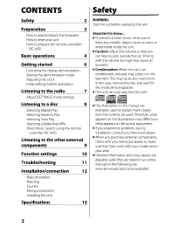
...Preparation 3 How to attach/detach the faceplate How to reset your area. If you can only play the CDs with your Kenwood dealer. Condensation: When the car is airconditioned, moisture may cause an accident. Important to the other external components 9 Function ...settings 10 Troubleshooting 11 Installation/connection 12 Basic procedure Warning Caution Wiring connection Installing the unit Specifications 15 WARNING Stop the car before operating the unit. Caution: Adjust the volume so that...
...Preparation 3 How to attach/detach the faceplate How to reset your area. If you can only play the CDs with your Kenwood dealer. Condensation: When the car is airconditioned, moisture may cause an accident. Important to the other external components 9 Function ...settings 10 Troubleshooting 11 Installation/connection 12 Basic procedure Warning Caution Wiring connection Installing the unit Specifications 15 WARNING Stop the car before operating the unit. Caution: Adjust the volume so that...
Instruction Manual
Page 12
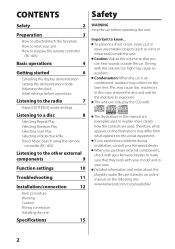
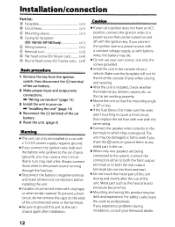
... Mount the unit so that in turn may die. Be sure to ground this unit during installation, consult your Kenwood dealer. 12 on the car are being connected to the system, connect the connectors either to both the front output...sake, leave this product requires skills and experience. Installation/connection Part list: A Faceplate 1) B Escutcheon 1) C Mounting sleeve 1) D Casing for faceplate (KDC-148/ KDC-MP148CR only 1) E Wiring harness 1) F Removal tool 2) G Flat head screw (for Nissan cars 4) H Round head screw (for Toyota cars).... (×4) Basic procedure 1 Remove...
... Mount the unit so that in turn may die. Be sure to ground this unit during installation, consult your Kenwood dealer. 12 on the car are being connected to the system, connect the connectors either to both the front output...sake, leave this product requires skills and experience. Installation/connection Part list: A Faceplate 1) B Escutcheon 1) C Mounting sleeve 1) D Casing for faceplate (KDC-148/ KDC-MP148CR only 1) E Wiring harness 1) F Removal tool 2) G Flat head screw (for Nissan cars 4) H Round head screw (for Toyota cars).... (×4) Basic procedure 1 Remove...
Instruction Manual
Page 13
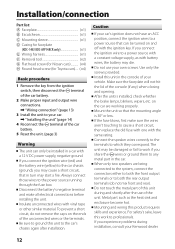
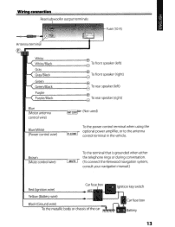
...terminals Fuse (10 A) Antenna terminal White White/Black Gray Gray/Black Green Green/Black Purple Purple/Black Blue (Motor antenna control wire) Blue/White (Power control wire) To front speaker (left) To front speaker (right) To rear speaker (left) To rear speaker (right) (Not used...the vehicle. Brown (Mute control wire) To the terminal that is grounded when either the telephone rings or during conversation. (To connect the Kenwood navigation system, consult your navigation manual.) Red (Ignition wire) Yellow (Battery wire) Car fuse box Black (Ground wire) To the metallic body or ...
...terminals Fuse (10 A) Antenna terminal White White/Black Gray Gray/Black Green Green/Black Purple Purple/Black Blue (Motor antenna control wire) Blue/White (Power control wire) To front speaker (left) To front speaker (right) To rear speaker (left) To rear speaker (right) (Not used...the vehicle. Brown (Mute control wire) To the terminal that is grounded when either the telephone rings or during conversation. (To connect the Kenwood navigation system, consult your navigation manual.) Red (Ignition wire) Yellow (Battery wire) Car fuse box Black (Ground wire) To the metallic body or ...
Instruction Manual
Page 14
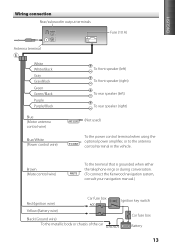
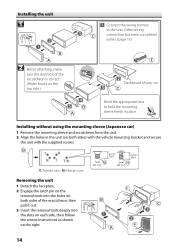
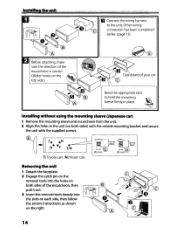
Other wiring connection has been completed earlier. (page 13) 2 Before attaching, make sure the direction of the escutcheon is correct. (Wider hooks on the top side.) Dashboard ... the holes on both sides) with the vehicle mounting bracket and secure the unit with the supplied screws. T: Toyota cars ; Installing the unit 1 Connect the wiring harness to hold the mounting sleeve firmly in the unit (on both sides of your car Bend the appropriate tabs to the unit. N: Nissan cars...
Other wiring connection has been completed earlier. (page 13) 2 Before attaching, make sure the direction of the escutcheon is correct. (Wider hooks on the top side.) Dashboard ... the holes on both sides) with the vehicle mounting bracket and secure the unit with the supplied screws. T: Toyota cars ; Installing the unit 1 Connect the wiring harness to hold the mounting sleeve firmly in the unit (on both sides of your car Bend the appropriate tabs to the unit. N: Nissan cars...
User Manual
Page 2
...objects (such as coins or metal tools) inside the unit. • Caution: Adjust the volume so that you purchase external components, check with your Kenwood dealer to make sure that they work with : [Q]D~ [Q]~~ [Q]Nm0'5 DIGITAL AUDIO DIOITAL AUDIO nlOlTAL l;iijliM1mtil fleWritabl4!. • The illustrations in an online...manual are examples used to the other external components 9 Function settings 10 Troubleshooting 11 Installation/connection 12 Basic procedure Warning Caution Wiring connection Installing the unit Specifications 15 WARNING Stop the car before operating the unit.
...objects (such as coins or metal tools) inside the unit. • Caution: Adjust the volume so that you purchase external components, check with your Kenwood dealer to make sure that they work with : [Q]D~ [Q]~~ [Q]Nm0'5 DIGITAL AUDIO DIOITAL AUDIO nlOlTAL l;iijliM1mtil fleWritabl4!. • The illustrations in an online...manual are examples used to the other external components 9 Function settings 10 Troubleshooting 11 Installation/connection 12 Basic procedure Warning Caution Wiring connection Installing the unit Specifications 15 WARNING Stop the car before operating the unit.
User Manual
Page 12
...correspond. Installation/connection Part list: ® Faceplate (xl) ® Escutcheon (xl) © Mounting sleeve (xl) @ Casing for faceplate (KDC-148/ KDC-MP148CR only) (xl) ® Wiring harness (xl) ® Removal tool (x2) ® Flat head screw (for Nissan cars) (x4) (8) Round head screw (for Toyota... ignition 8 switch, then disconnect the terminal of the unconnected wires or the terminals. • Be sure to ground this work if you experience problems during and shortly after installation. • If your Kenwood dealer. 12 For safety's sake, leave this unit to ...
...correspond. Installation/connection Part list: ® Faceplate (xl) ® Escutcheon (xl) © Mounting sleeve (xl) @ Casing for faceplate (KDC-148/ KDC-MP148CR only) (xl) ® Wiring harness (xl) ® Removal tool (x2) ® Flat head screw (for Nissan cars) (x4) (8) Round head screw (for Toyota... ignition 8 switch, then disconnect the terminal of the unconnected wires or the terminals. • Be sure to ground this work if you experience problems during and shortly after installation. • If your Kenwood dealer. 12 For safety's sake, leave this unit to ...
User Manual
Page 13
...terminal that is grounded when either the telephone rings or during conversation. (To connect the Kenwood navigation system, consult your navigation manual.) Red (Ignition wire) Yellow (Battery wire) r Black (Ground wire) To the metallic body or chassis of the car Car fuse box + Battery 13... (left) rP..:u~rP:.:.le=-- Purple/Black -f+ To rear speaker (right) Blue --=(M=ot-o-r-a-nt-e-n-na----r-::c::-:c-= (Not used) control wire) BluelWhite (Power control wire) P.CONT To the power control terminal when using the optional power amplifier, or to the antenna control terminal in the vehicle.
...terminal that is grounded when either the telephone rings or during conversation. (To connect the Kenwood navigation system, consult your navigation manual.) Red (Ignition wire) Yellow (Battery wire) r Black (Ground wire) To the metallic body or chassis of the car Car fuse box + Battery 13... (left) rP..:u~rP:.:.le=-- Purple/Black -f+ To rear speaker (right) Blue --=(M=ot-o-r-a-nt-e-n-na----r-::c::-:c-= (Not used) control wire) BluelWhite (Power control wire) P.CONT To the power control terminal when using the optional power amplifier, or to the antenna control terminal in the vehicle.
User Manual
Page 14
... and secure the unit with the supplied screws. ::=:U ~I'" T@ @N N@@T @ TIN MAX. !dsmMmAX. 0SHmmG 05:-.m.:;" H . Other wiring connection has been completed earlier (page 13) Before attaching, make sure the direction of the escutcheon, then pull it out. 3 Insert ... side.) c Bend the appropriate tabs B to the unit. T: Toyota cars, N. "II;1S~!!!~.J.:t:.;h:;c!~u::n::.:i:.:t""' "hilii"""'..r"'t ' _' .. o Connectthe wiring harness to hold the mounting \.~ sleeve firmly in place. ~ Installing without using the mounting sleeve (Japanese car) 1 Remove the mounting sleeve and...
... and secure the unit with the supplied screws. ::=:U ~I'" T@ @N N@@T @ TIN MAX. !dsmMmAX. 0SHmmG 05:-.m.:;" H . Other wiring connection has been completed earlier (page 13) Before attaching, make sure the direction of the escutcheon, then pull it out. 3 Insert ... side.) c Bend the appropriate tabs B to the unit. T: Toyota cars, N. "II;1S~!!!~.J.:t:.;h:;c!~u::n::.:i:.:t""' "hilii"""'..r"'t ' _' .. o Connectthe wiring harness to hold the mounting \.~ sleeve firmly in place. ~ Installing without using the mounting sleeve (Japanese car) 1 Remove the mounting sleeve and...


