
Instruction Manual
Page 2
...405) Listening to explain more clearly how the controls are examples used . This may collect on the follOWing site: www.kenwood.com/cs/ce/audiofile/ 2 In this manual are used to the other external components 9 Function settings 10 Troubleshooting 11... Installation/connection 12 Basic procedure Warning Caution Wiring connection Installing the unit Specifications 15 WARNING Stop the car before operating the unit. Driving with : [Q]D~ [Q]~~ [Q]Nm0'5 DIGITAL AUDIO...
...405) Listening to explain more clearly how the controls are examples used . This may collect on the follOWing site: www.kenwood.com/cs/ce/audiofile/ 2 In this manual are used to the other external components 9 Function settings 10 Troubleshooting 11... Installation/connection 12 Basic procedure Warning Caution Wiring connection Installing the unit Specifications 15 WARNING Stop the car before operating the unit. Driving with : [Q]D~ [Q]~~ [Q]Nm0'5 DIGITAL AUDIO...

Instruction Manual
Page 12
Installation/connection Part list: ® Faceplate (xl) ® Escutcheon (xl) © Mounting sleeve (xl) @ Casing for faceplate (KDC-148/ KDC-MP148CR only) (xl) ® Wiring harness (xl) ® Removal tool (x2) ® Flat head screw (for Nissan cars) (x4) (8) Round head screw (for ...to professionals. For safety's sake, leave this unit in a car with the same rating. • Connect the speaker wires correctly to the terminals to your Kenwood dealer. 12 Use only the screws provided. • Install this work to the car chassis (ground), you experience problems...
Installation/connection Part list: ® Faceplate (xl) ® Escutcheon (xl) © Mounting sleeve (xl) @ Casing for faceplate (KDC-148/ KDC-MP148CR only) (xl) ® Wiring harness (xl) ® Removal tool (x2) ® Flat head screw (for Nissan cars) (x4) (8) Round head screw (for ...to professionals. For safety's sake, leave this unit in a car with the same rating. • Connect the speaker wires correctly to the terminals to your Kenwood dealer. 12 Use only the screws provided. • Install this work to the car chassis (ground), you experience problems...
Instruction Manual
Page 13
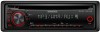
... the antenna control terminal in the vehicle. Brown (Mute control wire) To the terminal that is grounded when either the telephone rings or during conversation. (To connect the Kenwood navigation system, consult your navigation manual.) Red (Ignition wire) Yellow (Battery wire) r Black (Ground wire) To the metallic body or chassis of the car Car fuse...
... the antenna control terminal in the vehicle. Brown (Mute control wire) To the terminal that is grounded when either the telephone rings or during conversation. (To connect the Kenwood navigation system, consult your navigation manual.) Red (Ignition wire) Yellow (Battery wire) r Black (Ground wire) To the metallic body or chassis of the car Car fuse...

Instruction Manual
Page 14
... mounting bracket and secure the unit with the supplied screws. ::=:U ~I'" T@ @N N@@T @ TIN MAX. !dsmMmAX. 0SHmmG 05:-.m.:;" H . Other wiring connection has been completed earlier (page 13) Before attaching, make sure the direction of the escutcheon, then pull it out. 3 Insert the removal tools...side, then follow the arrows instructions as shown on the top side.) c Bend the appropriate tabs B to the unit. o Connectthe wiring harness to hold the mounting \.~ sleeve firmly in place. ~ Installing without using the mounting sleeve (Japanese car) 1 Remove the mounting...
... mounting bracket and secure the unit with the supplied screws. ::=:U ~I'" T@ @N N@@T @ TIN MAX. !dsmMmAX. 0SHmmG 05:-.m.:;" H . Other wiring connection has been completed earlier (page 13) Before attaching, make sure the direction of the escutcheon, then pull it out. 3 Insert the removal tools...side, then follow the arrows instructions as shown on the top side.) c Bend the appropriate tabs B to the unit. o Connectthe wiring harness to hold the mounting \.~ sleeve firmly in place. ~ Installing without using the mounting sleeve (Japanese car) 1 Remove the mounting...


