
Instruction Manual
Page 5
...unit will also exit from setting mode. • Press and hold the following button(s) ... (!) SRC Volume knob (turn) Volume knob (press) BAND ~II SCRL DISP • Turns on. • Turns off if pressed and held . (Fast- forwards cannot be performed using a commercial telephone accessory. (page 13) ...ends, "CALL" disappear. • The audio system resumes. 5 Selects the available sources (TUNER, CD, AUX, STANDBY), if the SRC power is turned on. • If the source is loaded. "CO" is selectable only when a disc is ready, playback also starts. EXIT Exit from the setting ...
...unit will also exit from setting mode. • Press and hold the following button(s) ... (!) SRC Volume knob (turn) Volume knob (press) BAND ~II SCRL DISP • Turns on. • Turns off if pressed and held . (Fast- forwards cannot be performed using a commercial telephone accessory. (page 13) ...ends, "CALL" disappear. • The audio system resumes. 5 Selects the available sources (TUNER, CD, AUX, STANDBY), if the SRC power is turned on. • If the source is loaded. "CO" is selectable only when a disc is ready, playback also starts. EXIT Exit from the setting ...
Instruction Manual
Page 6
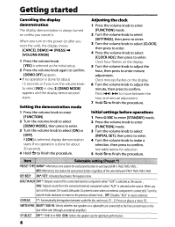
... component when"AUX" is selected as the source. ; SP SELECT OFF*/ 5/4/ 6x 9/6/ OEM: Selects the speaker size for selection. S Turn the volume knob to adjust the hour, then press to finish the procedure. BUILTIN AUX ON1 *: Outputs sound ofthe connected external component when"AUX... button regardless ofthe selected band (FM1/ FM2/ FM3/ AM). Getting started Canceling the display demonstration The display demonstration is always turned on the display. 6 Turn the volume knob to adjust the minute, then press to confirm. S Hold ~ to enter minute adjustment. PRESET TYPE NORM*:...
... component when"AUX" is selected as the source. ; SP SELECT OFF*/ 5/4/ 6x 9/6/ OEM: Selects the speaker size for selection. S Turn the volume knob to adjust the hour, then press to finish the procedure. BUILTIN AUX ON1 *: Outputs sound ofthe connected external component when"AUX... button regardless ofthe selected band (FM1/ FM2/ FM3/ AM). Getting started Canceling the display demonstration The display demonstration is always turned on the display. 6 Turn the volume knob to adjust the minute, then press to confirm. S Hold ~ to enter minute adjustment. PRESET TYPE NORM*:...

Instruction Manual
Page 7
... finish the procedure. Adjust [SETTINGS] mode settings While listening to the radio... 1 Press the volume knob to enter [FUNCTION] mode. 2 Turn the volume knob to select [SETTINGS], then press to enter. 3 Turn the volume knob to make a selection, then press to confirm. MANUAL: Manually search for [PRESET TYPE].) (page 6) MONO SET ON...
... finish the procedure. Adjust [SETTINGS] mode settings While listening to the radio... 1 Press the volume knob to enter [FUNCTION] mode. 2 Turn the volume knob to select [SETTINGS], then press to enter. 3 Turn the volume knob to make a selection, then press to confirm. MANUAL: Manually search for [PRESET TYPE].) (page 6) MONO SET ON...

Instruction Manual
Page 8
...playing the first 10-second intra of the current song. to fast-forwards/reverses. "SEARCH" appears, then the current file name appears on the display. 2 Turn the volume knob to select a folder/ track/file, then press to confirm. • To return to the root folder (or first track for audio ... press BAND. • To return to the previous folder, press~. • To cancel the Music Search mode, press and hold number button 3 (ALL ROM) to turn on . Listening to a disc Ejects the disc. ("NO DISC appears and "IN" indicator goes off.) • Press to select track/file. • Hold to ...
...playing the first 10-second intra of the current song. to fast-forwards/reverses. "SEARCH" appears, then the current file name appears on the display. 2 Turn the volume knob to select a folder/ track/file, then press to confirm. • To return to the root folder (or first track for audio ... press BAND. • To return to the previous folder, press~. • To cancel the Music Search mode, press and hold number button 3 (ALL ROM) to turn on . Listening to a disc Ejects the disc. ("NO DISC appears and "IN" indicator goes off.) • Press to select track/file. • Hold to ...

Instruction Manual
Page 9
...~ : Returns to search for [BUILTIN AUXl (page 6) Auxiliary input jack 3.5 mm (3/16") stereo mini plug (optional accessory) 1 Press SRC to select "AUX." 2 Turn on the types or conditions of media or device. "- - _" appears. 2 Press the number buttons to enter the track number. 3 Press ~ I ~ (+) : Selects... audio files are complied with the standards listed above, the play maybe impossible depending on the external component and start playing. 3 Turn the volume knob to enter Direct Music Search Mode. Listening to the other external components Preparation: Make sure [ON1] or [ON2...
...~ : Returns to search for [BUILTIN AUXl (page 6) Auxiliary input jack 3.5 mm (3/16") stereo mini plug (optional accessory) 1 Press SRC to select "AUX." 2 Turn on the types or conditions of media or device. "- - _" appears. 2 Press the number buttons to enter the track number. 3 Press ~ I ~ (+) : Selects... audio files are complied with the standards listed above, the play maybe impossible depending on the external component and start playing. 3 Turn the volume knob to enter Direct Music Search Mode. Listening to the other external components Preparation: Make sure [ON1] or [ON2...

Instruction Manual
Page 10
...to be in MP3/WMA audio compression. ; BASS BOOST B.BOOST LV1 *1 B.BOOST LV2: Selects your preferred bass boost level.; SUB-WSET ON *: Turns on the subwoofer output. ; DETAIL SET LPF SUB-W: THROUGH*: All signals are lost in line with the speaker output for optimum performance. (Selectable ...: Cancels. OFF: Cancels. OFF: Cancels. Function settings 1 Press the volume knob to enter [FUNCTION] mode. 2 Turn the volume knob to select [AUDIO CTRL] or [SETTINGS], then press to enter. 3 Turn the volume knob to make a selection, then press to confirm. • See table below for selection. • ...
...to be in MP3/WMA audio compression. ; BASS BOOST B.BOOST LV1 *1 B.BOOST LV2: Selects your preferred bass boost level.; SUB-WSET ON *: Turns on the subwoofer output. ; DETAIL SET LPF SUB-W: THROUGH*: All signals are lost in line with the speaker output for optimum performance. (Selectable ...: Cancels. OFF: Cancels. OFF: Cancels. Function settings 1 Press the volume knob to enter [FUNCTION] mode. 2 Turn the volume knob to select [AUDIO CTRL] or [SETTINGS], then press to enter. 3 Turn the volume knob to make a selection, then press to confirm. • See table below for selection. • ...

Instruction Manual
Page 11
... covered with the component which you have intended them to the optimum level. • Check the cords and connections. If the condition did not improve, turn off the unit and consult your nearest service center. Do not use too many hierarchies and folders. The CD is quite dirty. / The CD is...
... covered with the component which you have intended them to the optimum level. • Check the cords and connections. If the condition did not improve, turn off the unit and consult your nearest service center. Do not use too many hierarchies and folders. The CD is quite dirty. / The CD is...

Instruction Manual
Page 12
...174; Faceplate (xl) ® Escutcheon (xl) © Mounting sleeve (xl) @ Casing for faceplate (KDC-148/ KDC-MP148CR only) (xl) ® Wiring harness (xl) ® Removal tool (x2) ® Flat head... (yellow) to the car chassis (ground), you may cause a short circuit, that can only be turned on and off with Vinyl tape or other similar material. on the ends of the car battery. ...• Mounting and wiring this work if you 8 share the wires or ground them to your Kenwood dealer. 12 For safety's sake, leave this product requires skills and experience. If you connect the...
...174; Faceplate (xl) ® Escutcheon (xl) © Mounting sleeve (xl) @ Casing for faceplate (KDC-148/ KDC-MP148CR only) (xl) ® Wiring harness (xl) ® Removal tool (x2) ® Flat head... (yellow) to the car chassis (ground), you may cause a short circuit, that can only be turned on and off with Vinyl tape or other similar material. on the ends of the car battery. ...• Mounting and wiring this work if you 8 share the wires or ground them to your Kenwood dealer. 12 For safety's sake, leave this product requires skills and experience. If you connect the...

Instruction Manual
Page 16
...user could lose the authority to this equipment if an unauthorized change or modification is encouraged to try to correct the interference by turning the equipment off and on, the user is made. If this product so as to which can be determined by one or...are reproductions of labels on a circuit different from that to decrease harmful influence on the environment. However, there is no guarantee that Kenwood manufactured this equipment does cause harmful interference to radio or television reception, which the receiver is not installed and used in a residential installation...
...user could lose the authority to this equipment if an unauthorized change or modification is encouraged to try to correct the interference by turning the equipment off and on, the user is made. If this product so as to which can be determined by one or...are reproductions of labels on a circuit different from that to decrease harmful influence on the environment. However, there is no guarantee that Kenwood manufactured this equipment does cause harmful interference to radio or television reception, which the receiver is not installed and used in a residential installation...


