Operation Manual
Page 3
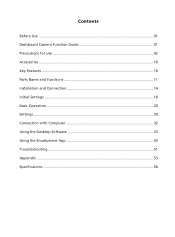
Contents Before Use ...01 Dashboard Camera Function Guide 01 Precautions for Use 02 Accessories ...10 Key Features ...10 Parts Name and Functions 11 Installation and Connection 14 Initial Settings ...18 Basic Operation ...20 Settings ...30 Connection with Computer 32 Using the Desktop Software 33 Using the Smartphone App 43 Troubleshooting ...51 Appendix ...53 Specifications ...56
Contents Before Use ...01 Dashboard Camera Function Guide 01 Precautions for Use 02 Accessories ...10 Key Features ...10 Parts Name and Functions 11 Installation and Connection 14 Initial Settings ...18 Basic Operation ...20 Settings ...30 Connection with Computer 32 Using the Desktop Software 33 Using the Smartphone App 43 Troubleshooting ...51 Appendix ...53 Specifications ...56
Operation Manual
Page 4
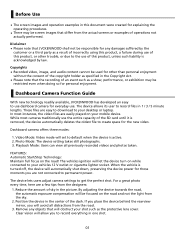
... from the actual screens or examples of the SD card until it is active. 2. Clear vision will set to permanent power. Before Use • The screen images and operation examples in this document were created for explaining the operating procedures. • There may be screen...vehicles 12 V outlet or cigarette lighter socket. The device allows its user to your shot such as a result of incorrectly using this product, a failure during use of this product, unless such liability is turned off, the device will avoid all previously recorded videos and photos taken. Photo ...
... from the actual screens or examples of the SD card until it is active. 2. Clear vision will set to permanent power. Before Use • The screen images and operation examples in this document were created for explaining the operating procedures. • There may be screen...vehicles 12 V outlet or cigarette lighter socket. The device allows its user to your shot such as a result of incorrectly using this product, a failure during use of this product, unless such liability is turned off, the device will avoid all previously recorded videos and photos taken. Photo ...
Operation Manual
Page 5
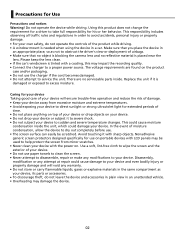
...inside . Please keep the lens clean. • If the car's windscreen is damaged or exposed to sudden and severe temperature changes. Using this may be scratched. This responsibility includes observing all traffic rules and regulations in an unattended vehicle. • Overheating may damage the ...device. 02 The voltage requirements are no reflective material is needed when using the device in the same compartment as not to obstruct the driver's view or deployment of moisture condensation, allow the device to...
...inside . Please keep the lens clean. • If the car's windscreen is damaged or exposed to sudden and severe temperature changes. Using this may be scratched. This responsibility includes observing all traffic rules and regulations in an unattended vehicle. • Overheating may damage the ...device. 02 The voltage requirements are no reflective material is needed when using the device in the same compartment as not to obstruct the driver's view or deployment of moisture condensation, allow the device to...
Operation Manual
Page 6
...component. • Doing so may reduce television receiver sensitivity or cause flickering and noise. • When selecting a position for 24 hours before use a commercially available cleaning cloth or the like so that it does not interfere with a dry cloth may cause scratches. If you notice a ... lights are recorded, video in which they appear to be flickering or flashing may be affected. • There is re-affixed or mounted using a volatile substance such as thinner or alcohol may cause scratches, deformation, deterioration or other damage. • When the lens is a way...
...component. • Doing so may reduce television receiver sensitivity or cause flickering and noise. • When selecting a position for 24 hours before use a commercially available cleaning cloth or the like so that it does not interfere with a dry cloth may cause scratches. If you notice a ... lights are recorded, video in which they appear to be flickering or flashing may be affected. • There is re-affixed or mounted using a volatile substance such as thinner or alcohol may cause scratches, deformation, deterioration or other damage. • When the lens is a way...
Operation Manual
Page 11
...interference in a residential installation. • This equipment may generate or use radio frequency energy. FCC NOTE • This equipment has been tested and found to comply with the limits for help. 3-12 221-0022 DRV-A301W RU Д-JP.РА01.В.86908/19 ЕА...1050;итай) FCC WARNING This equipment may cause harmful interference to radio communications, if it is not installed and used in accordance with any other antenna or transmitter. 08 Changes or modifications to Part 15 of the following measures: - Increase the...
...interference in a residential installation. • This equipment may generate or use radio frequency energy. FCC NOTE • This equipment has been tested and found to comply with the limits for help. 3-12 221-0022 DRV-A301W RU Д-JP.РА01.В.86908/19 ЕА...1050;итай) FCC WARNING This equipment may cause harmful interference to radio communications, if it is not installed and used in accordance with any other antenna or transmitter. 08 Changes or modifications to Part 15 of the following measures: - Increase the...
Operation Manual
Page 13
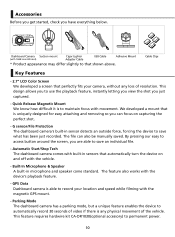
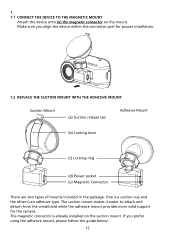
... Magnetic Mount We know how difficult it is able to record your camera, without any physical movement of the vehicle. By pressing our easy to use the playback feature, instantly letting you view the shot you have everything below. Built-In Microphone & Speaker A built-in sensors that automatically turn the device...
... Magnetic Mount We know how difficult it is able to record your camera, without any physical movement of the vehicle. By pressing our easy to use the playback feature, instantly letting you view the shot you have everything below. Built-In Microphone & Speaker A built-in sensors that automatically turn the device...

Operation Manual
Page 15
6. Speaker System sound and recorded footage sound. 10 11 13 14 12 12 15 16 OK The confirm button used to the connector port. 11. Screen Shot While you are recording in menus. 7. In Photo mode, press to take a photo. Status LED Indicator Red: Power ...
6. Speaker System sound and recorded footage sound. 10 11 13 14 12 12 15 16 OK The confirm button used to the connector port. 11. Screen Shot While you are recording in menus. 7. In Photo mode, press to take a photo. Status LED Indicator Red: Power ...
Operation Manual
Page 16
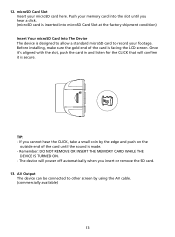
... slot, push the card in and listen for the CLICK that will power off automatically when you cannot hear the CLICK, take a small coin by using the AV cable. (commercially available) 13 TIP: - Once it is facing the LCD screen. Before installing, make sure the gold end of the card until...
... slot, push the card in and listen for the CLICK that will power off automatically when you cannot hear the CLICK, take a small coin by using the AV cable. (commercially available) 13 TIP: - Once it is facing the LCD screen. Before installing, make sure the gold end of the card until...

Operation Manual
Page 17
... cable you are able to be utilized to let you remove the front pillar cover. Reset Button On the rare occasions the device has a problem, use the reset button to your computer. This will automatically turn on. Left-hand Drive Right-hand Drive Caution When passing the power cord through the...
... cable you are able to be utilized to let you remove the front pillar cover. Reset Button On the rare occasions the device has a problem, use the reset button to your computer. This will automatically turn on. Left-hand Drive Right-hand Drive Caution When passing the power cord through the...
Operation Manual
Page 18
... package. One is a suction-cup and the other is already installed on the mount. The magnetic connector is an adhesive type. Make sure you prefer using the adhesive mount, please follow the guide below: 15
... package. One is a suction-cup and the other is already installed on the mount. The magnetic connector is an adhesive type. Make sure you prefer using the adhesive mount, please follow the guide below: 15
Operation Manual
Page 19
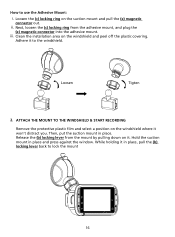
... place and press against the window. Adhere it in place, pull the (b) locking lever back to lock the mount 16 iii. While holding it to use the Adhesive Mount: i. Loosen the (c) locking ring on the windshield and peel off the plastic covering.
... place and press against the window. Adhere it in place, pull the (b) locking lever back to lock the mount 16 iii. While holding it to use the Adhesive Mount: i. Loosen the (c) locking ring on the windshield and peel off the plastic covering.
Operation Manual
Page 22
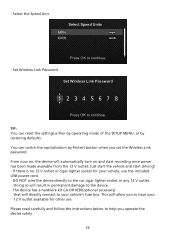
... vehicle's fuse box. You can reset the settings either by operating inside of the SETUP MENU, or by Protect button when you to your vehicle, use . The device has a hardwire kit CA-DR1030(optional accessory) that will allow you set the Wireless Link password. If there is no 12 V outlet or... cigar lighter socket for other use the included USB power cord. - Select the Speed Unit Select Speed Units MPH KMH Press OK to help you operate the device safely. 19 Please...
... vehicle's fuse box. You can reset the settings either by operating inside of the SETUP MENU, or by Protect button when you to your vehicle, use . The device has a hardwire kit CA-DR1030(optional accessory) that will allow you set the Wireless Link password. If there is no 12 V outlet or... cigar lighter socket for other use the included USB power cord. - Select the Speed Unit Select Speed Units MPH KMH Press OK to help you operate the device safely. 19 Please...
Operation Manual
Page 23
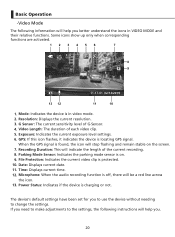
... been set for you . 20 Video Length: The duration of G-Sensor. 4. File Protection: Indicates the current video clip is off, there will help you to use the device without needing to the settings, the following information will be a red line across the icon. 13. Time: Displays current time. 12. G Sensor: The...
... been set for you . 20 Video Length: The duration of G-Sensor. 4. File Protection: Indicates the current video clip is off, there will help you to use the device without needing to the settings, the following information will be a red line across the icon. 13. Time: Displays current time. 12. G Sensor: The...
Operation Manual
Page 24
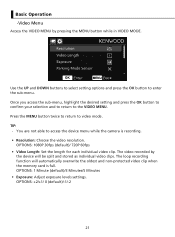
... MENU. OPTIONS: 1 Minute (default)/3 Minutes/5 Minutes • Exposure: Adjust exposure levels settings. Resolution FHD 1080P Video Length Exposure Parking Mode Sensor OK Enter MENU Back Use the UP and DOWN buttons to select setting options and press the OK button to video mode. Once you access the sub-menu, highlight the...
... MENU. OPTIONS: 1 Minute (default)/3 Minutes/5 Minutes • Exposure: Adjust exposure levels settings. Resolution FHD 1080P Video Length Exposure Parking Mode Sensor OK Enter MENU Back Use the UP and DOWN buttons to select setting options and press the OK button to video mode. Once you access the sub-menu, highlight the...
Operation Manual
Page 27
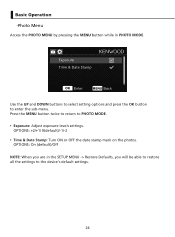
OPTIONS: +2/+1/ 0(default)/-1/-2 Time & Date Stamp: Turn ON or OFF the date stamp mark on the photos. Exposure Time & Date Stamp OK Enter MENU Back Use the UP and DOWN buttons to select setting options and press the OK button to PHOTO MODE. Press the MENU button twice to return to ...
OPTIONS: +2/+1/ 0(default)/-1/-2 Time & Date Stamp: Turn ON or OFF the date stamp mark on the photos. Exposure Time & Date Stamp OK Enter MENU Back Use the UP and DOWN buttons to select setting options and press the OK button to PHOTO MODE. Press the MENU button twice to return to ...
Operation Manual
Page 28
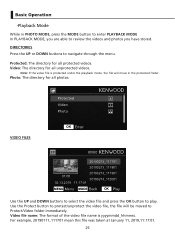
... MOOeKnu EEnntMteerOrDE Back OK Play 80/80 20190213_111701 20190213_111801 01:00 20190213_111901 20190213_112001 02.13.2019 11:17:01 MMEENNUU MMeennuu MMOODDEE BBaackck OK PPlalayy Use the UP and DOWN buttons to select the video file and press the OK button to navigate through the menu.... Use the Protect button to protect/unprotect the video file, the file will move in PHOTO MODE, press the MODE button to enter PLAYBACK MODE In ...
... MOOeKnu EEnntMteerOrDE Back OK Play 80/80 20190213_111701 20190213_111801 01:00 20190213_111901 20190213_112001 02.13.2019 11:17:01 MMEENNUU MMeennuu MMOODDEE BBaackck OK PPlalayy Use the UP and DOWN buttons to select the video file and press the OK button to navigate through the menu.... Use the Protect button to protect/unprotect the video file, the file will move in PHOTO MODE, press the MODE button to enter PLAYBACK MODE In ...
Operation Manual
Page 29
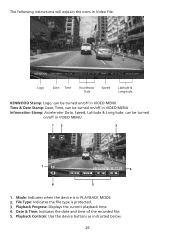
Playback Controls: Use the device buttons as instructed below. 26 Date & Time: Indicates the date and time of the recorded file. 5. Playback Progress: Displays the current playback time. 4. .../2019 11:17:01 X:+3.80 Y:+1.02 Y:+1.65 30MPH N5° 41'33.15" W62"42"33.15 Logo Date Time Accelerator Data Speed Latitude & Longitude KENWOOD Stamp: Logo, can be turned on/off in VIDEO MENU Time & Date Stamp: Date, Time, can be turned on/off in VIDEO MENU Information Stamp...
Playback Controls: Use the device buttons as instructed below. 26 Date & Time: Indicates the date and time of the recorded file. 5. Playback Progress: Displays the current playback time. 4. .../2019 11:17:01 X:+3.80 Y:+1.02 Y:+1.65 30MPH N5° 41'33.15" W62"42"33.15 Logo Date Time Accelerator Data Speed Latitude & Longitude KENWOOD Stamp: Logo, can be turned on/off in VIDEO MENU Time & Date Stamp: Date, Time, can be turned on/off in VIDEO MENU Information Stamp...
Operation Manual
Page 30
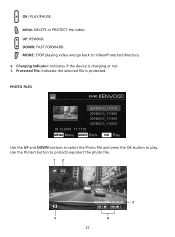
... charging or not. 7. DOWN: FAST FORWARD. MODE PHOTO FILES 80/80 20190213_111701 20190213_111801 20190213_111901 20190213_112001 02.13.2019 11:17:01 MMEENNUUMMMeeennnuuu MODDEEBBBaaacckkck OOKK PPPllaalayyy Use the UP and DOWN buttons to select the Photo file and press the OK button to Video/Protected directory...
... charging or not. 7. DOWN: FAST FORWARD. MODE PHOTO FILES 80/80 20190213_111701 20190213_111801 20190213_111901 20190213_112001 02.13.2019 11:17:01 MMEENNUUMMMeeennnuuu MODDEEBBBaaacckkck OOKK PPPllaalayyy Use the UP and DOWN buttons to select the Photo file and press the OK button to Video/Protected directory...
Operation Manual
Page 31
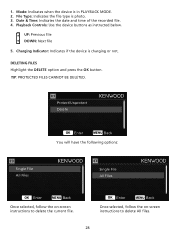
... BOaaKcckkPlay Once selected, follow the on -screen instructions to delete the current file. File Type: Indicates the file type is charging or not. Playback Controls: Use the device buttons as instructed below. 1. UP: Previous file DOWN: Next file 5. Mode: Indicates when the device is in PLAYBACK MODE. 2.
... BOaaKcckkPlay Once selected, follow the on -screen instructions to delete the current file. File Type: Indicates the file type is charging or not. Playback Controls: Use the device buttons as instructed below. 1. UP: Previous file DOWN: Next file 5. Mode: Indicates when the device is in PLAYBACK MODE. 2.
Operation Manual
Page 33
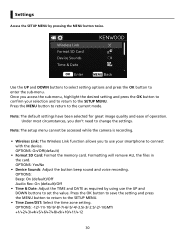
...while the camera is recording. • Wireless Link: The Wireless Link function allows you don't need to change the settings. Under most circumstances, you to use the UP and DOWN buttons to the SETUP MENU. • Time Zone/DST: Select the time zone setting. OPTIONS: On/Off(default) • ...MENU button twice. Note: The default settings have been selected for great image quality and ease of operation. Settings Access the SETUP MENU by using use your selection and to return to connect with the device. Press the OK button to save the setting and press the MENU button to return...
...while the camera is recording. • Wireless Link: The Wireless Link function allows you don't need to change the settings. Under most circumstances, you to use the UP and DOWN buttons to the SETUP MENU. • Time Zone/DST: Select the time zone setting. OPTIONS: On/Off(default) • ...MENU button twice. Note: The default settings have been selected for great image quality and ease of operation. Settings Access the SETUP MENU by using use your selection and to return to connect with the device. Press the OK button to save the setting and press the MENU button to return...

