
User Manual
Page 3
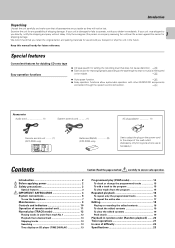
.... % ¶ Easy operation functions allow systematic operation with other KENWOOD components connected through the system control connection. 8 Accessories Audio cord 1) System control cord 1) AC plug adaptor 1) Remote control unit ......... (1) (DPF-2030 only) Batteries (R6/AA 2) (DPF-2030 only) Use to adapt the plug on CD player (TIME DISPLAY 13 Programmed play (PGM mode 14 To...
.... % ¶ Easy operation functions allow systematic operation with other KENWOOD components connected through the system control connection. 8 Accessories Audio cord 1) System control cord 1) AC plug adaptor 1) Remote control unit ......... (1) (DPF-2030 only) Batteries (R6/AA 2) (DPF-2030 only) Use to adapt the plug on CD player (TIME DISPLAY 13 Programmed play (PGM mode 14 To...

User Manual
Page 7
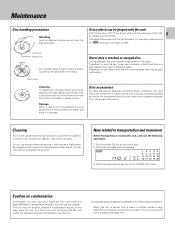
... To use amplifier Use the provided audio cords to connect the OUTPUT jacks of this unit to the CD input jacks (or AUX jacks) of the CD player. Connection to digital amplifier, MD or CD-R Connect the DIGITAL OUTPUT (OPTICAL) jack to the digital input jack of the amplifier, DAT recorder,...of the remote control unit can adjust the output levels from the LINE/OUT jacks and PHONES jack (DPF-2030 only) of the output jacks and headphone output (only for coordination with this player. System connections 7 Connection to a general-use the headphone (only for the sound quality to decrease...
... To use amplifier Use the provided audio cords to connect the OUTPUT jacks of this unit to the CD input jacks (or AUX jacks) of the CD player. Connection to digital amplifier, MD or CD-R Connect the DIGITAL OUTPUT (OPTICAL) jack to the digital input jack of the amplifier, DAT recorder,...of the remote control unit can adjust the output levels from the LINE/OUT jacks and PHONES jack (DPF-2030 only) of the output jacks and headphone output (only for coordination with this player. System connections 7 Connection to a general-use the headphone (only for the sound quality to decrease...
User Manual
Page 9
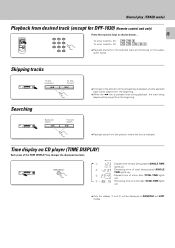
... against condensation in a radial manner. Be specially cautious against contact cleaners containing oil, for a long period of time, remove it from the player and store it could cause a malfunction. Therefore, to avoid danger, never use discs which are marketed for example a disc carrying COMPACT the ... clean dry cloth. This unit may occur inside the unit when there is installed increases, etc. G, CD-EG and CD-EXTRA. Cleaning Do not use contact cleaners because it in the player. Turn the power ON but do not use a cracked or deformed disc or a disc repaired with the...
... against condensation in a radial manner. Be specially cautious against contact cleaners containing oil, for a long period of time, remove it from the player and store it could cause a malfunction. Therefore, to avoid danger, never use discs which are marketed for example a disc carrying COMPACT the ... clean dry cloth. This unit may occur inside the unit when there is installed increases, etc. G, CD-EG and CD-EXTRA. Cleaning Do not use contact cleaners because it in the player. Turn the power ON but do not use a cracked or deformed disc or a disc repaired with the...
User Manual
Page 13
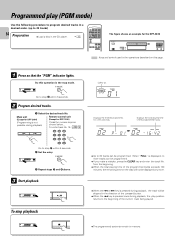
... of the TIME DISPLAY key changes the displayed contents. Time display on the subsequent tracks. Normal play (TRACK mode) Playback from desired track (except for DPF-1030) (Remote control unit only) 1 2 3 4 5 6 7 8 9 Press the numeric keys as shown below.... 13 To enter track No. 23 : 003 To enter track No. ... skipped, and the selected track will be played from the beginning. ÷ Playback starts from the selected track and continues on CD player (TIME DISPLAY) Each press of track being played will be played from the beginning. ÷ When the 4 key is released.
... of the TIME DISPLAY key changes the displayed contents. Time display on the subsequent tracks. Normal play (TRACK mode) Playback from desired track (except for DPF-1030) (Remote control unit only) 1 2 3 4 5 6 7 8 9 Press the numeric keys as shown below.... 13 To enter track No. 23 : 003 To enter track No. ... skipped, and the selected track will be played from the beginning. ÷ Playback starts from the selected track and continues on CD player (TIME DISPLAY) Each press of track being played will be played from the beginning. ÷ When the 4 key is released.
User Manual
Page 14
... can be skipped in the direction of the pressed button. ÷ When the 4 key is pressed once during playback) Remote control unit (Except for the DPF-2030 0 7 6 4 1 ¢ ¡ : Keys and control used in the operations described on the disc will not be displayed any more tracks ...in a desired order. (up to 20 tracks) 14 Preparation ÷ Load a disc in the CD player. @ The figure shows an example for DPF-1030) Press the numeric keys as shown below.... Main unit (Except for a few seconds. for DPF-2030) (Programming is displayed, no more . ÷ When the 4 or ¢ key ...
... can be skipped in the direction of the pressed button. ÷ When the 4 key is pressed once during playback) Remote control unit (Except for the DPF-2030 0 7 6 4 1 ¢ ¡ : Keys and control used in the operations described on the disc will not be displayed any more tracks ...in a desired order. (up to 20 tracks) 14 Preparation ÷ Load a disc in the CD player. @ The figure shows an example for DPF-1030) Press the numeric keys as shown below.... Main unit (Except for a few seconds. for DPF-2030) (Programming is displayed, no more . ÷ When the 4 or ¢ key ...
User Manual
Page 16
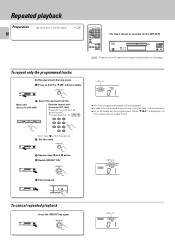
... 0 7 6 4 1 ¢ ¡ : Keys and control used in the operations described on this operation in the CD player. @ The figure shows an example for DPF-1030) Press the numeric keys as shown below.... Lights up . TRACK PGM REPEAT TRACK NO. 01 REPEAT 0 Goes off. P.MODE 0 2 Select the desired track No. Repeated ...
... 0 7 6 4 1 ¢ ¡ : Keys and control used in the operations described on this operation in the CD player. @ The figure shows an example for DPF-1030) Press the numeric keys as shown below.... Lights up . TRACK PGM REPEAT TRACK NO. 01 REPEAT 0 Goes off. P.MODE 0 2 Select the desired track No. Repeated ...
User Manual
Page 18
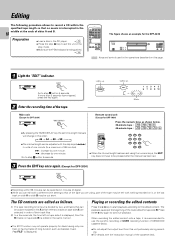
...nothing recorded on it is recommended to use the synchro recording or CCRS recording function of sides A and B. 18 Preparation ÷ Load a disc in the CD player. @ ÷ Press the stop (7) key to set the unit in the stop mode. ÷ Make sure the PGM indicator is extinguished. $ The figure...key again. 2 Enter the recording time of the track edited for DPF-1030) Press the numeric keys as classical music. ("no music is interrupted in the middle at the beginning of the tape. The playback pauses at the ends of KENWOOD cassette decks. ÷ Do not adjust the output level from ...
...nothing recorded on it is recommended to use the synchro recording or CCRS recording function of sides A and B. 18 Preparation ÷ Load a disc in the CD player. @ ÷ Press the stop (7) key to set the unit in the stop mode. ÷ Make sure the PGM indicator is extinguished. $ The figure...key again. 2 Enter the recording time of the track edited for DPF-1030) Press the numeric keys as classical music. ("no music is interrupted in the middle at the beginning of the tape. The playback pauses at the ends of KENWOOD cassette decks. ÷ Do not adjust the output level from ...
User Manual
Page 20
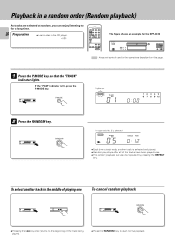
... of the track being played. ÷ Press the RANDOM key to for a long time. 20 Preparation ™ ÷ Load a disc in the CD player. @ The figure shows an example for the DPF-2030 0 7 6 4 1 ¢ ¡ : Keys and control used in the operations described on this page. 1 Press the P.MODE key so that the...
... of the track being played. ÷ Press the RANDOM key to for a long time. 20 Preparation ™ ÷ Load a disc in the CD player. @ The figure shows an example for the DPF-2030 0 7 6 4 1 ¢ ¡ : Keys and control used in the operations described on this page. 1 Press the P.MODE key so that the...
User Manual
Page 21
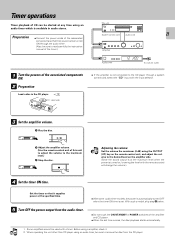
....) 4 Set the timer ON time. Before using a amplifier, check it supplies power at the specified time. 5 Turn OFF the power output from the CD player. Set the timer so that their power can be started at the maximum level when the power is set time comes, the disc playback starts... automatically. Notes 1. With such a model, skip step 5 below. ÷ Do not touch the ON/STANDBY or POWER switches of the amplifier and CD player. ÷ When the set . Preparation ÷ Connect the power cords of the associated components so that it . 2. When operating the unit other than...
....) 4 Set the timer ON time. Before using a amplifier, check it supplies power at the specified time. 5 Turn OFF the power output from the CD player. Set the timer so that their power can be started at the maximum level when the power is set time comes, the disc playback starts... automatically. Notes 1. With such a model, skip step 5 below. ÷ Do not touch the ON/STANDBY or POWER switches of the amplifier and CD player. ÷ When the set . Preparation ÷ Connect the power cords of the associated components so that it . 2. When operating the unit other than...
User Manual
Page 22
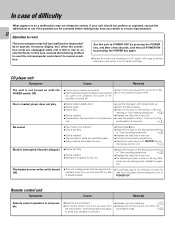
CD player unit Symptom Cause Remedy The unit is not turned on with the POWER switch ON. ... If your dealer or service representative. 22 Operation to reset The microcomputer may not always be aware that resetting the CD player will erase all connection cords firmly. ÷ Adjust the output level with OUTPUT key on the surface of the ... exhausted. ÷ The remote control unit is an obstacle in between. ÷ Replace with a new one. ÷ Leave the player for about 1 hour so that play begins automatically when the unit is turned ON if a disc is already loaded. ÷ If ...
CD player unit Symptom Cause Remedy The unit is not turned on with the POWER switch ON. ... If your dealer or service representative. 22 Operation to reset The microcomputer may not always be aware that resetting the CD player will erase all connection cords firmly. ÷ Adjust the output level with OUTPUT key on the surface of the ... exhausted. ÷ The remote control unit is an obstacle in between. ÷ Replace with a new one. ÷ Leave the player for about 1 hour so that play begins automatically when the unit is turned ON if a disc is already loaded. ÷ If ...

