Instruction Manual
Page 6
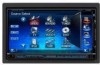
... into the unit, the adapter might separate from this unit is not supported by any broadcasting station. 6 DNX8120/DDX812/DDX8032BT For how to remove the USB device, refer to operate properly, press the Reset button. If the unit still does not operate normally after removing the burrs with tape stuck on the...; The RDS or RBDS feature won't work where the service is stained, wipe it . • Do not use the disc only after a while, consult your Kenwood dealer. • Discs with This unit may not allow discs to play a CD-R or CD-RW that they work with your model and in the...
... into the unit, the adapter might separate from this unit is not supported by any broadcasting station. 6 DNX8120/DDX812/DDX8032BT For how to remove the USB device, refer to operate properly, press the Reset button. If the unit still does not operate normally after removing the burrs with tape stuck on the...; The RDS or RBDS feature won't work where the service is stained, wipe it . • Do not use the disc only after a while, consult your Kenwood dealer. • Discs with This unit may not allow discs to play a CD-R or CD-RW that they work with your model and in the...
Instruction Manual
Page 71
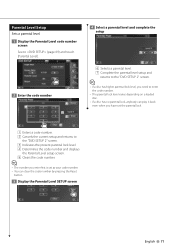
... code number. ⁄ • The number you enter first is set as your code number. • You can clear the code number by pressing the Reset button. 3 Display the Parental Level SETUP screen 4 Select a parental level and complete the setup 6 6 7 6 Selects a parental level. 7 Complete the parental level setup and returns to...
... code number. ⁄ • The number you enter first is set as your code number. • You can clear the code number by pressing the Reset button. 3 Display the Parental Level SETUP screen 4 Select a parental level and complete the setup 6 6 7 6 Selects a parental level. 7 Complete the parental level setup and returns to...
Instruction Manual
Page 78
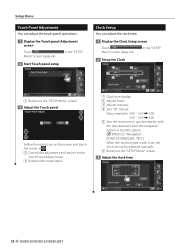
... touch the center of . 2 Cancels the adjustment and returns to the Touch Panel Adjust screen. 3 Resets to the "SETUP Menu" screen. 3 Adjust the clock time 78 DNX8120/DDX812/DDX8032BT Clock Setup You can adjust the touch panel operations. 1 Display the Touch panel Adjustment screen ...3:00 - 3:29 \ 3:00 3:30 - 3:59 \ 4:00 5 Sets the clock time in synchronization with the time data sent from the navigation system or the RDS station. ( DNX8120: "Navigatoin", DDX812/DDX8032BT: "RDS") When the synchronized mode is set, the clock cannot be adjusted manually. 6 Returns to the initial status. ...
... touch the center of . 2 Cancels the adjustment and returns to the Touch Panel Adjust screen. 3 Resets to the "SETUP Menu" screen. 3 Adjust the clock time 78 DNX8120/DDX812/DDX8032BT Clock Setup You can adjust the touch panel operations. 1 Display the Touch panel Adjustment screen ...3:00 - 3:29 \ 3:00 3:30 - 3:59 \ 4:00 5 Sets the clock time in synchronization with the time data sent from the navigation system or the RDS station. ( DNX8120: "Navigatoin", DDX812/DDX8032BT: "RDS") When the synchronized mode is set, the clock cannot be adjusted manually. 6 Returns to the initial status. ...
Instruction Manual
Page 81
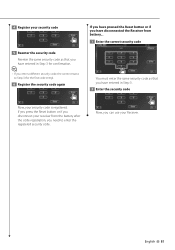
... have disconnected the Receiver from the battery after the code registration, you can use your security code is registered. English 81 If you press the Reset button or if you disconnect your receiver from battery... 1 Enter the correct security code You must enter the same security code as that you have... enter the registered security code. Now, you need to Step 3 (for the first code entry). 6 Register the security code again If you have pressed the Reset button or if you have entered in Step 3. 2 Enter the security code Now, your Receiver.
... have disconnected the Receiver from the battery after the code registration, you can use your security code is registered. English 81 If you press the Reset button or if you disconnect your receiver from battery... 1 Enter the correct security code You must enter the same security code as that you have... enter the registered security code. Now, you need to Step 3 (for the first code entry). 6 Register the security code again If you have pressed the Reset button or if you have entered in Step 3. 2 Enter the security code Now, your Receiver.
Instruction Manual
Page 106
...from the previous one or the contained audio files are replaced. ➡ Update your nearest Kenwood dealer. Authorization Error: Connection to the iPod has failed. ➡ Remove the iPod and... unit fails to USB/iPod again. Hold Error : Activation of USB Device Control (page 37). 106 DNX8120/DDX812/DDX8032BT Read Error : Disc is upside down. ➡ Load the disc with the labeled side...USB device. ➡ Change the source to some reason or other. ➡ Push the unit's Reset button. Remove the USB device. If the "Error 07−67" message does not disappear, see...
...from the previous one or the contained audio files are replaced. ➡ Update your nearest Kenwood dealer. Authorization Error: Connection to the iPod has failed. ➡ Remove the iPod and... unit fails to USB/iPod again. Hold Error : Activation of USB Device Control (page 37). 106 DNX8120/DDX812/DDX8032BT Read Error : Disc is upside down. ➡ Load the disc with the labeled side...USB device. ➡ Change the source to some reason or other. ➡ Push the unit's Reset button. Remove the USB device. If the "Error 07−67" message does not disappear, see...
Instruction Manual
Page 110
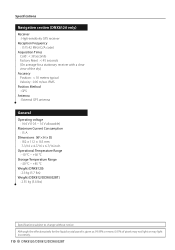
Specifications Navigation section (DNX8120 only) Receiver : High-sensitivity GPS receiver Reception Frequency : 1575.42 MHz (C/A code) Acquisition Times Cold : < 38 seconds Factory Reset : < 45 seconds (On average for the liquid crystal panel is given as 99.99% or more, 0.01% of the sky) Accuracy Position : < 10 meters typical ...
Specifications Navigation section (DNX8120 only) Receiver : High-sensitivity GPS receiver Reception Frequency : 1575.42 MHz (C/A code) Acquisition Times Cold : < 38 seconds Factory Reset : < 45 seconds (On average for the liquid crystal panel is given as 99.99% or more, 0.01% of the sky) Accuracy Position : < 10 meters typical ...
Installation Manual
Page 3
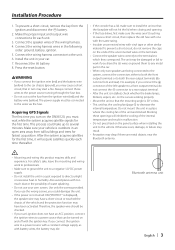
...of the unit are working properly. • Mount the unit so that can be turned on the DNX8120, you share the - This process could damage the unit. • If the power is not...activated. Bluetooth antenna unit English | 3 If you may drop if there are being connected to the system, connect the connectors either to both the rear output terminals (do not connect the - Installation Procedure 1.... the unit in malfunction. • Do not press hard on the car are blocked. Press the reset button. 2WARNING • If you connect the ignition wire (red) and the battery wire (yellow...
...of the unit are working properly. • Mount the unit so that can be turned on the DNX8120, you share the - This process could damage the unit. • If the power is not...activated. Bluetooth antenna unit English | 3 If you may drop if there are being connected to the system, connect the connectors either to both the rear output terminals (do not connect the - Installation Procedure 1.... the unit in malfunction. • Do not press hard on the car are blocked. Press the reset button. 2WARNING • If you connect the ignition wire (red) and the battery wire (yellow...


