Instruction Manual
Page 1
... installation and operation procedures will help you call upon your Kenwood dealer for information or service on the warranty card, and in the space provided below. For your records Record the serial number, found on the back of the unit, in the spaces designated on the product. Refer to read through this instruction manual. GPS NAVIGATION SYSTEM DNX8120 MONITOR WITH DVD RECEIVER DDX812 DDX8032BT INSTRUCTION MANUAL Take the time...
... installation and operation procedures will help you call upon your Kenwood dealer for information or service on the warranty card, and in the space provided below. For your records Record the serial number, found on the back of the unit, in the spaces designated on the product. Refer to read through this instruction manual. GPS NAVIGATION SYSTEM DNX8120 MONITOR WITH DVD RECEIVER DDX812 DDX8032BT INSTRUCTION MANUAL Take the time...
Instruction Manual
Page 2
... Screen 20 DVD Disc Menu 21 VCD Zoom Control 22 Music Disc & Audio File Listening 23 Functions While Displaying the Control Screen 23 Set Disc Name 25 Folder Select (Function of Audio File) 25 Video File/Picture Watching 26 Function During Playback Screen 26 Functions When Displaying the Easy Control Panel 26 Functions While Displaying the Control Screen 27 Picture Control 28 Folder Select 28 Radio Listening 29 Functions While Displaying the Control Screen 29 Seek Mode 30 Auto Memory 30 Manual Memory 31 Preset Select 31 Radio Text 32 Set Station...
... Screen 20 DVD Disc Menu 21 VCD Zoom Control 22 Music Disc & Audio File Listening 23 Functions While Displaying the Control Screen 23 Set Disc Name 25 Folder Select (Function of Audio File) 25 Video File/Picture Watching 26 Function During Playback Screen 26 Functions When Displaying the Easy Control Panel 26 Functions While Displaying the Control Screen 27 Picture Control 28 Folder Select 28 Radio Listening 29 Functions While Displaying the Control Screen 29 Seek Mode 30 Auto Memory 30 Manual Memory 31 Preset Select 31 Radio Text 32 Set Station...
Instruction Manual
Page 3
...Hands Free Phone 58 Voice Registration 59 Key Word Voice Registration 60 Phone Number Preset 61 SMS (Short Message Service) 62 Audio Control 92 Audio Control Menu 92 Audio Control 92 Equalizer Control 93 Graphic Equalizer Setup 93 Zone Control 94 SRS WOW Control 94 SRS WOW User Setup 95 Surround Control 95 Surround Control Adjustment 96 Position 96 Position Fine Control 97 Remote Controller 98 Battery installation 98 Remote Controller mode switch 98 Common operations (AUD mode) 99 DVD/DVD Audio/VCD/CD/Audio files (DVD mode) 100 Radio (AUD mode) 101...
...Hands Free Phone 58 Voice Registration 59 Key Word Voice Registration 60 Phone Number Preset 61 SMS (Short Message Service) 62 Audio Control 92 Audio Control Menu 92 Audio Control 92 Equalizer Control 93 Graphic Equalizer Setup 93 Zone Control 94 SRS WOW Control 94 SRS WOW User Setup 95 Surround Control 95 Surround Control Adjustment 96 Position 96 Position Fine Control 97 Remote Controller 98 Battery installation 98 Remote Controller mode switch 98 Common operations (AUD mode) 99 DVD/DVD Audio/VCD/CD/Audio files (DVD mode) 100 Radio (AUD mode) 101...
Instruction Manual
Page 6
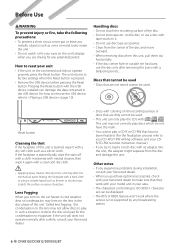
... Kenwood dealer. • Discs with your Kenwood dealer to make sure that has not been finalized. (For the finalization process refer to your CD-R/CD-RW writing software, and your unit • If the unit or the connected unit fails to (page 10). The unit returns to play a CD-R or CD-RW that they work with your model and in the USB device. Reset button Cleaning the Unit...
... Kenwood dealer. • Discs with your Kenwood dealer to make sure that has not been finalized. (For the finalization process refer to your CD-R/CD-RW writing software, and your unit • If the unit or the connected unit fails to (page 10). The unit returns to play a CD-R or CD-RW that they work with your model and in the USB device. Reset button Cleaning the Unit...

Instruction Manual
Page 7
... can use the functions. Registration Code changes each time a file with the displayed Registration Code is inserted or ejected. Notes Navigation units that can be connected to this unit (DDX812/DDX8032BT only) • KNA-G510* • KNA-DV4100 • KNA-DV3100 • KNA-DV2100 * Update the navigation software to the instruction manual of the navigation unit. The following iPods can be controlled from this unit, the surface of "DualDisc" When playing a "DualDisc" on iPod Touch. Supports audio only...
... can use the functions. Registration Code changes each time a file with the displayed Registration Code is inserted or ejected. Notes Navigation units that can be connected to this unit (DDX812/DDX8032BT only) • KNA-G510* • KNA-DV4100 • KNA-DV3100 • KNA-DV2100 * Update the navigation software to the instruction manual of the navigation unit. The following iPods can be controlled from this unit, the surface of "DualDisc" When playing a "DualDisc" on iPod Touch. Supports audio only...
Instruction Manual
Page 10
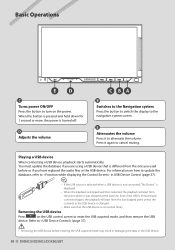
... update the database, refer to in the USB device. Even if the USB is turned off. D Adjusts the volume C BA B Switches to the Navigation system Press the button to switch the display to attenuate the volume. For information on the USB control screen to turn on the power. E Attenuates the volume Press it was stopped at the last time. Basic Operations ED C Turns power ON/OFF Press the button to enter the USB suspend mode, and then remove...
... update the database, refer to in the USB device. Even if the USB is turned off. D Adjusts the volume C BA B Switches to the Navigation system Press the button to switch the display to attenuate the volume. For information on the USB control screen to turn on the power. E Attenuates the volume Press it was stopped at the last time. Basic Operations ED C Turns power ON/OFF Press the button to enter the USB suspend mode, and then remove...
Instruction Manual
Page 14
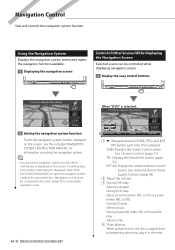
...the navigation system function Touch the navigation system button displayed on the screen. Using the Navigation System Displays the navigation system screen and makes the navigation function available. 1 Displaying the navigation screen Control of Other Sources While Displaying the Navigation Screen Selected source can set the navigation system function when nothing else is played from its beginning when you play : Selects music. See (page 48). 2 Adjust the volume. 3 During DVD play : Selects a file. 4 Stops playing. When pressed twice, the disc is displayed on using the navigation...
...the navigation system function Touch the navigation system button displayed on the screen. Using the Navigation System Displays the navigation system screen and makes the navigation function available. 1 Displaying the navigation screen Control of Other Sources While Displaying the Navigation Screen Selected source can set the navigation system function when nothing else is played from its beginning when you play : Selects music. See (page 48). 2 Adjust the volume. 3 During DVD play : Selects a file. 4 Stops playing. When pressed twice, the disc is displayed on using the navigation...
Instruction Manual
Page 19
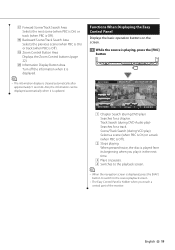
... DVD Audio play it is playing, press the [FNC] button DVD VIDEO Mode:Full AV - Also, the information can be displayed automatically when it in the next time. 3 Plays or pauses. 4 Switches to the playback screen. ⁄ • When the navigation screen is displayed, press the [NAV] button to switch to the source playback screen. • The Easy Control Panel is cleared automatically after approximately 5 seconds. Functions When Displaying the Easy Control Panel Displays the basic operation buttons...
... DVD Audio play it is playing, press the [FNC] button DVD VIDEO Mode:Full AV - Also, the information can be displayed automatically when it in the next time. 3 Plays or pauses. 4 Switches to the playback screen. ⁄ • When the navigation screen is displayed, press the [NAV] button to switch to the source playback screen. • The Easy Control Panel is cleared automatically after approximately 5 seconds. Functions When Displaying the Easy Control Panel Displays the basic operation buttons...
Instruction Manual
Page 29
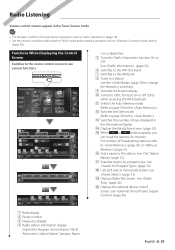
... display 2 Preset number 3 Frequency display 4 Radio station information display. y Sets a name to change the frequency switching. 9 Switches the button display. See (page 31). Displays the external device control screen. u Searches station by program type. Functions While Displaying the Control Screen Switches to the source control screen to P6 buttons appear, you can recall the stations on memory. r Displays the Hands Free screen. (page 52) t When P1 to use various functions. 1 2 5 6 8 7 9 10 11 12 13 3 14 4 8 15 16 17 18 19 20 1/2, or Radio Text. 5 Turns the...
... display 2 Preset number 3 Frequency display 4 Radio station information display. y Sets a name to change the frequency switching. 9 Switches the button display. See (page 31). Displays the external device control screen. u Searches station by program type. Functions While Displaying the Control Screen Switches to the source control screen to P6 buttons appear, you can recall the stations on memory. r Displays the Hands Free screen. (page 52) t When P1 to use various functions. 1 2 5 6 8 7 9 10 11 12 13 3 14 4 8 15 16 17 18 19 20 1/2, or Radio Text. 5 Turns the...
Instruction Manual
Page 51
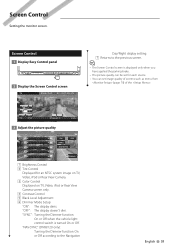
... vehicle light control switch is displayed only when you have applied the parking brake. • The picture quality can be set for an NTSC system image on TV, Video, iPod or Rear View Camera. 3 Color Control Displayed on TV, Video, iPod or Rear View Camera screen only. 4 Contrast Control 5 Black Level Adjustment 6 Dimmer Mode Setup "ON": The display dims. "OFF": The display doesn't dim. Screen Control Setting the monitor screen. "NAV-SYNC" (DNX8120 only): Turning the Dimmer function On or Off according to the previous screen. ⁄ • The Screen Control screen is turned On...
... vehicle light control switch is displayed only when you have applied the parking brake. • The picture quality can be set for an NTSC system image on TV, Video, iPod or Rear View Camera. 3 Color Control Displayed on TV, Video, iPod or Rear View Camera screen only. 4 Contrast Control 5 Black Level Adjustment 6 Dimmer Mode Setup "ON": The display dims. "OFF": The display doesn't dim. Screen Control Setting the monitor screen. "NAV-SYNC" (DNX8120 only): Turning the Dimmer function On or Off according to the previous screen. ⁄ • The Screen Control screen is turned On...
Instruction Manual
Page 71
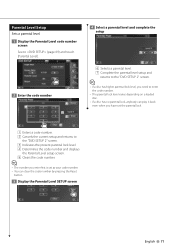
... the code number by pressing the Reset button. 3 Display the Parental Level SETUP screen 4 Select a parental level and complete the setup 6 6 7 6 Selects a parental level. 7 Complete the parental level setup and returns to the "DVD SETUP 2" screen. ⁄ • If a disc has higher parental lock level, you need to enter the code number. • The parental lock level varies depending on a loaded disc. • If a disc has no parental lock, anybody can play...
... the code number by pressing the Reset button. 3 Display the Parental Level SETUP screen 4 Select a parental level and complete the setup 6 6 7 6 Selects a parental level. 7 Complete the parental level setup and returns to the "DVD SETUP 2" screen. ⁄ • If a disc has higher parental lock level, you need to enter the code number. • The parental lock level varies depending on a loaded disc. • If a disc has no parental lock, anybody can play...
Instruction Manual
Page 72
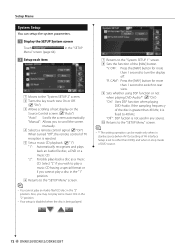
.... 5 Sets a music CD playback. ( "1") "1": Automatically recognizes and plays back an Audio file disc, a DVD or a music CD. "R. "Manual": Allows you to turn the display off. Also, you cannot play a disc in the "1" position. 6 Returns to 48 kHz. "V. in the "SETUP 2 Setup each item 1 2 3 4 5 6 1 Moves to the "System SETUP 1" screen. 8 Sets the function of the [NAV] button. If the sampling frequency of the disc is greater than DVD), and when in stop mode of DVD source. 72 DNX8120/DDX812...
.... 5 Sets a music CD playback. ( "1") "1": Automatically recognizes and plays back an Audio file disc, a DVD or a music CD. "R. "Manual": Allows you to turn the display off. Also, you cannot play a disc in the "1" position. 6 Returns to 48 kHz. "V. in the "SETUP 2 Setup each item 1 2 3 4 5 6 1 Moves to the "System SETUP 1" screen. 8 Sets the function of the [NAV] button. If the sampling frequency of the disc is greater than DVD), and when in stop mode of DVD source. 72 DNX8120/DDX812...
Instruction Manual
Page 76
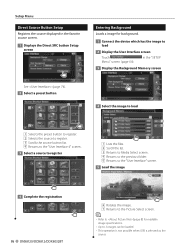
... "User Interface" screen. 5 Load the image 7 6 6 6 Rotates the image. 7 Returns to the Picture Select screen. ⁄ • Refer to (page 8) for background. 1 Connect the device which has the image to 3 images can be loaded. • This operation is not possible when USB is selected as the source. in the favorite source screen. 1 Displays the Direct SRC button Setup screen Entering Background Loads a image for readable image specifications. • Up to load 2 Display the User Interface screen Touch Menu" screen (page...
... "User Interface" screen. 5 Load the image 7 6 6 6 Rotates the image. 7 Returns to the Picture Select screen. ⁄ • Refer to (page 8) for background. 1 Connect the device which has the image to 3 images can be loaded. • This operation is not possible when USB is selected as the source. in the favorite source screen. 1 Displays the Direct SRC button Setup screen Entering Background Loads a image for readable image specifications. • Up to load 2 Display the User Interface screen Touch Menu" screen (page...
Instruction Manual
Page 80
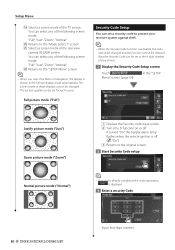
... number of these displays cannot be changed and the function cannot be set for each source. If turned "On", the burglar alarm lamp flashes when the vehicle ignition is shown in the "SETUP 1 2 Justify picture mode ("Just") Zoom picture mode ("Zoom") 3 1 Displays the Security code input screen. 2 Turns the SI function on or off . ( "On") 3 Returns to protect your choice. 1 Display the Security Code Setup screen Touch Menu" screen (page 64). The screen mode of your receiver system against...
... number of these displays cannot be changed and the function cannot be set for each source. If turned "On", the burglar alarm lamp flashes when the vehicle ignition is shown in the "SETUP 1 2 Justify picture mode ("Just") Zoom picture mode ("Zoom") 3 1 Displays the Security code input screen. 2 Turns the SI function on or off . ( "On") 3 Returns to protect your choice. 1 Display the Security Code Setup screen Touch Menu" screen (page 64). The screen mode of your receiver system against...

Instruction Manual
Page 84
... code number as you are requested to input the code once more. 84 DNX8120/DDX812/DDX8032BT Parental Lock function is now set to on or off , and the display returns to complete beforehand. 2 Enter the code number Enter the same code number as you input in . Sirius Parental Lock Setup Sets a Sirius Parental Lock function on or off . 1 Display the Parental Code screen Sirius Parental code is now set, and the display returns to SIRIUS SETUP screen. ⁄ • You need to SIRIUS SETUP screen...
... code number as you are requested to input the code once more. 84 DNX8120/DDX812/DDX8032BT Parental Lock function is now set to on or off , and the display returns to complete beforehand. 2 Enter the code number Enter the same code number as you input in . Sirius Parental Lock Setup Sets a Sirius Parental Lock function on or off . 1 Display the Parental Code screen Sirius Parental code is now set, and the display returns to SIRIUS SETUP screen. ⁄ • You need to SIRIUS SETUP screen...

Instruction Manual
Page 94
..." • "USER" 2 Switches to the "Audio Control Menu" screen. 94 DNX8120/DDX812/DDX8032BT Audio Control Zone Control You can set the front and rear audio source. 1 Display Zone Control Touch in the "Audio Control Menu" screen (page 92). 2 1 Displays the current source. 2 Returns to the "Audio Control Menu" screen. 2 Set the Zone Control 3 4 5 5 6 7 3 Turns the Zone Function (that sets different source sounds for front and rear speakers) On or Off. 4 Switches the front and rear audio sources. (This button appears when the Zone function is On.) Use "Reverse" to change over the...
..." • "USER" 2 Switches to the "Audio Control Menu" screen. 94 DNX8120/DDX812/DDX8032BT Audio Control Zone Control You can set the front and rear audio source. 1 Display Zone Control Touch in the "Audio Control Menu" screen (page 92). 2 1 Displays the current source. 2 Returns to the "Audio Control Menu" screen. 2 Set the Zone Control 3 4 5 5 6 7 3 Turns the Zone Function (that sets different source sounds for front and rear speakers) On or Off. 4 Switches the front and rear audio sources. (This button appears when the Zone function is On.) Use "Reverse" to change over the...
Instruction Manual
Page 105
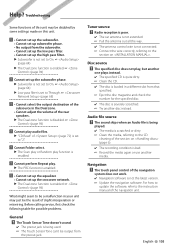
... Dual zone. • Cannot adjust the volume of the navigation unit. Tuner source ? Audio file source ? Help? Cannot set to "2". ! Before calling service, first check the following table for the specified disc. ✔ The disc is enabled. ! For how to update the software, refer to the section on . Cannot play function is severely scratched. ☞ Try another media. Radio reception is poor. ✔ The car antenna is not extended. ☞ Pull...
... Dual zone. • Cannot adjust the volume of the navigation unit. Tuner source ? Audio file source ? Help? Cannot set to "2". ! Before calling service, first check the following table for the specified disc. ✔ The disc is enabled. ! For how to update the software, refer to the section on . Cannot play function is severely scratched. ☞ Try another media. Radio reception is poor. ✔ The car antenna is not extended. ☞ Pull...
Instruction Manual
Page 106
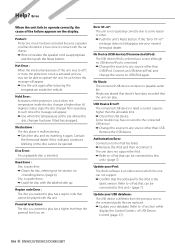
...;67" message does not disappear, see your iPod: The iPod's software is upside down. ➡ Load the disc with the car chassis. ➡ Wire or insulate the speaker cord as a source although no playable audio file. Media was played that doesn't have occurred to the connected USB device. ➡ Change the source to operate the unit. Some trouble may not be able to any source other . ➡ Push the unit's Reset button. Help? Error When the unit fails...
...;67" message does not disappear, see your iPod: The iPod's software is upside down. ➡ Load the disc with the car chassis. ➡ Wire or insulate the speaker cord as a source although no playable audio file. Media was played that doesn't have occurred to the connected USB device. ➡ Change the source to operate the unit. Some trouble may not be able to any source other . ➡ Push the unit's Reset button. Help? Error When the unit fails...
Installation Manual
Page 3
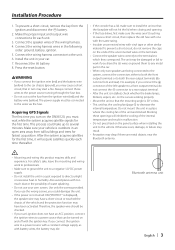
... wiring harness. 4. Install the unit in turn on the ends of water splashing. • Do not use the wrong screws, you must be damaged or fail to a front output terminal, do not remove the caps on the DNX8120, you could take up to the power source running through the fuse box. • Do not cut out the fuse from the ignition wire (red) and the battery wire...
... wiring harness. 4. Install the unit in turn on the ends of water splashing. • Do not use the wrong screws, you must be damaged or fail to a front output terminal, do not remove the caps on the DNX8120, you could take up to the power source running through the fuse box. • Do not cut out the fuse from the ignition wire (red) and the battery wire...
Installation Manual
Page 4
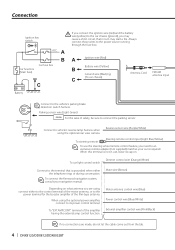
...the external amp control function. Always connect those wires to an exclusive remote adapter (not supplied) matches your navigation manual. When using the optional rear view camera. terminal of the film-type antenna. Mute wire (Brown) Depending on . Motor antenna control wire (Blue) Power control wire (Blue/White) External amplifier control wire (Pink/Black) If no connections are using, connect either the telephone rings or during conversation. Reveres sensor wire (Purple/White) To steering remote Steering remote control input (Light Blue/Yellow) To use , leave its power...
...the external amp control function. Always connect those wires to an exclusive remote adapter (not supplied) matches your navigation manual. When using the optional rear view camera. terminal of the film-type antenna. Mute wire (Brown) Depending on . Motor antenna control wire (Blue) Power control wire (Blue/White) External amplifier control wire (Pink/Black) If no connections are using, connect either the telephone rings or during conversation. Reveres sensor wire (Purple/White) To steering remote Steering remote control input (Light Blue/Yellow) To use , leave its power...


