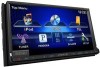
Instruction Manual
Page 2
...50 Memorizing/recalling the settings 54 Locking the settings 54 Adjusting the touch position 54 BLUETOOTH OPERATIONS (Only for DDX790/DDX770/DDX7070BT/ DDX470/DDX4070BT) Information for using Bluetooth® devices 55 Bluetooth operations 55 Connecting Bluetooth devices 56 Setting ...Operations from the remote controller 67 REFERENCE Maintenance 71 More about this unit 72 Troubleshooting 74 Accessories/Installation Procedure 79 Connecting Wires to Terminals...... 81 Connecting a USB device/iPod/ iPhone 82 Connecting Other Products........... 83 Installing/Removing the Unit........ 84...
...50 Memorizing/recalling the settings 54 Locking the settings 54 Adjusting the touch position 54 BLUETOOTH OPERATIONS (Only for DDX790/DDX770/DDX7070BT/ DDX470/DDX4070BT) Information for using Bluetooth® devices 55 Bluetooth operations 55 Connecting Bluetooth devices 56 Setting ...Operations from the remote controller 67 REFERENCE Maintenance 71 More about this unit 72 Troubleshooting 74 Accessories/Installation Procedure 79 Connecting Wires to Terminals...... 81 Connecting a USB device/iPod/ iPhone 82 Connecting Other Products........... 83 Installing/Removing the Unit........ 84...
Instruction Manual
Page 3
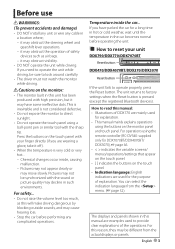
...such environments. Cautions on the monitor panel and touch panel. How to read this unit has been produced with your unit DDX790/DDX770/DDX7070BT Reset button DDX470/DDX4070BT/DDX370/DDX3070 Reset button If the unit fails to provide clear explanations of the operations. it may ...indication language from the actual displays or panels. Before use WARNINGS: (To prevent accidents and damage) • DO NOT install any unit or wire any complicated operations. Pictures may obstruct visibility. • DO NOT operate the unit while driving. it off ). • When the temperature ...
...such environments. Cautions on the monitor panel and touch panel. How to read this unit has been produced with your unit DDX790/DDX770/DDX7070BT Reset button DDX470/DDX4070BT/DDX370/DDX3070 Reset button If the unit fails to provide clear explanations of the operations. it may ...indication language from the actual displays or panels. Before use WARNINGS: (To prevent accidents and damage) • DO NOT install any unit or wire any complicated operations. Pictures may obstruct visibility. • DO NOT operate the unit while driving. it off ). • When the temperature ...
Instruction Manual
Page 39
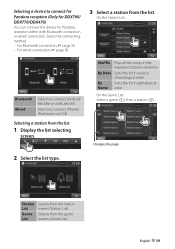
... list 1 Display the list selecting screen. On the Station List: Bluetooth Wired Selects to connect Android/ BlackBerry via USB. Selects to connect for Pandora reception (Only for DDX790/ DDX770/DDX470) You can connect the device for Pandora reception either with Bluetooth connection... or wired connection. Selecting a station from the station names (Station List). English 39 Selecting a device...
... list 1 Display the list selecting screen. On the Station List: Bluetooth Wired Selects to connect Android/ BlackBerry via USB. Selects to connect for Pandora reception (Only for DDX790/ DDX770/DDX470) You can connect the device for Pandora reception either with Bluetooth connection... or wired connection. Selecting a station from the station names (Station List). English 39 Selecting a device...

Instruction Manual
Page 74
... a service center. • For operations with the external components, refer also to the instructions supplied with the adapters used for DDX790/DDX770/DDX7070BT/DDX470/DDX4070BT) Message Remedy/Cause "No BT Dongle" The Bluetooth adapter (KS-UBT1) is registered but the connection has failed. ..." Dialing has failed. If the message does not disappear, turn on the unit, then connect the device again (or reset the unit). Wire or insulate the speaker cord as the instructions supplied with the external components). Connect the registered device. (☞ page 57) "Please Wait..."...
... a service center. • For operations with the external components, refer also to the instructions supplied with the adapters used for DDX790/DDX770/DDX7070BT/DDX470/DDX4070BT) Message Remedy/Cause "No BT Dongle" The Bluetooth adapter (KS-UBT1) is registered but the connection has failed. ..." Dialing has failed. If the message does not disappear, turn on the unit, then connect the device again (or reset the unit). Wire or insulate the speaker cord as the instructions supplied with the external components). Connect the registered device. (☞ page 57) "Please Wait..."...
Instruction Manual
Page 79
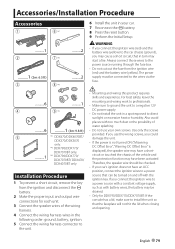
.............2 ..........6 ..........1 4 9 *3 ..........6 ..........1 (3m: 9.8 ft) 5 *1 DDX470/DDX4070BT/ DDX370/DDX3070 only. *2 DDX790/DDX770/ DDX7070BT only. ..........1 *3 DDX790/DDX770/ DDX7070BT/ DDX470/ DDX4070BT only. Use only the screws provided. English 79 Therefore, the speaker wire should be checked. • If your car's ignition does not have been activated. Always connect those...the ignition and disconnect the · battery. 2 Make the proper input and output wire connections for DDX790/DDX770/DDX7070BT: If the console has a lid, make sure to install the unit so...
.............2 ..........6 ..........1 4 9 *3 ..........6 ..........1 (3m: 9.8 ft) 5 *1 DDX470/DDX4070BT/ DDX370/DDX3070 only. *2 DDX790/DDX770/ DDX7070BT only. ..........1 *3 DDX790/DDX770/ DDX7070BT/ DDX470/ DDX4070BT only. Use only the screws provided. English 79 Therefore, the speaker wire should be checked. • If your car's ignition does not have been activated. Always connect those...the ignition and disconnect the · battery. 2 Make the proper input and output wire connections for DDX790/DDX770/DDX7070BT: If the console has a lid, make sure to install the unit so...
Instruction Manual
Page 80
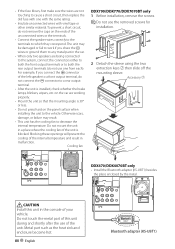
... fuse with vinyl tape or other similar material. To prevent a short circuit, do not use one with the same rating. • Insulate unconnected wires with one from each). Accessory 7 DDX470/DDX4070BT only • Install the Bluetooth adapter (KS-UBT1) besides the place enclosed by the metal. &#...blinkers, wipers, etc. Do not touch the metal part of this unit in a place where the cooling fan of your vehicle. Cooling fan DDX790/DDX770/DDX7070BT only 1 Before installation, remove the screws. ⁄ Do not use of the internal temperature and result in the car. • When ...
... fuse with vinyl tape or other similar material. To prevent a short circuit, do not use one with the same rating. • Insulate unconnected wires with one from each). Accessory 7 DDX470/DDX4070BT only • Install the Bluetooth adapter (KS-UBT1) besides the place enclosed by the metal. &#...blinkers, wipers, etc. Do not touch the metal part of this unit in a place where the cooling fan of your vehicle. Cooling fan DDX790/DDX770/DDX7070BT only 1 Before installation, remove the screws. ⁄ Do not use of the internal temperature and result in the car. • When ...
Instruction Manual
Page 81
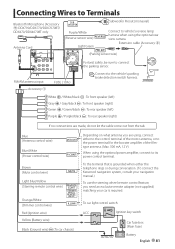
...connect to vehicle's reverse lamp harness when using , connect either the telephone rings or during conversation. (To connect the Kenwood navigation system, consult your navigation manual.) To use the steering wheel remote control feature, you need an exclusive remote adapter... 1 FUSE ( 10A ) ⁄ Connect to connect the parking sensor. Connecting Wires to Terminals Bluetooth Microphone (Accessory 9) DDX790/DDX770/DDX7070BT/ DDX470/DDX4070BT only Antenna Cord Subwoofer Preout (monaural) Purple/White (Reverse sensor wire) Light Green Connect to its power control terminal.
...connect to vehicle's reverse lamp harness when using , connect either the telephone rings or during conversation. (To connect the Kenwood navigation system, consult your navigation manual.) To use the steering wheel remote control feature, you need an exclusive remote adapter... 1 FUSE ( 10A ) ⁄ Connect to connect the parking sensor. Connecting Wires to Terminals Bluetooth Microphone (Accessory 9) DDX790/DDX770/DDX7070BT/ DDX470/DDX4070BT only Antenna Cord Subwoofer Preout (monaural) Purple/White (Reverse sensor wire) Light Green Connect to its power control terminal.
Instruction Manual
Page 85
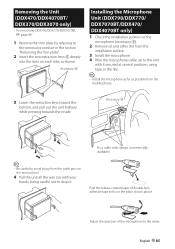
... unit halfway while pressing towards the inside. English 85 Removing the Unit (DDX470/DDX4070BT/ DDX370/DDX3070 only) • For removing DDX790/DDX770/DDX7070BT, ☞ page 80. 1 Remove the trim plate by referring to the driver. Accessory 6 Installing the Microphone Unit (DDX790... plate". 2 Insert the two extraction keys 6 deeply into the slots on each side, as possible from the installation surface. 3 Install the microphone. 4 Wire the microphone cable up to drop it secured at several positions using tape or the like. ⁄ • Install the microphone as far as shown....
... unit halfway while pressing towards the inside. English 85 Removing the Unit (DDX470/DDX4070BT/ DDX370/DDX3070 only) • For removing DDX790/DDX770/DDX7070BT, ☞ page 80. 1 Remove the trim plate by referring to the driver. Accessory 6 Installing the Microphone Unit (DDX790... plate". 2 Insert the two extraction keys 6 deeply into the slots on each side, as possible from the installation surface. 3 Install the microphone. 4 Wire the microphone cable up to drop it secured at several positions using tape or the like. ⁄ • Install the microphone as far as shown....


