
Instruction Manual
Page 6
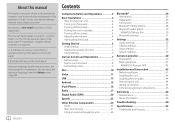
...External Components 25 AV-IN 25 Rear view camera 25 Using an external navigation unit 26 Bluetooth 26 Information 26 Preparation 26 Connection 26 Bluetooth mobile phone 28 Bluetooth audio player 30 KENWOOD Music Mix 30 Bluetooth settings 31 Settings 32 Audio settings 32 Display settings... 35 Input settings 37 System settings 37 Remote Controller 40 Preparation 40 Basic operations 41 KENWOOD Remote APP 42 Installation and Connection 43 Before installation 43 Installing the unit 44 Installing the trim plate 44 Removing the ...
...External Components 25 AV-IN 25 Rear view camera 25 Using an external navigation unit 26 Bluetooth 26 Information 26 Preparation 26 Connection 26 Bluetooth mobile phone 28 Bluetooth audio player 30 KENWOOD Music Mix 30 Bluetooth settings 31 Settings 32 Audio settings 32 Display settings... 35 Input settings 37 System settings 37 Remote Controller 40 Preparation 40 Basic operations 41 KENWOOD Remote APP 42 Installation and Connection 43 Before installation 43 Installing the unit 44 Installing the trim plate 44 Removing the ...

Instruction Manual
Page 7
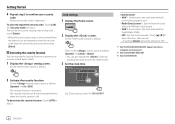
Component Names and Operations DDX4018DAB/DDX4018BT 8 TEL/VOICE button • TEL (Press): Displays the phone control screen. • VOICE (Hold): Activates voice dialing. 9 Volume/MENU/ATT knob • Volume (Turn): ...; Resets the unit. • Lights up the short-cut menu. • ATT (Hold): Attenuates the sound. * When the navigation unit is connected, the screen is switched between the current source and the navigation screen. (Page 46) 1 Reset button/Power indicator/Security indicator • Resets the unit. • Lights up while the unit...
Component Names and Operations DDX4018DAB/DDX4018BT 8 TEL/VOICE button • TEL (Press): Displays the phone control screen. • VOICE (Hold): Activates voice dialing. 9 Volume/MENU/ATT knob • Volume (Turn): ...; Resets the unit. • Lights up the short-cut menu. • ATT (Hold): Attenuates the sound. * When the navigation unit is connected, the screen is switched between the current source and the navigation screen. (Page 46) 1 Reset button/Power indicator/Security indicator • Resets the unit. • Lights up while the unit...
Instruction Manual
Page 10
Now, your security code is connected. *2 Only for DDX4018BT/DDX318BT. *3 Only for DDX4018DAB/DDX4018BT: Appears only when a navigation unit is registered. Then, enter the current security code to clear and touch [Enter]. • When the unit has been reset... Synchronizes the clock time with the Digital Radio (DAB). • OFF: Sets the clock manually. Touching [Reset] will set the minute to "00". *1 Only for DDX4018DAB. 2 Activate the security function. E.g. Getting Started 4 Repeat step 3 to enter the security code. On the Home screen, touch as follows: [System] :...
Now, your security code is connected. *2 Only for DDX4018BT/DDX318BT. *3 Only for DDX4018DAB/DDX4018BT: Appears only when a navigation unit is registered. Then, enter the current security code to clear and touch [Enter]. • When the unit has been reset... Synchronizes the clock time with the Digital Radio (DAB). • OFF: Sets the clock manually. Touching [Reset] will set the minute to "00". *1 Only for DDX4018DAB. 2 Activate the security function. E.g. Getting Started 4 Repeat step 3 to enter the security code. On the Home screen, touch as follows: [System] :...

Instruction Manual
Page 11
...radio broadcast. To change the page: Touch [ ]/[ ]. Touching the operation keys performs the following actions: [NAV]*1 Displays the navigation screen when a navigation unit is connected. *2 Only for DDX4018BT Touching the operation keys performs the following actions: 1 Displays all playback sources and options.... of the screen. Current page is shown by the page indication on the source/option selection screen. *1 Only for DDX4018DAB/DDX4018BT: Selectable only when a navigation unit is connected. [DISC] Plays a disc. [USB] Plays files on the power for the first time, the...
...radio broadcast. To change the page: Touch [ ]/[ ]. Touching the operation keys performs the following actions: [NAV]*1 Displays the navigation screen when a navigation unit is connected. *2 Only for DDX4018BT Touching the operation keys performs the following actions: 1 Displays all playback sources and options.... of the screen. Current page is shown by the page indication on the source/option selection screen. *1 Only for DDX4018DAB/DDX4018BT: Selectable only when a navigation unit is connected. [DISC] Plays a disc. [USB] Plays files on the power for the first time, the...
Instruction Manual
Page 30
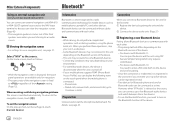
...Preparation Connect and install the microphone beforehand. Note • While driving, do not perform complicated operations such as follows: • While the navigation screen is connected. - For details, see page 37. On the Home screen, touch as dialing numbers, using SSP (Secure Simple Pairing...the front speakers even when you reset the unit. Other External Components Bluetooth® Using an external navigation unit (Only for DDX4018DAB/DDX4018BT) You can connect an external navigation unit (KNA-610 or KNA-G620T: optional accessory) to the NAV input terminal so that you ...
...Preparation Connect and install the microphone beforehand. Note • While driving, do not perform complicated operations such as follows: • While the navigation screen is connected. - For details, see page 37. On the Home screen, touch as dialing numbers, using SSP (Secure Simple Pairing...the front speakers even when you reset the unit. Other External Components Bluetooth® Using an external navigation unit (Only for DDX4018DAB/DDX4018BT) You can connect an external navigation unit (KNA-610 or KNA-G620T: optional accessory) to the NAV input terminal so that you ...

Instruction Manual
Page 32
... signal strength and battery level are displayed when the information is acquired from the rear view camera is displayed. • When receiving a call during navigation guidance (only for DDX4018DAB/DDX4018BT), the screen is in ... During a call . • Call information is displayed if acquired. • Phone operation is not available while the picture... select [Connection] (2). 3 Select the device (1) to connect, then return to the (2). To delete the registered device: Perform step 1, select the device you want to the navigation screen, touch [ ]. Touch [Yes].
... signal strength and battery level are displayed when the information is acquired from the rear view camera is displayed. • When receiving a call during navigation guidance (only for DDX4018DAB/DDX4018BT), the screen is in ... During a call . • Call information is displayed if acquired. • Phone operation is not available while the picture... select [Connection] (2). 3 Select the device (1) to connect, then return to the (2). To delete the registered device: Perform step 1, select the device you want to the navigation screen, touch [ ]. Touch [Yes].

Instruction Manual
Page 36
...• DivX/MPEG1/MPEG2/MP3/WMA/WAV/AAC/FLAC You cannot adjust the sound when the unit is in the following adjustments are stored for DDX4018DAB/DDX4018BT. Select the enhance level. • OFF (Initial)/Small/Medium/Large Adjusts loudness. • OFF (Initial)/Low/High Selects the bass ...the width of other bands. * Not adjustable when is used (making or receiving a call, during a call, or while voice dialling). • During navigation guidance* * Only for each source until you adjust the sound again. The following situations: • When the AV source is turned off. • ...
...• DivX/MPEG1/MPEG2/MP3/WMA/WAV/AAC/FLAC You cannot adjust the sound when the unit is in the following adjustments are stored for DDX4018DAB/DDX4018BT. Select the enhance level. • OFF (Initial)/Small/Medium/Large Adjusts loudness. • OFF (Initial)/Low/High Selects the bass ...the width of other bands. * Not adjustable when is used (making or receiving a call, during a call, or while voice dialling). • During navigation guidance* * Only for each source until you adjust the sound again. The following situations: • When the AV source is turned off. • ...

Instruction Manual
Page 39
... the captured image may look different from that of the actual scene. : Change the background design. *: Change the illumination color of the connected navigation unit. * Only for each source. While playing a video or picture, you turn on the monitor panel • You can change the source.... • -15 to +6 (Initial: 00) Display settings Display the screen. The adjustment is stored for DDX4018DAB/DDX4018BT. You can also adjust the illumination color yourself. If the source is a disc, the adjustment is saved in [User]. • Selecting [Scan...
... the captured image may look different from that of the actual scene. : Change the background design. *: Change the illumination color of the connected navigation unit. * Only for each source. While playing a video or picture, you turn on the monitor panel • You can change the source.... • -15 to +6 (Initial: 00) Display settings Display the screen. The adjustment is stored for DDX4018DAB/DDX4018BT. You can also adjust the illumination color yourself. If the source is a disc, the adjustment is saved in [User]. • Selecting [Scan...

Instruction Manual
Page 41
... for DDX4018BT Configure the rear view camera settings. • ON: Displays the picture from moving. Input settings screen for DDX4018DAB/DDX4018BT) Change the navigation settings. To remove the caution message, touch the screen. • OFF (Initial): Select this when no camera is connected... A caution message appears on . Select which front speakers are the same length. • Touch and hold [Initialize ] for the navigation unit. Select the mark (1), then adjust the position of the selected mark (2). • ON (Initial): Attenuates the sound coming out...
... for DDX4018BT Configure the rear view camera settings. • ON: Displays the picture from moving. Input settings screen for DDX4018DAB/DDX4018BT) Change the navigation settings. To remove the caution message, touch the screen. • OFF (Initial): Select this when no camera is connected... A caution message appears on . Select which front speakers are the same length. • Touch and hold [Initialize ] for the navigation unit. Select the mark (1), then adjust the position of the selected mark (2). • ON (Initial): Attenuates the sound coming out...

Instruction Manual
Page 45
... battery, or place it will not move during braking or other operations. Answers incoming calls. Switches between the current source control screen and the navigation screen. Selects a track. J/FM+ / K/AM− Selects a folder. Slow forward/backward speed changes each time you press this key..... Switches the AV source to the current source control screen. For discs/USB/iPod: Switches to be output. R.VOL Not used for DDX4018DAB/DDX4018BT. In the unlikely event that is selected. *2 Only for this unit. *1 Available only when the AUD mode is not integrated in...
... battery, or place it will not move during braking or other operations. Answers incoming calls. Switches between the current source control screen and the navigation screen. Selects a track. J/FM+ / K/AM− Selects a folder. Slow forward/backward speed changes each time you press this key..... Switches the AV source to the current source control screen. For discs/USB/iPod: Switches to be output. R.VOL Not used for DDX4018DAB/DDX4018BT. In the unlikely event that is selected. *2 Only for this unit. *1 Available only when the AUD mode is not integrated in...

Instruction Manual
Page 49
...stripe (output A) Brown Yellow (Battery wire) Red (Ignition wire) Red (A7) Yellow (A4) Connector A Connector B Note: Total ouput for DDX4018DAB/ DDX4018BT. *4 If no connections are made, do not let the cable come out from the tab. USB input terminal (1 m) To the car...when either the telephone rings or during conversation. (To connect the Kenwood navigation system, consult your navigation manual.)*3 Connecting the ISO connectors You may need to the aerial terminal/DAB aerial input *1 Only for DDX4018BT/ DDX318BT. *2 Only for DDX4018DAB. *3 Only for blue with white stripe wires (output A ...
...stripe (output A) Brown Yellow (Battery wire) Red (Ignition wire) Red (A7) Yellow (A4) Connector A Connector B Note: Total ouput for DDX4018DAB/ DDX4018BT. *4 If no connections are made, do not let the cable come out from the tab. USB input terminal (1 m) To the car...when either the telephone rings or during conversation. (To connect the Kenwood navigation system, consult your navigation manual.)*3 Connecting the ISO connectors You may need to the aerial terminal/DAB aerial input *1 Only for DDX4018BT/ DDX318BT. *2 Only for DDX4018DAB. *3 Only for blue with white stripe wires (output A ...

Instruction Manual
Page 50
... damaged. Handling discs • Do not touch the recording surface of the car; Contact your KENWOOD dealer for details. 3 Microphone input (MIC) (Page 45) 4 Audio video input (AV-...crossover: REAR: Tweeter preouts FRONT: Mid range speaker preouts SW: Woofer preouts *1 Only for DDX4018DAB/DDX4018BT. *2 When connecting an external amplifier, connect its ground wire to the car's steering ...(.wma), WAV (.wav), AAC (.m4a) - Installation and Connection Connecting external components 1 Navigation input (NAV)*1 2 Steering wheel remote controller input (REMO-IN)*1 • Connect to the chassis ...
... damaged. Handling discs • Do not touch the recording surface of the car; Contact your KENWOOD dealer for details. 3 Microphone input (MIC) (Page 45) 4 Audio video input (AV-...crossover: REAR: Tweeter preouts FRONT: Mid range speaker preouts SW: Woofer preouts *1 Only for DDX4018DAB/DDX4018BT. *2 When connecting an external amplifier, connect its ground wire to the car's steering ...(.wma), WAV (.wav), AAC (.m4a) - Installation and Connection Connecting external components 1 Navigation input (NAV)*1 2 Steering wheel remote controller input (REMO-IN)*1 • Connect to the chassis ...


