User Manual
Page 2
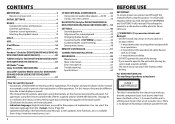
... it may obstruct the operation of the operations. V WARNINGS: (To prevent accidents and damage) • DO NOT install any unit or wire any cable in this manual. If you read and observe WARNINGS and CAUTIONS in a location where; - The label is utilizing laser beams that...COMPONENTS 32 Using external audio/video players-AV-IN ........32 Using a rear view camera 33 BLUETOOTH (Only for DDX672BH/DDX492/ DDX415BT/DDX392/DDX372BT/DDX320BT).... 34 SETTINGS 42 Sound adjustment 42 Adjustment for the purpose of explanation. For this product. The displays and panels shown in ...
... it may obstruct the operation of the operations. V WARNINGS: (To prevent accidents and damage) • DO NOT install any unit or wire any cable in this manual. If you read and observe WARNINGS and CAUTIONS in a location where; - The label is utilizing laser beams that...COMPONENTS 32 Using external audio/video players-AV-IN ........32 Using a rear view camera 33 BLUETOOTH (Only for DDX672BH/DDX492/ DDX415BT/DDX392/DDX372BT/DDX320BT).... 34 SETTINGS 42 Sound adjustment 42 Adjustment for the purpose of explanation. For this product. The displays and panels shown in ...

User Manual
Page 20
... screen 1 2 34 Playback information 1 Picture data (Shown if available from current content and when iPod touch/iPhone is connected via a wired connection or from iPod touch/ iPhone via USB) 2 Track information • Pressing [ When the connection is established, the Pandora application ... using Pandora on the screen. (Page 36) "Connected" appears. Playback operations You can only be used with DDX672BH/DDX492/DDX392/DDX372BT/ DDX320BT. For Android/BlackBerry 1 Pair the Android/BlackBerry device through Bluetooth. • Install the latest version of the Pandora application...
... screen 1 2 34 Playback information 1 Picture data (Shown if available from current content and when iPod touch/iPhone is connected via a wired connection or from iPod touch/ iPhone via USB) 2 Track information • Pressing [ When the connection is established, the Pandora application ... using Pandora on the screen. (Page 36) "Connected" appears. Playback operations You can only be used with DDX672BH/DDX492/DDX392/DDX372BT/ DDX320BT. For Android/BlackBerry 1 Pair the Android/BlackBerry device through Bluetooth. • Install the latest version of the Pandora application...
User Manual
Page 53
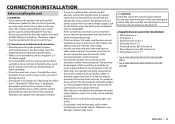
... fuse with one with the same rating. • Insulate unconnected wires with the ignition key. The power supply must be drained. • Only for DDX672BH/DDX492/DDX415BT/DDX392/DDX372BT/ DDX320BT. Use only the screws provided. V Precautions on the panel... become hot. ❏ Supplied accessories for installation 1 Wiring harness x 1 2 Trim plate x 1 3 Extension wire (2 m) x 1 4 Extraction keys x 2 *1 5 Flat head screws (M5 x 8 mm) x 6 6 Round head screws (M5 x 8 mm) x 6 7 Microphone (3 m) x 1 *2 *1 Only for DDX672BH/DDX492/DDX392/DDX372BT/DDX320BT/ DDX272. *2 Only for DDX672BH: If the ...
... fuse with one with the same rating. • Insulate unconnected wires with the ignition key. The power supply must be drained. • Only for DDX672BH/DDX492/DDX415BT/DDX392/DDX372BT/ DDX320BT. Use only the screws provided. V Precautions on the panel... become hot. ❏ Supplied accessories for installation 1 Wiring harness x 1 2 Trim plate x 1 3 Extension wire (2 m) x 1 4 Extraction keys x 2 *1 5 Flat head screws (M5 x 8 mm) x 6 6 Round head screws (M5 x 8 mm) x 6 7 Microphone (3 m) x 1 *2 *1 Only for DDX672BH/DDX492/DDX392/DDX372BT/DDX320BT/ DDX272. *2 Only for DDX672BH: If the ...
User Manual
Page 54
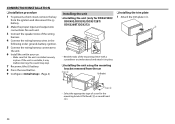
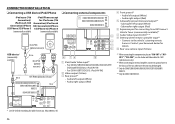
... the · DDX492/DDX392/DDX372BT/ battery. from the car 5 or 6 Car Bracket 5 or 6 • Select the appropriate type of the wiring harness. 4 Connect the wiring harness wires in the following order: ground, battery, ignition. 5 Connect the wiring harness connector to the unit....sure that the unit is installed securely in place. DDX320BT/DDX272) 2 Make the proper input and output wire 2 connections for each unit. 3 Connect the speaker wires of screw for DDX672BH/ 1 Attach the trim plate (2). CONNECTION/INSTALLATION ❏ Installation procedure Installing the...
... the · DDX492/DDX392/DDX372BT/ battery. from the car 5 or 6 Car Bracket 5 or 6 • Select the appropriate type of the wiring harness. 4 Connect the wiring harness wires in the following order: ground, battery, ignition. 5 Connect the wiring harness connector to the unit....sure that the unit is installed securely in place. DDX320BT/DDX272) 2 Make the proper input and output wire 2 connections for each unit. 3 Connect the speaker wires of screw for DDX672BH/ 1 Attach the trim plate (2). CONNECTION/INSTALLATION ❏ Installation procedure Installing the...
User Manual
Page 55
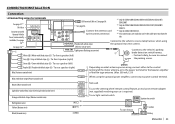
... A fuse USB terminal (0.8 m): See page 56. Brown (Mute control wire) Not used. Connect SiriusXM Connect Vehicle Tuner (commercially Connect the antenna cord to the antenna terminal. *3 Only for DDX672BH/DDX492/DDX392/DDX372BT/DDX320BT/ DDX272. See page 56. *1 Only for DDX672BH/DDX492/DDX415BT/DDX392/DDX372BT/ DDX320BT. *2 Only for DDX415BT/DDX315. *4 If no connections are...
... A fuse USB terminal (0.8 m): See page 56. Brown (Mute control wire) Not used. Connect SiriusXM Connect Vehicle Tuner (commercially Connect the antenna cord to the antenna terminal. *3 Only for DDX672BH/DDX492/DDX392/DDX372BT/DDX320BT/ DDX272. See page 56. *1 Only for DDX672BH/DDX492/DDX415BT/DDX392/DDX372BT/ DDX320BT. *2 Only for DDX415BT/DDX315. *4 If no connections are...
User Manual
Page 56
Contact your Kenwood dealer for extending the cable if necessary. (Max 500 mA, 5V) 56 otherwise the unit may be damaged. *3 Only for DDX672BH/DDX492/DDX392/DDX372BT/DDX320BT/ DDX272. *4 Only for DDX415BT/DDX315. * Use CA-U1EX for details. 9 Rear view camera input (Yellow) *1... When connecting the component to play on "AV-IN" or "AVIN1" /"AV-IN2", use the Audio and Video cable CA-C3AV (optional accessory). *2 When connecting an external amplifier, connect its ground wire...
Contact your Kenwood dealer for extending the cable if necessary. (Max 500 mA, 5V) 56 otherwise the unit may be damaged. *3 Only for DDX672BH/DDX492/DDX392/DDX372BT/DDX320BT/ DDX272. *4 Only for DDX415BT/DDX315. * Use CA-U1EX for details. 9 Rear view camera input (Yellow) *1... When connecting the component to play on "AV-IN" or "AVIN1" /"AV-IN2", use the Audio and Video cable CA-C3AV (optional accessory). *2 When connecting an external amplifier, connect its ground wire...

User Manual
Page 61
... Slovak ZU Zulu SL Slovenian SM Samoan SN Shona Error message list If an error occurs while using the unit, a message appears. Reset the unit. Wire or insulate the speaker cord as appropriate, then reset the unit. (Pages 3 and 55) "Parking Off": • No playback picture is shown when the parking...
... Slovak ZU Zulu SL Slovenian SM Samoan SN Shona Error message list If an error occurs while using the unit, a message appears. Reset the unit. Wire or insulate the speaker cord as appropriate, then reset the unit. (Pages 3 and 55) "Parking Off": • No playback picture is shown when the parking...


