
Instruction Manual
Page 1
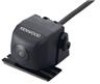
... number US Residence Only Register Online Register your new Universal Camera. CMOS-300 CMOS-200 UNIVERSAL MULTI-VIEW CAMERA/ UNIVERSAL REAR VIEW CAMERA INSTRUCTION MANUAL CAMÉRA MULTI-VUES UNIVERSELLE/ CAMÉRA DE RECUL UNIVERSELLE MODE D'EMPLOI UNIVERSAL MULTIVIEW-KAMERA/ UNIVERSAL RÜ...and serial numbers whenever you obtain the best performance from your Kenwood product at www.Kenwoodusa.com © B64-4756-18/01 (W) Familiarity with installation and operation procedures will help you call upon your Kenwood dealer for information or service on the warranty card, and in...
... number US Residence Only Register Online Register your new Universal Camera. CMOS-300 CMOS-200 UNIVERSAL MULTI-VIEW CAMERA/ UNIVERSAL REAR VIEW CAMERA INSTRUCTION MANUAL CAMÉRA MULTI-VUES UNIVERSELLE/ CAMÉRA DE RECUL UNIVERSELLE MODE D'EMPLOI UNIVERSAL MULTIVIEW-KAMERA/ UNIVERSAL RÜ...and serial numbers whenever you obtain the best performance from your Kenwood product at www.Kenwoodusa.com © B64-4756-18/01 (W) Familiarity with installation and operation procedures will help you call upon your Kenwood dealer for information or service on the warranty card, and in...

Instruction Manual
Page 3
... Double-side adhesive tape (Large)..........1 Power cord ..........1 Waterproof packing ..........1 Camera bracket clamping screw..........1 CMOS-300 only Switch unit..........1 Double-side adhesive tape (Small) ..........1 Head unit connection cord ..........1 The...circuit, do not remove the caps on the unit. • Refer to the Instruction's manual for connection to the vehicle body. • When replacing the fuse, be splashed by ...be sure to use only fuse of the wiring short-circuiting to a Kenwood car navigation system equipped etc. If the insulation of the wiring melts ...
... Double-side adhesive tape (Large)..........1 Power cord ..........1 Waterproof packing ..........1 Camera bracket clamping screw..........1 CMOS-300 only Switch unit..........1 Double-side adhesive tape (Small) ..........1 Head unit connection cord ..........1 The...circuit, do not remove the caps on the unit. • Refer to the Instruction's manual for connection to the vehicle body. • When replacing the fuse, be splashed by ...be sure to use only fuse of the wiring short-circuiting to a Kenwood car navigation system equipped etc. If the insulation of the wiring melts ...

Instruction Manual
Page 4
...position. Installing the Camera/Adjusting its angle 1 Decide the camera installation position. 2 Clean the camera installation surface. Make sure that the "KENWOOD" logo appears at the top. Recommended Installation Position Examples of 55 cm (21.7 inch) or more. Bend Adjust the camera bracket .../CMOS-200 Mount so that the camera points straight toward other directions of the vehicle, etc. 7 Complete all of the vehicle travel direction. Attach the camera on which the camera bracket is to the external video input function. For details, read the instruction manual for your video...
...position. Installing the Camera/Adjusting its angle 1 Decide the camera installation position. 2 Clean the camera installation surface. Make sure that the "KENWOOD" logo appears at the top. Recommended Installation Position Examples of 55 cm (21.7 inch) or more. Bend Adjust the camera bracket .../CMOS-200 Mount so that the camera points straight toward other directions of the vehicle, etc. 7 Complete all of the vehicle travel direction. Attach the camera on which the camera bracket is to the external video input function. For details, read the instruction manual for your video...

Instruction Manual
Page 8
... only) Switch Unit Operation The switch unit can be used to other people. 8 | CMOS-300/CMOS-200 Use the + or - Perform the setting in the setting mode. • Press and hold the view and + buttons of the switch unit simultaneously to red. ... that will not cause nuisance to switch the image display mode, view/hide the guideline display and adjust the camera. For details, read the instruction manual for camera adjustment. 1. In a parking space with white lines and tire stoppers, park the vehicle in the center of the white line frame. 2 Advance the...
... only) Switch Unit Operation The switch unit can be used to other people. 8 | CMOS-300/CMOS-200 Use the + or - Perform the setting in the setting mode. • Press and hold the view and + buttons of the switch unit simultaneously to red. ... that will not cause nuisance to switch the image display mode, view/hide the guideline display and adjust the camera. For details, read the instruction manual for camera adjustment. 1. In a parking space with white lines and tire stoppers, park the vehicle in the center of the white line frame. 2 Advance the...
Instruction Manual
Page 100
... if it is not installed and used in accordance with Canadian ICES-003. These limits are expressly approved in the instruction manual. If this equipment may cause harmful interference unless the modifications are designed to provide reasonable protection against harmful interference in a ... met betrekking tot de EMC-richtlijn van de Europese Unie (2004/108/EC) Fabrikant: Kenwood Corporation 2967-3 Ishikawa-machi, Hachioji-shi, Tokio, 192-8525 Japan EU-vertegenwoordiger: Kenwood Electronics Europe BV Amsterdamseweg 37, 1422 AC UITHOORN, Nederland Italiano Dichiarazione di conformità ...
... if it is not installed and used in accordance with Canadian ICES-003. These limits are expressly approved in the instruction manual. If this equipment may cause harmful interference unless the modifications are designed to provide reasonable protection against harmful interference in a ... met betrekking tot de EMC-richtlijn van de Europese Unie (2004/108/EC) Fabrikant: Kenwood Corporation 2967-3 Ishikawa-machi, Hachioji-shi, Tokio, 192-8525 Japan EU-vertegenwoordiger: Kenwood Electronics Europe BV Amsterdamseweg 37, 1422 AC UITHOORN, Nederland Italiano Dichiarazione di conformità ...


