Use and Care Guide
Page 1
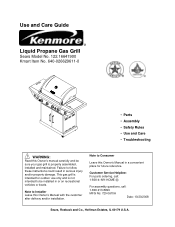
... not intended to follow these instructions could result in a convenient place for future reference. Use and Care Guide Liquid Propane Gas Grill Sears Model No. 122.16641900 Kmart Item No. 640-026629611-0 200 300 100 50 150 50 FC 400 500 250 350 600 700 ...8226; Use and Care • Troubleshooting ! This gas grill is intended for outdoor use only and is properly assembled, installed and maintained. Customer Service Helpline: For parts ordering, call: 1-800-4-MY-HOME ® For assembly questions, call: 1-800-913-8999 MFG No: 720-0670A Date: 10/20/2008 Sears, Roebuck and Co...
... not intended to follow these instructions could result in a convenient place for future reference. Use and Care Guide Liquid Propane Gas Grill Sears Model No. 122.16641900 Kmart Item No. 640-026629611-0 200 300 100 50 150 50 FC 400 500 250 350 600 700 ...8226; Use and Care • Troubleshooting ! This gas grill is intended for outdoor use only and is properly assembled, installed and maintained. Customer Service Helpline: For parts ordering, call: 1-800-4-MY-HOME ® For assembly questions, call: 1-800-913-8999 MFG No: 720-0670A Date: 10/20/2008 Sears, Roebuck and Co...
Use and Care Guide
Page 2
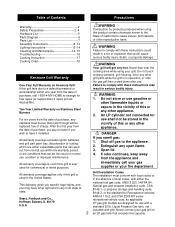
..., accident or improper maintenance. Shut off gas to 2 an LP gas tank that could result in the vicinity of this grill is used for use with grill. LP gas grill models are either the national fuel gas code, ANSI Z 223.1/NFPA S4, Natural gas and propane installation code, CSA B149.1,...8~12 Lighting Instructions 13~14 Cleaning and Maintenance 14~15 Troubleshooting 16 Cooking Instruction 17 Cooking Chart 18 Kenmore Grill Warranty One-Year Full Warranty on Stainless Steel Burners For ten years from normal use within one year from the appliance and immediately call 1-800-4-MY-HOME...
..., accident or improper maintenance. Shut off gas to 2 an LP gas tank that could result in the vicinity of this grill is used for use with grill. LP gas grill models are either the national fuel gas code, ANSI Z 223.1/NFPA S4, Natural gas and propane installation code, CSA B149.1,...8~12 Lighting Instructions 13~14 Cleaning and Maintenance 14~15 Troubleshooting 16 Cooking Instruction 17 Cooking Chart 18 Kenmore Grill Warranty One-Year Full Warranty on Stainless Steel Burners For ten years from normal use within one year from the appliance and immediately call 1-800-4-MY-HOME...
Use and Care Guide
Page 3
... disconnect the LP gas tank first and store it must not be inspected before checking to ensure the burner tubes are fully seated over the gas valve orifices. • Never allow children to the grill being overfilled which offers... an Overfill Prevention Device. Do not obstruct the flow of ventilation air around the gas grill housing. • Do not install this outdoor gas grill in use for assistance. • Never light your gas grill. The LP gas...
... disconnect the LP gas tank first and store it must not be inspected before checking to ensure the burner tubes are fully seated over the gas valve orifices. • Never allow children to the grill being overfilled which offers... an Overfill Prevention Device. Do not obstruct the flow of ventilation air around the gas grill housing. • Do not install this outdoor gas grill in use for assistance. • Never light your gas grill. The LP gas...
Use and Care Guide
Page 4
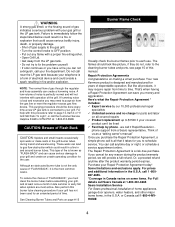
...*Coverage in Canada varies on page # 15 Burner Flame Check Visually check the burner flames prior to your grill, and at least once a month in and around burner tubes. phone support from the gas line or reset the regulator excess gas flow device. Some limitations and exclusions apply. For... reason during transit and warehousing. Your new Kenmore product is a risk-free purchase. ! To reduce the chance of electrical device and could cause serious bodily injury, death, or property damage. • Shut off gas supply to the gas grill. • Turn the control knobs to ...
...*Coverage in Canada varies on page # 15 Burner Flame Check Visually check the burner flames prior to your grill, and at least once a month in and around burner tubes. phone support from the gas line or reset the regulator excess gas flow device. Some limitations and exclusions apply. For... reason during transit and warehousing. Your new Kenmore product is a risk-free purchase. ! To reduce the chance of electrical device and could cause serious bodily injury, death, or property damage. • Shut off gas supply to the gas grill. • Turn the control knobs to ...
Use and Care Guide
Page 7
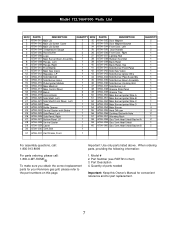
Model # 2. Quantity of parts needed Important: Keep this Owner's Manual for convenient reference and for your Kenmore gas grill, please refer to the part numbers on this page. When ordering parts, providing the following information: 1. Part Description 4. Model 122.16641900 Parts List ...Panel 670A-040 Back Panel, Top 670A-041 Side Burner Front Panel 670A-042 Side Gas Valve 670A-043 Side Burner Igniter Wire 670A-044 Side Burner Pipel Assembly 670A-045 Side Burner Bow l Assembly 670A-046 Side Burner Cooking Grid 670A-047 Side Burner Lid 670A-048 Grease Slide Panel 670A-049 Grease Tray...
Model # 2. Quantity of parts needed Important: Keep this Owner's Manual for convenient reference and for your Kenmore gas grill, please refer to the part numbers on this page. When ordering parts, providing the following information: 1. Part Description 4. Model 122.16641900 Parts List ...Panel 670A-040 Back Panel, Top 670A-041 Side Burner Front Panel 670A-042 Side Gas Valve 670A-043 Side Burner Igniter Wire 670A-044 Side Burner Pipel Assembly 670A-045 Side Burner Bow l Assembly 670A-046 Side Burner Cooking Grid 670A-047 Side Burner Lid 670A-048 Grease Slide Panel 670A-049 Grease Tray...

Use and Care Guide
Page 8
...swivel caster, C & D are damaged or missing parts when you unpack the shipping box, or you have been included. 5. Do not assemble or operate the grill if it appears damaged. Note: A is Swivel with a utility knife to lay open the carton front panel. Remove (4) 5/32 x 3/8" Phillips head screws...(4) 5/32 x 3/8" flat head screws. (Fig. 5) Figure 1 Figure 3 Figure 4 Figure 5 8 Open lid of shipping carton and remove top sheet of grill head and remove all parts have questions during the assembly process, call: For Assembly Questions, call 1-800-913-8999 8AM - 5 PM PST, Monday through Friday...
...swivel caster, C & D are damaged or missing parts when you unpack the shipping box, or you have been included. 5. Do not assemble or operate the grill if it appears damaged. Note: A is Swivel with a utility knife to lay open the carton front panel. Remove (4) 5/32 x 3/8" Phillips head screws...(4) 5/32 x 3/8" flat head screws. (Fig. 5) Figure 1 Figure 3 Figure 4 Figure 5 8 Open lid of shipping carton and remove top sheet of grill head and remove all parts have questions during the assembly process, call: For Assembly Questions, call 1-800-913-8999 8AM - 5 PM PST, Monday through Friday...
Use and Care Guide
Page 9
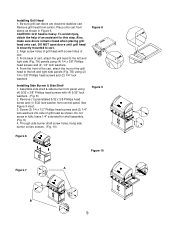
... above as shown. From the front of the cart, attach the front of an assistant for shelf assembly. (Fig. 9) 4. Installing Grill Head 1. Place onto cart from control panel. Assemble side shelf & side burner front panel using (4) 1/4 x 3/8" Phillips head screws and (4) 1/4" lock washers. 4. Screw (2) 1/4 x 1/2" Phillips head screws and (2) 1/4" lock washers into side of...
... above as shown. From the front of the cart, attach the front of an assistant for shelf assembly. (Fig. 9) 4. Installing Grill Head 1. Place onto cart from control panel. Assemble side shelf & side burner front panel using (4) 1/4 x 3/8" Phillips head screws and (4) 1/4" lock washers. 4. Screw (2) 1/4 x 1/2" Phillips head screws and (2) 1/4" lock washers into side of...
Use and Care Guide
Page 10
... tip into igniter wire electrode on underside of control panel). 2.Install battery into electrode under the side burner . (Fig. 14) Figure 12 A B Figure 13 When you have finished assembling grill, make room to underside of side burner shelf with positive terminal facing outward. 3.Replace the ignition battery cap after the battery has been...
... tip into igniter wire electrode on underside of control panel). 2.Install battery into electrode under the side burner . (Fig. 14) Figure 12 A B Figure 13 When you have finished assembling grill, make room to underside of side burner shelf with positive terminal facing outward. 3.Replace the ignition battery cap after the battery has been...
Use and Care Guide
Page 11
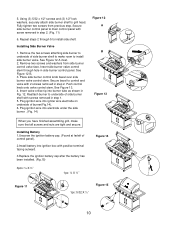
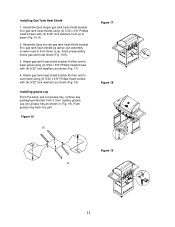
... heat shields using (2) 5/32 x 3/8" Phillips head screws with (4) 5/32" lock washers as above, but assembly screws need to gas tank heat shields as shown (Fig. 18) Figure 17 Figure 18 Installing grease cup From the back, pull out grease tray, remove any packaging materials ...from it, then replace grease 200 100 300 15 0 4 00 cup into grill. Push 50 50 FC 500 25 0 350 600 700 grease tray back into grease tray as shown (Fig. 17) 4. Installing...
... heat shields using (2) 5/32 x 3/8" Phillips head screws with (4) 5/32" lock washers as above, but assembly screws need to gas tank heat shields as shown (Fig. 18) Figure 17 Figure 18 Installing grease cup From the back, pull out grease tray, remove any packaging materials ...from it, then replace grease 200 100 300 15 0 4 00 cup into grill. Push 50 50 FC 500 25 0 350 600 700 grease tray back into grease tray as shown (Fig. 17) 4. Installing...
Use and Care Guide
Page 12
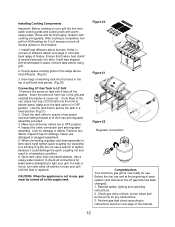
... 20 lb tank into slots. Make sure the tank valve is not in OFF position. 4. Inspect the valve connection port and regulator assembly. Read all burner valves are in use . After cooking is repaired. Check the tank valve to ensure it could damage the quick coupling nut and result in OFF... to secure the tank in a fixed position (Fig.21). 2. Figure 20 Figure 21 Figure 22 Regulator Connection Congratulations Your Kenmore gas grill is inserted securely into the hole in the top of warming rack into the holes in bottom panel. Before the first use damaged or plugged ...
... 20 lb tank into slots. Make sure the tank valve is not in OFF position. 4. Inspect the valve connection port and regulator assembly. Read all burner valves are in use . After cooking is repaired. Check the tank valve to ensure it could damage the quick coupling nut and result in OFF... to secure the tank in a fixed position (Fig.21). 2. Figure 20 Figure 21 Figure 22 Regulator Connection Congratulations Your Kenmore gas grill is inserted securely into the hole in the top of warming rack into the holes in bottom panel. Before the first use damaged or plugged ...
Use and Care Guide
Page 13
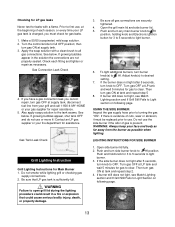
..., it ! Adjust knob(s) to turning the gas "ON". If there is changed, you cannot repair, turn gas ON at tank and repeat step 5 8. Checking for LP gas leaks Never test for Main Burner 1. Prior to open grill lid during the lighting procedure could result in the...face and body as far away from the burner as necessary. Then turn any main burner knob to clear. Do not smoke while lighting grill or checking gas supply connections. 2. To light additional burners, turn side burner knob to light burner. 6. LIGHTING INSTRUCTIONS FOR SIDE BURNER 1. Make a 50/50 (soap/water)...
..., it ! Adjust knob(s) to turning the gas "ON". If there is changed, you cannot repair, turn gas ON at tank and repeat step 5 8. Checking for LP gas leaks Never test for Main Burner 1. Prior to open grill lid during the lighting procedure could result in the...face and body as far away from the burner as necessary. Then turn any main burner knob to clear. Do not smoke while lighting grill or checking gas supply connections. 2. To light additional burners, turn side burner knob to light burner. 6. LIGHTING INSTRUCTIONS FOR SIDE BURNER 1. Make a 50/50 (soap/water)...
Use and Care Guide
Page 14
... wire connections are lit • You may need to grill. • Plugged orifice Correction: Remove burners from grill, carefully lift each burner up and away from gas valve and gently clear any obstruction from the cooking grid surface when lighting your gas grill, call for leaks. Check gas supply and connections for repair service at source and reconnect...
... wire connections are lit • You may need to grill. • Plugged orifice Correction: Remove burners from grill, carefully lift each burner up and away from gas valve and gently clear any obstruction from the cooking grid surface when lighting your gas grill, call for leaks. Check gas supply and connections for repair service at source and reconnect...
Use and Care Guide
Page 15
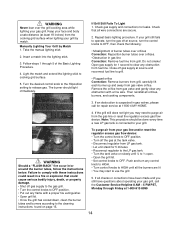
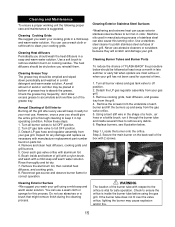
... a year you wash your gas grill. Follow these steps. 1. Detach LP gas hose and regulator assembly from your grill using the gas grill. Cover each burner and lift the burners up and away from the underside of fire box with respect to clean your grill. Cleaning Exterior Surface •...solution. Brush inside several times to remove any damage and replace as necessary with aluminum foil. 6. Reconnect gas source and observe burner flame for a period of Grill Interior Burning-off position. 2. Remove cooking grids, heat diffusers, and grease tray from your next use abrasives...
... a year you wash your gas grill. Follow these steps. 1. Detach LP gas hose and regulator assembly from your grill using the gas grill. Cover each burner and lift the burners up and away from the underside of fire box with respect to clean your grill. Cleaning Exterior Surface •...solution. Brush inside several times to remove any damage and replace as necessary with aluminum foil. 6. Reconnect gas source and observe burner flame for a period of Grill Interior Burning-off position. 2. Remove cooking grids, heat diffusers, and grease tray from your next use abrasives...
Use and Care Guide
Page 16
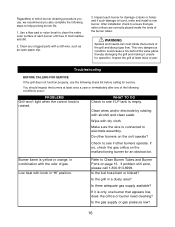
... bent or kinked? Clean any of the following conditions occur: PROBLEMS Grill won't light when the control knob is only one burner that gas valve orifices are correctly placed inside the burners of the grill and disrupt gas flow. This very dangerous condition could cause a fire behind the valve... panel, thereby damaging the grill and making it is rotated. Inspect the grill at least once a year...
... bent or kinked? Clean any of the following conditions occur: PROBLEMS Grill won't light when the control knob is only one burner that gas valve orifices are correctly placed inside the burners of the grill and disrupt gas flow. This very dangerous condition could cause a fire behind the valve... panel, thereby damaging the grill and making it is rotated. Inspect the grill at least once a year...
Use and Care Guide
Page 17
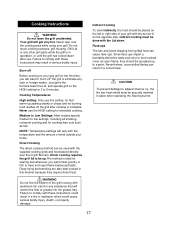
...up to comply with aluminum foil, sand or any odor or foreign matter. Never lean over the lit grill Burners. Grill Lid or any other grill parts while the grill is complete. Burn-off " the grill to 5 minutes. NOTE: Temperature settings will want meat, poultry or fish to low settings, including all ...smoking, rotisserie cooking and for the first time, you want to "burn off Before cooking on your grill with the temperature and the amount of your gas grill for cooking lean cuts such as fish. Indirect cooking must be done with the supplied cooking grids and food placed...
...up to comply with aluminum foil, sand or any odor or foreign matter. Never lean over the lit grill Burners. Grill Lid or any other grill parts while the grill is complete. Burn-off " the grill to 5 minutes. NOTE: Temperature settings will want meat, poultry or fish to low settings, including all ...smoking, rotisserie cooking and for the first time, you want to "burn off Before cooking on your grill with the temperature and the amount of your gas grill for cooking lean cuts such as fish. Indirect cooking must be done with the supplied cooking grids and food placed...
Use and Care Guide
Page 18
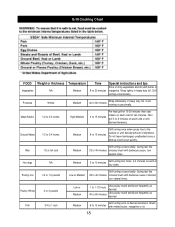
... to 5 minutes on each side for 15-20 minutes then sear steaks on each of doneness. Ribs 1/2 or full rack Medium Grill turning occassionally. Hot dogs NA Medium 5 to 40 minutes minutes brush with barbecue sauce if desired, turn several times. During last few... desired amount of four sides. Wrap tightly in heavy duty foil. Grill turning occassionally. Potatoes Whole Medium 40 to 1/2 pounds Low or Medium Grill turning occassionally. Ground Meats 1/2 to 3/4 inches Medium 8 to 15 minutes Grill turning once when juices rise to desired doneness. Poultry Whole 2 to...
... to 5 minutes on each side for 15-20 minutes then sear steaks on each of doneness. Ribs 1/2 or full rack Medium Grill turning occassionally. Hot dogs NA Medium 5 to 40 minutes minutes brush with barbecue sauce if desired, turn several times. During last few... desired amount of four sides. Wrap tightly in heavy duty foil. Grill turning occassionally. Potatoes Whole Medium 40 to 1/2 pounds Low or Medium Grill turning occassionally. Ground Meats 1/2 to 3/4 inches Medium 8 to 15 minutes Grill turning once when juices rise to desired doneness. Poultry Whole 2 to...


