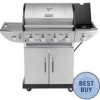
Use and Care Guide
Page 1
...720-0670A Date: 10/20/2008 Sears, Roebuck and Co., Hoffman Estates, IL 60179 U.S.A. WARNING: Read this Owner's Manual in a convenient place for outdoor use only and is not intended to follow these instructions could result in or on recreational vehicles or boats. Failure to be sure your gas grill... is intended for future reference. Note to Installer Leave this Owner's Manual with the customer after delivery and/or installation. This gas grill is properly assembled, installed and maintained. Note to Consumer ...
...720-0670A Date: 10/20/2008 Sears, Roebuck and Co., Hoffman Estates, IL 60179 U.S.A. WARNING: Read this Owner's Manual in a convenient place for outdoor use only and is not intended to follow these instructions could result in or on recreational vehicles or boats. Failure to be sure your gas grill... is intended for future reference. Note to Installer Leave this Owner's Manual with the customer after delivery and/or installation. This gas grill is properly assembled, installed and maintained. Note to Consumer ...
Use and Care Guide
Page 3
...before checking to ensure the burner tubes are fully seated over the gas valve orifices. • Never allow children to be used must be stored outdoors in an upright position. • Do not store (or) or use . Your gas grill is adjusted to the grill being overfilled which offers an... each filling. • Do not store a spare LP gas tank under overhead combustible construction . Visually inspect the hose prior to an LP gas tank. • Only use of the tank. 2. Call 1-800-4-MY-HOME for this manual. • Have your gas grill in a garage, porch, shed, breezeway or any other...
...before checking to ensure the burner tubes are fully seated over the gas valve orifices. • Never allow children to be used must be stored outdoors in an upright position. • Do not store (or) or use . Your gas grill is adjusted to the grill being overfilled which offers an... each filling. • Do not store a spare LP gas tank under overhead combustible construction . Visually inspect the hose prior to an LP gas tank. • Only use of the tank. 2. Call 1-800-4-MY-HOME for this manual. • Have your gas grill in a garage, porch, shed, breezeway or any other...
Use and Care Guide
Page 4
... in a fire in the U.S.A. ! If humming noise is known as a "talking owner's manual" Once you purchase the Repair Protection Agreement, a simple phone call near the LP gas tank because your grill, and at : 1-800-913-8999 CAUTION: Beware of electrical device and could create a spark...representative. Your new Kenmore product is designed and manufactured for you must clean the burner tubes before assembling your telephone is connected to OFF position. • Put out any reason during transit and warehousing. Purchase your gas grill or the LP gas tank. WARNING A strong gas smell, or ...
... in a fire in the U.S.A. ! If humming noise is known as a "talking owner's manual" Once you purchase the Repair Protection Agreement, a simple phone call near the LP gas tank because your grill, and at : 1-800-913-8999 CAUTION: Beware of electrical device and could create a spark...representative. Your new Kenmore product is designed and manufactured for you must clean the burner tubes before assembling your telephone is connected to OFF position. • Put out any reason during transit and warehousing. Purchase your gas grill or the LP gas tank. WARNING A strong gas smell, or ...
Use and Care Guide
Page 7
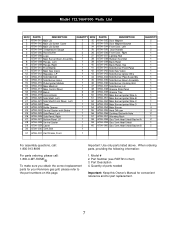
...670A-040 Back Panel, Top 670A-041 Side Burner Front Panel 670A-042 Side Gas Valve 670A-043 Side Burner Igniter Wire 670A-044 Side Burner Pipel Assembly 670A-045 Side Burner Bow l Assembly 670A-046 Side Burner Cooking Grid 670A-047 Side Burner Lid 670A-048 Grease Slide Panel 670A-049 Grease...-913-8999 For parts ordering, please call: 1-800-4-MY-HOME® To make sure you obtain the correct replacement parts for your Kenmore gas grill, please refer to the part numbers on this Owner's Manual for convenient reference and for part replacement. 7 Important: Use only parts listed above.
...670A-040 Back Panel, Top 670A-041 Side Burner Front Panel 670A-042 Side Gas Valve 670A-043 Side Burner Igniter Wire 670A-044 Side Burner Pipel Assembly 670A-045 Side Burner Bow l Assembly 670A-046 Side Burner Cooking Grid 670A-047 Side Burner Lid 670A-048 Grease Slide Panel 670A-049 Grease...-913-8999 For parts ordering, please call: 1-800-4-MY-HOME® To make sure you obtain the correct replacement parts for your Kenmore gas grill, please refer to the part numbers on this Owner's Manual for convenient reference and for part replacement. 7 Important: Use only parts listed above.
Use and Care Guide
Page 12
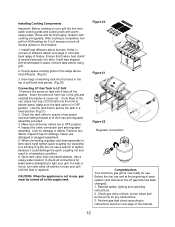
...is now ready for 3 to 5 minutes to LP Grill 1.Remove the screw on your grill the first time, wash cooking grids and cooking rack with warm , soapy water. Evenly space cooking grids on next page of the manual. 12 From Rear of the cart, place foot ring...). Figure 20 Figure 21 Figure 22 Regulator Connection Congratulations Your Kenmore gas grill is completed, turn tank valve off and do not use and at the supply tank. Before the first use your grill. Check gas valve orifices, burner tubes and burner ports for damage. Make sure all safety, lighting and operating...
...is now ready for 3 to 5 minutes to LP Grill 1.Remove the screw on your grill the first time, wash cooking grids and cooking rack with warm , soapy water. Evenly space cooking grids on next page of the manual. 12 From Rear of the cart, place foot ring...). Figure 20 Figure 21 Figure 22 Regulator Connection Congratulations Your Kenmore gas grill is completed, turn tank valve off and do not use and at the supply tank. Before the first use your grill. Check gas valve orifices, burner tubes and burner ports for damage. Make sure all safety, lighting and operating...
Use and Care Guide
Page 14
... or corrections have been made and you may start to grill. • Plugged orifice Correction: Remove burners from grill, carefully lift each burner up and away from grill. To purge air from your gas grill. If all the burners are secure. 2. Do not smoke! Manually Lighting Your Grill by match. If Grill Still Fails To Light 1. WARNING Never lean over orifices...
... or corrections have been made and you may start to grill. • Plugged orifice Correction: Remove burners from grill, carefully lift each burner up and away from grill. To purge air from your gas grill. If all the burners are secure. 2. Do not smoke! Manually Lighting Your Grill by match. If Grill Still Fails To Light 1. WARNING Never lean over orifices...