Use and Care Guide
Page 1
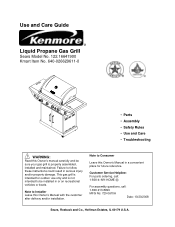
Use and Care Guide Liquid Propane Gas Grill Sears Model No. 122.16641900 Kmart Item No. 640-026629611-0 200 300 100 50 150 50 FC 400 500 250 350 600 700 • Parts • Assembly • Safety Rules • Use and Care • Troubleshooting ! Note to Consumer Leave this Owner's Manual in a convenient place for outdoor use only and is properly assembled, installed and maintained. Note to Installer Leave this Owner's manual carefully and...
Use and Care Guide Liquid Propane Gas Grill Sears Model No. 122.16641900 Kmart Item No. 640-026629611-0 200 300 100 50 150 50 FC 400 500 250 350 600 700 • Parts • Assembly • Safety Rules • Use and Care • Troubleshooting ! Note to Consumer Leave this Owner's Manual in a convenient place for outdoor use only and is properly assembled, installed and maintained. Note to Installer Leave this Owner's manual carefully and...
Use and Care Guide
Page 2
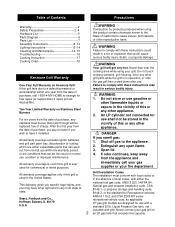
.... Shut off gas to comply with local codes or, in the United States. Table of Contents Precautions Warranty 2 Safety Precautions 2~4 Hardware List 5 Parts Diagram 6 Parts List 7 Assembly Instructions 8~12 Lighting Instructions 13~14 Cleaning and Maintenance 14~15 Troubleshooting 16 Cooking Instruction 17 Cooking Chart 18 Kenmore Grill Warranty One-Year Full Warranty on Stainless Steel Burners For ten years from the date of purchase, any stainless steel burner that rusts...
.... Shut off gas to comply with local codes or, in the United States. Table of Contents Precautions Warranty 2 Safety Precautions 2~4 Hardware List 5 Parts Diagram 6 Parts List 7 Assembly Instructions 8~12 Lighting Instructions 13~14 Cleaning and Maintenance 14~15 Troubleshooting 16 Cooking Instruction 17 Cooking Chart 18 Kenmore Grill Warranty One-Year Full Warranty on Stainless Steel Burners For ten years from the date of purchase, any stainless steel burner that rusts...
Use and Care Guide
Page 3
... use your gas grill is not in use . If this gas grill. • Do not subject the LP gas tank to use . Your gas grill should not be inspected before checking to ensure the burner tubes are fully seated over the gas valve orifices. • Never allow children to the grill being overfilled which offers an Overfill Prevention Device. The gas regulator assembly supplied with your grill. 3 If you store your gas grill...
... use your gas grill is not in use . If this gas grill. • Do not subject the LP gas tank to use . Your gas grill should not be inspected before checking to ensure the burner tubes are fully seated over the gas valve orifices. • Never allow children to the grill being overfilled which offers an Overfill Prevention Device. The gas regulator assembly supplied with your grill. 3 If you store your gas grill...
Use and Care Guide
Page 4
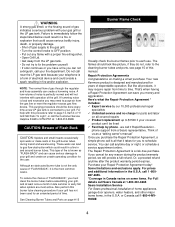
... all covered repairs 9 Product replacement up to schedule service. Also perform this manual. Repair Protection Agreements Congratulations on page # 15 Burner Flame Check Visually check the burner flames prior to your grill has not been used for parts and labor on some items. For Full details call anytime day or night, or schedule a service appointment online. Your new Kenmore product is connected to each use. WARNING A strong gas...
... all covered repairs 9 Product replacement up to schedule service. Also perform this manual. Repair Protection Agreements Congratulations on page # 15 Burner Flame Check Visually check the burner flames prior to your grill has not been used for parts and labor on some items. For Full details call anytime day or night, or schedule a service appointment online. Your new Kenmore product is connected to each use. WARNING A strong gas...

Use and Care Guide
Page 5
Contents for Hardware Pack The following table illustrates a breakdown of assembly. Item 1 2 3 4 5 6 7 Description Phillips Head Screw Phillips Head Screw Phillips Head Screw Lock Washer Flat Washer Phillips Head Screw Tank Bolt Specification 1/4 x 1/2" 1/4 x 3/8" 5/32 x 3/8" 1/4" 5/32" 5/32 x 1/2" Quantity 26 pcs 4 pcs 39 pcs 30 pcs 43 pcs 2 pcs 1 pc 5 It highlights what components are used in the various stages of the hardware pack.
Contents for Hardware Pack The following table illustrates a breakdown of assembly. Item 1 2 3 4 5 6 7 Description Phillips Head Screw Phillips Head Screw Phillips Head Screw Lock Washer Flat Washer Phillips Head Screw Tank Bolt Specification 1/4 x 1/2" 1/4 x 3/8" 5/32 x 3/8" 1/4" 5/32" 5/32 x 1/2" Quantity 26 pcs 4 pcs 39 pcs 30 pcs 43 pcs 2 pcs 1 pc 5 It highlights what components are used in the various stages of the hardware pack.
Use and Care Guide
Page 7
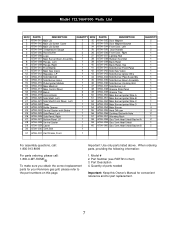
... 670A-058 Gas Tank Heat Shield Backet A 670A-059 Gas Tank Heat Shield 670A-060 Gas Tank Heat Shield Backet B 1 QUANTITY 2 1 1 2 1 1 1 1 1 1 1 1 1 1 1 1 1 1 1 1 1 1 4 4 2 1 2 1 2 For assembly questions, call: 1-800-913-8999 For parts ordering, please call: 1-800-4-MY-HOME® To make sure you obtain the correct replacement parts for your Kenmore gas grill, please refer to the part numbers on this Owner's Manual for convenient reference and for part replacement. 7 When ordering parts, providing the...
... 670A-058 Gas Tank Heat Shield Backet A 670A-059 Gas Tank Heat Shield 670A-060 Gas Tank Heat Shield Backet B 1 QUANTITY 2 1 1 2 1 1 1 1 1 1 1 1 1 1 1 1 1 1 1 1 1 1 4 4 2 1 2 1 2 For assembly questions, call: 1-800-913-8999 For parts ordering, please call: 1-800-4-MY-HOME® To make sure you obtain the correct replacement parts for your Kenmore gas grill, please refer to the part numbers on this Owner's Manual for convenient reference and for part replacement. 7 When ordering parts, providing the...

Use and Care Guide
Page 8
... door handles firstly, then attach door handles to doors. (Fig.4) 5. Remove (4) 5/32 x 3/8" Phillips head screws and 5/32" lock washers from scratches. 2. Lay cardboard sheet on floor and use as you assemble it. Use the parts list to check that all packaging from shipping carton. 3. Do not assemble or operate the grill if it appears damaged. Note: A is Swivel with (6) 5/32...
... door handles firstly, then attach door handles to doors. (Fig.4) 5. Remove (4) 5/32 x 3/8" Phillips head screws and 5/32" lock washers from scratches. 2. Lay cardboard sheet on floor and use as you assemble it. Use the parts list to check that all packaging from shipping carton. 3. Do not assemble or operate the grill if it appears damaged. Note: A is Swivel with (6) 5/32...
Use and Care Guide
Page 9
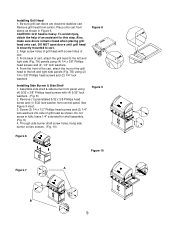
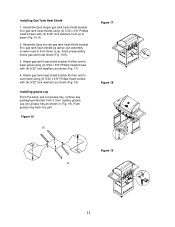
...to the left and right side panels (Fig. 7B) using (2) 1/4 x 3/8" Phillips head screws and (2) 1/4" lock washers Figure 8 Installing Side Burner & Side Shelf 1. DO NOT open doors until grill head is heavy. Assemble side shelf & side burner front panel using (4) 1/4 x 3/8" Phillips head screws and (4) 1/4"...2 50 350 60 0 70 0 Figure 9 inset. 3. Installing Grill Head 1. Remove grill head from control panel. Be sure grill cart doors are closed when placing grill head onto cart. Place onto cart from above as shown. Remove (1) preinstalled 5/32 x 3/8 Phillips head screw and (1) 5/...
...to the left and right side panels (Fig. 7B) using (2) 1/4 x 3/8" Phillips head screws and (2) 1/4" lock washers Figure 8 Installing Side Burner & Side Shelf 1. DO NOT open doors until grill head is heavy. Assemble side shelf & side burner front panel using (4) 1/4 x 3/8" Phillips head screws and (4) 1/4"...2 50 350 60 0 70 0 Figure 9 inset. 3. Installing Grill Head 1. Remove grill head from control panel. Be sure grill cart doors are closed when placing grill head onto cart. Place onto cart from above as shown. Remove (1) preinstalled 5/32 x 3/8 Phillips head screw and (1) 5/...
Use and Care Guide
Page 10
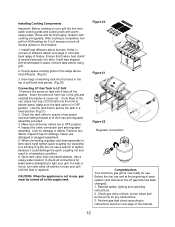
... Insert valve orifice tip into ignition box with screw removed in step 2. (Fig. 11) 6. Plug ignition wire into electrode under the side burner . (Fig. 14) Figure 12 A B Figure 13 When you have finished assembling grill, make room to install side shelf. Installing Battery 1.Unscrew the ignition battery cap. (Found at farleft of side burner shelf to control and valve with screws removed in step 2. Installing Side Burner Valve 1. Insert side burner valve control stem...
... Insert valve orifice tip into ignition box with screw removed in step 2. (Fig. 11) 6. Plug ignition wire into electrode under the side burner . (Fig. 14) Figure 12 A B Figure 13 When you have finished assembling grill, make room to install side shelf. Installing Battery 1.Unscrew the ignition battery cap. (Found at farleft of side burner shelf to control and valve with screws removed in step 2. Installing Side Burner Valve 1. Insert side burner valve control stem...
Use and Care Guide
Page 11
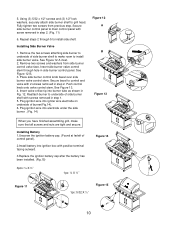
... grease tray as shown (Fig. 18) Figure 17 Figure 18 Installing grease cup From the back, pull out grease tray, remove any packaging materials from up , finish preassembly whole gas tank heat shield (Fig. 16 B). 3. Assemble 2pcs longer gas tank heat shield bracket A to gas tank heat shields using (2) 5/32 x 3/8" Phillips head screws with (4) 5/32" lock washers from it, then replace grease 200 100 300 15 0 4 00 cup into grill. Attach gas tank heat...
... grease tray as shown (Fig. 18) Figure 17 Figure 18 Installing grease cup From the back, pull out grease tray, remove any packaging materials from up , finish preassembly whole gas tank heat shield (Fig. 16 B). 3. Assemble 2pcs longer gas tank heat shield bracket A to gas tank heat shields using (2) 5/32 x 3/8" Phillips head screws with (4) 5/32" lock washers from it, then replace grease 200 100 300 15 0 4 00 cup into grill. Attach gas tank heat...
Use and Care Guide
Page 12
... safety, lighting and operating instructions. 2. Perform gas leak check according to instructions found , turn grill to light your grill. Holes in corners of diffusers attach onto pegs in place, remove tape before attempting to HIGH setting for leaks before using grill. 2. Ensure that firebox heat shield is completed, turn tank valve off excess grease or food residue. 1. Open tank valve fully (counterclockwise). Check gas valve orifices, burner tubes and burner ports for use damaged or...
... safety, lighting and operating instructions. 2. Perform gas leak check according to instructions found , turn grill to light your grill. Holes in corners of diffusers attach onto pegs in place, remove tape before attempting to HIGH setting for leaks before using grill. 2. Ensure that firebox heat shield is completed, turn tank valve off excess grease or food residue. 1. Open tank valve fully (counterclockwise). Check gas valve orifices, burner tubes and burner ports for use damaged or...
Use and Care Guide
Page 13
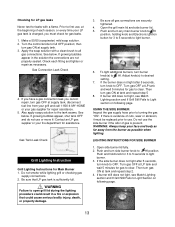
... be replaced prior to Light section on following page. If there is changed, you cannot repair, turn burner knob(s) to full OFF position; LIGHTING INSTRUCTIONS FOR SIDE BURNER 1. If growing bubbles appear, shut tank OFF and do not use or move it must check for gas leaks. 1. If burner still does not light, see Match Lighting section and If Grill Still Fails to use. Turn the control knobs to...
... be replaced prior to Light section on following page. If there is changed, you cannot repair, turn burner knob(s) to full OFF position; LIGHTING INSTRUCTIONS FOR SIDE BURNER 1. If growing bubbles appear, shut tank OFF and do not use or move it must check for gas leaks. 1. If burner still does not light, see Match Lighting section and If Grill Still Fails to use. Turn the control knobs to...
Use and Care Guide
Page 14
... cooking grid surface when lighting your gas grill, call for 5 minutes. • Reconnect regulator to grill. • Plugged orifice Correction: Remove burners from grill, carefully lift each burner up and away from gas valve and gently clear any flame with a fine wire. ! Insert a match into the lighting stick. 3. Close off gas supply at source, turn the gas off gas supply to the gas grill. • Turn the control knobs to OFF position. •...
... cooking grid surface when lighting your gas grill, call for 5 minutes. • Reconnect regulator to grill. • Plugged orifice Correction: Remove burners from grill, carefully lift each burner up and away from gas valve and gently clear any flame with a fine wire. ! Insert a match into the lighting stick. 3. Close off gas supply at source, turn the gas off gas supply to the gas grill. • Turn the control knobs to OFF position. •...
Use and Care Guide
Page 15
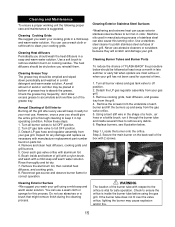
.... 7. Remove the aluminum foil, then reinstall heat diffusers, and cooking grids. 8. If the burner tube does not fit over the valve orifice, lighting the burner may be emptied and wiped down periodically and washed in the shape of sand or cat litter may cause explosion and/or fire. 15 Inspect for correct operation. Detach the LP gas regulator assembly from your grill using the gas grill. Replace burners...
.... 7. Remove the aluminum foil, then reinstall heat diffusers, and cooking grids. 8. If the burner tube does not fit over the valve orifice, lighting the burner may be emptied and wiped down periodically and washed in the shape of sand or cat litter may cause explosion and/or fire. 15 Inspect for correct operation. Detach the LP gas regulator assembly from your grill using the gas grill. Replace burners...
Use and Care Guide
Page 16
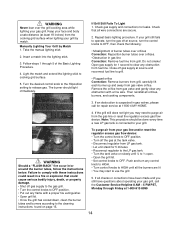
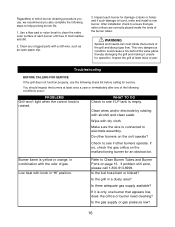
... to help prolong burner life. 1. Regardless of which burner cleaning procedure you use the following conditions occur: PROBLEMS Grill won't light when the control knob is empty. Clean any of the following check list before calling for damage (cracks or holes) and if such damage is only one burner that gas valve orifices are correctly placed inside the burners of gas. Inspect the grill at least...
... to help prolong burner life. 1. Regardless of which burner cleaning procedure you use the following conditions occur: PROBLEMS Grill won't light when the control knob is empty. Clean any of the following check list before calling for damage (cracks or holes) and if such damage is only one burner that gas valve orifices are correctly placed inside the burners of gas. Inspect the grill at least...
Use and Care Guide
Page 17
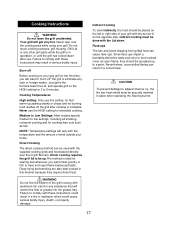
... grill parts while the grill is in operation, or until the grill has cooled down . Just ignite the burners,lower the Lid, and operate grill on your home. Medium to Low Settings: Most recipes specify medium to low settings, including all smoking, rotisserie cooking and for 3 to 5 minutes. Direct cooking requires the grill lid to be accepted up to food cooked cover an open -flame barbecued...
... grill parts while the grill is in operation, or until the grill has cooled down . Just ignite the burners,lower the Lid, and operate grill on your home. Medium to Low Settings: Most recipes specify medium to low settings, including all smoking, rotisserie cooking and for 3 to 5 minutes. Direct cooking requires the grill lid to be accepted up to food cooked cover an open -flame barbecued...
Use and Care Guide
Page 18
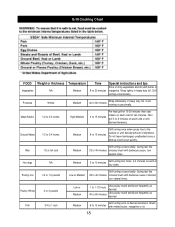
... minutes minutes brush with barbecue sauce, turn several times. Poultry Whole 2 to 3 pounds Low or Medium 1 to 1-1/2 hours Use poultry stand and brush frequently as desired 40 to 60 minutes Use poultry stand and brush frequently as desired Fish 3/4 to 1 inch Medium Grill turning once to 60...15-20 minutes then sear steaks on each side or until desired amount of four sides. Poultry-Cut 1/4 to 20 minutes Special instructions and tips Slice or chop vegetables and dot with melted butter, margarine or oil. 18 Grill Cooking Chart FOOD Vegetables Weight or thickness NA ...
... minutes minutes brush with barbecue sauce, turn several times. Poultry Whole 2 to 3 pounds Low or Medium 1 to 1-1/2 hours Use poultry stand and brush frequently as desired 40 to 60 minutes Use poultry stand and brush frequently as desired Fish 3/4 to 1 inch Medium Grill turning once to 60...15-20 minutes then sear steaks on each side or until desired amount of four sides. Poultry-Cut 1/4 to 20 minutes Special instructions and tips Slice or chop vegetables and dot with melted butter, margarine or oil. 18 Grill Cooking Chart FOOD Vegetables Weight or thickness NA ...


