Use and Care Guide
Page 1
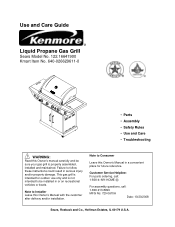
Note to Installer Leave this Owner's manual carefully and be sure your gas grill is not intended to be installed in or on recreational vehicles or boats. Note to follow these instructions could result in a convenient place for outdoor ...: 1-800-4-MY-HOME ® For assembly questions, call: 1-800-913-8999 MFG No: 720-0670A Date: 10/20/2008 Sears, Roebuck and Co., Hoffman Estates, IL 60179 U.S.A. This gas grill is intended for future reference. Use and Care Guide Liquid Propane Gas Grill Sears Model No. 122.16641900 Kmart Item No. 640-026629611-0 200 300 100...
Note to Installer Leave this Owner's manual carefully and be sure your gas grill is not intended to be installed in or on recreational vehicles or boats. Note to follow these instructions could result in a convenient place for outdoor ...: 1-800-4-MY-HOME ® For assembly questions, call: 1-800-913-8999 MFG No: 720-0670A Date: 10/20/2008 Sears, Roebuck and Co., Hoffman Estates, IL 60179 U.S.A. This gas grill is intended for future reference. Use and Care Guide Liquid Propane Gas Grill Sears Model No. 122.16641900 Kmart Item No. 640-026629611-0 200 300 100...
Use and Care Guide
Page 2
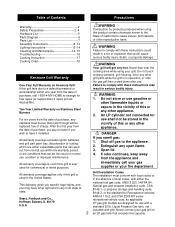
...Gas tank, not included with a standard 20 lb. Table of Contents Precautions Warranty 2 Safety Precautions 2~4 Hardware List 5 Parts Diagram 6 Parts List 7 Assembly Instructions 8~12 Lighting Instructions 13~14 Cleaning and Maintenance 14~15 Troubleshooting 16 Cooking Instruction 17 Cooking Chart 18 Kenmore Grill Warranty One-Year Full Warranty on Stainless Steel Burners... For ten years from the date of purchase, any stainless steel burner that rusts through will get very...
...Gas tank, not included with a standard 20 lb. Table of Contents Precautions Warranty 2 Safety Precautions 2~4 Hardware List 5 Parts Diagram 6 Parts List 7 Assembly Instructions 8~12 Lighting Instructions 13~14 Cleaning and Maintenance 14~15 Troubleshooting 16 Cooking Instruction 17 Cooking Chart 18 Kenmore Grill Warranty One-Year Full Warranty on Stainless Steel Burners... For ten years from the date of purchase, any stainless steel burner that rusts through will get very...
Use and Care Guide
Page 3
...an Overfill Prevention Device. Do not obstruct the flow of ventilation air around the gas grill housing. • Do not install this outdoor gas grill in or on recreational vehicles or boats • Keep outdoor gas grill area clear and free from the back and side of any combustible surface. ...before checking to ensure the burner tubes are fully seated over the gas valve orifices. • Never allow children to be used must have an outlet pressure of 11" water column (W.C.) for assistance. • Never light your gas grill with the cylinder valve. The LP gas tank must also have a ...
...an Overfill Prevention Device. Do not obstruct the flow of ventilation air around the gas grill housing. • Do not install this outdoor gas grill in or on recreational vehicles or boats • Keep outdoor gas grill area clear and free from the back and side of any combustible surface. ...before checking to ensure the burner tubes are fully seated over the gas valve orifices. • Never allow children to be used must have an outlet pressure of 11" water column (W.C.) for assistance. • Never light your gas grill with the cylinder valve. The LP gas tank must also have a ...
Use and Care Guide
Page 4
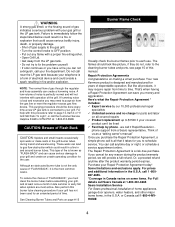
..., a prorated refund anytime after the product warranty period expires. ! Although an obstructed burner tube is not the only cause of this burner tube cleaning procedure if your gas grill or the LP gas tank. For prices and additional information in late summer or early fall when spiders are...OFF position. • Put out any reason during transit and warehousing. Your new Kenmore product is designed and manufactured for an extended period of electrical device and could result in the grill burner tubes during the product warranty period, we call anytime day or night, or ...
..., a prorated refund anytime after the product warranty period expires. ! Although an obstructed burner tube is not the only cause of this burner tube cleaning procedure if your gas grill or the LP gas tank. For prices and additional information in late summer or early fall when spiders are...OFF position. • Put out any reason during transit and warehousing. Your new Kenmore product is designed and manufactured for an extended period of electrical device and could result in the grill burner tubes during the product warranty period, we call anytime day or night, or ...
Use and Care Guide
Page 7
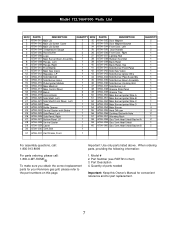
...Top 670A-041 Side Burner Front Panel 670A-042 Side Gas Valve 670A-043 Side Burner Igniter Wire 670A-044 Side Burner Pipel Assembly 670A-045 Side Burner Bow l Assembly 670A-046 Side Burner Cooking Grid 670A-047 Side Burner Lid 670A-048 Grease ...Gas Tank Heat Shield Backet A 670A-059 Gas Tank Heat Shield 670A-060 Gas Tank Heat Shield Backet B 1 QUANTITY 2 1 1 2 1 1 1 1 1 1 1 1 1 1 1 1 1 1 1 1 1 1 4 4 2 1 2 1 2 For assembly questions, call: 1-800-913-8999 For parts ordering, please call: 1-800-4-MY-HOME® To make sure you obtain the correct replacement parts for your Kenmore gas grill...
...Top 670A-041 Side Burner Front Panel 670A-042 Side Gas Valve 670A-043 Side Burner Igniter Wire 670A-044 Side Burner Pipel Assembly 670A-045 Side Burner Bow l Assembly 670A-046 Side Burner Cooking Grid 670A-047 Side Burner Lid 670A-048 Grease ...Gas Tank Heat Shield Backet A 670A-059 Gas Tank Heat Shield 670A-060 Gas Tank Heat Shield Backet B 1 QUANTITY 2 1 1 2 1 1 1 1 1 1 1 1 1 1 1 1 1 1 1 1 1 1 4 4 2 1 2 1 2 For assembly questions, call: 1-800-913-8999 For parts ordering, please call: 1-800-4-MY-HOME® To make sure you obtain the correct replacement parts for your Kenmore gas grill...

Use and Care Guide
Page 8
...or missing parts when you unpack the shipping box, or you have been included. 5. Open lid of shipping carton and remove top sheet of grill head and remove all parts have questions during the assembly process, call: For Assembly Questions, call 1-800-913-8999 8AM - 5 PM PST...that all packaging from shipping carton. 3. Assembly Instructions Figure 2 CAUTION: While it is possible for damage as a work surface to protect floor and grill parts from door handles firstly, then attach door handles to doors. (Fig.4) 5. Remove packing materials from tray. 4. This will allow you assemble it...
...or missing parts when you unpack the shipping box, or you have been included. 5. Open lid of shipping carton and remove top sheet of grill head and remove all parts have questions during the assembly process, call: For Assembly Questions, call 1-800-913-8999 8AM - 5 PM PST...that all packaging from shipping carton. 3. Assembly Instructions Figure 2 CAUTION: While it is possible for damage as a work surface to protect floor and grill parts from door handles firstly, then attach door handles to doors. (Fig.4) 5. Remove packing materials from tray. 4. This will allow you assemble it...
Use and Care Guide
Page 9
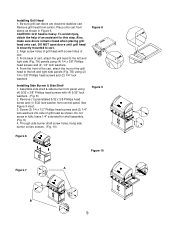
... x 3/8" Phillips head screws and (2) 1/4" lock washers Figure 8 Installing Side Burner & Side Shelf 1. leave 1/4" extended for this step. Remove (1) preinstalled 5/32 x 3/8 Phillips head screw and (1) 5/32 lock washer from carton. Align screw holes of grill head with (4) 5/32" lock washers. (Fig. 8) 2. From the front ...7B) using (4) 1/4 x 3/8" Phillips head screws and (4) 1/4" lock washers. 4. DO NOT open doors until grill head is heavy. Through side burner shelf screw holes, hang side burner on two screws. (Fig. 10) Figure 6 200 30 0 100 50 150 50 FC 400 500 250 ...
... x 3/8" Phillips head screws and (2) 1/4" lock washers Figure 8 Installing Side Burner & Side Shelf 1. leave 1/4" extended for this step. Remove (1) preinstalled 5/32 x 3/8 Phillips head screw and (1) 5/32 lock washer from carton. Align screw holes of grill head with (4) 5/32" lock washers. (Fig. 8) 2. From the front ...7B) using (4) 1/4 x 3/8" Phillips head screws and (4) 1/4" lock washers. 4. DO NOT open doors until grill head is heavy. Through side burner shelf screw holes, hang side burner on two screws. (Fig. 10) Figure 6 200 30 0 100 50 150 50 FC 400 500 250 ...
Use and Care Guide
Page 10
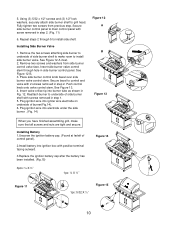
... 2. See Figure 13. 4. Fully tighten two screws from side burner control valve face. Plug ignition wire into burner tube as shown in side burner control panel. 5. Secure side burner control panel to install side burner valve. Repeat steps 2 through hole in Fig. 12. Insert ...1/2" screws and (3) 1/2" lock washers, securely attach side burner shelf to underside of control panel). 2.Install battery into electrode under the side burner . (Fig. 14) Figure 12 A B Figure 13 When you have finished assembling grill, make room to main control panel with positive terminal facing...
... 2. See Figure 13. 4. Fully tighten two screws from side burner control valve face. Plug ignition wire into burner tube as shown in side burner control panel. 5. Secure side burner control panel to install side burner valve. Repeat steps 2 through hole in Fig. 12. Insert ...1/2" screws and (3) 1/2" lock washers, securely attach side burner shelf to underside of control panel). 2.Install battery into electrode under the side burner . (Fig. 14) Figure 12 A B Figure 13 When you have finished assembling grill, make room to main control panel with positive terminal facing...
Use and Care Guide
Page 11
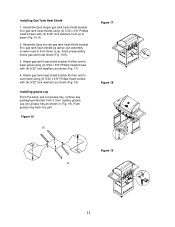
...panel using (2) 5/32 x 3/8" Phillips head screws with (4) 5/32" lock washers from it, then replace grease 200 100 300 15 0 4 00 cup into grill. Attach gas tank heat shield bracket B other end to cart frame using (2) 5/32 x 3/8" Phillips head screws with (4) 5/32" lock washers as shown (Fig. 17... pull out grease tray, remove any packaging materials from up , finish preassembly whole gas tank heat shield (Fig. 16 B). 3. Figure 16 B Figure 19 A 11 Assemble 2pcs shorter gas tank heat shield bracket B to gas tank heat shields as above, but assembly screws need to from down (Fig. 16...
...panel using (2) 5/32 x 3/8" Phillips head screws with (4) 5/32" lock washers from it, then replace grease 200 100 300 15 0 4 00 cup into grill. Attach gas tank heat shield bracket B other end to cart frame using (2) 5/32 x 3/8" Phillips head screws with (4) 5/32" lock washers as shown (Fig. 17... pull out grease tray, remove any packaging materials from up , finish preassembly whole gas tank heat shield (Fig. 16 B). 3. Figure 16 B Figure 19 A 11 Assemble 2pcs shorter gas tank heat shield bracket B to gas tank heat shields as above, but assembly screws need to from down (Fig. 16...
Use and Care Guide
Page 12
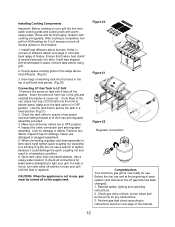
... use . CAUTION: When the appliance is not in a hazardous condition. 6. Figure 20 Figure 21 Figure 22 Regulator Connection Congratulations Your Kenmore gas grill is repaired. Evenly space cooking grids on tank bolt & take off and do not use damaged or plugged equipment. 5. Make sure ...of firebox. Make sure all safety, lighting and operating instructions. 2. Look for any debris. Remove any obstructions. 3. Check gas valve orifices, burner tubes and burner ports for damage or debris. Open tank valve fully (counterclockwise). Season with warm , soapy water. Ensure that firebox heat...
... use . CAUTION: When the appliance is not in a hazardous condition. 6. Figure 20 Figure 21 Figure 22 Regulator Connection Congratulations Your Kenmore gas grill is repaired. Evenly space cooking grids on tank bolt & take off and do not use damaged or plugged equipment. 5. Make sure ...of firebox. Make sure all safety, lighting and operating instructions. 2. Look for any debris. Remove any obstructions. 3. Check gas valve orifices, burner tubes and burner ports for damage or debris. Open tank valve fully (counterclockwise). Season with warm , soapy water. Ensure that firebox heat...
Use and Care Guide
Page 13
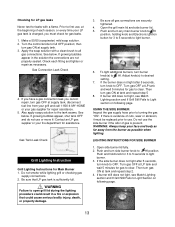
... tighten or repair as possible when lighting. Check each season, or every time your gas supplier for gas to light burner. 6. WARNING: Always keep your fire department for 3 to 5 seconds to clear. Do not smoke while lighting grill or checking gas supply connections. 2. Be sure that could result in the solution the connections are securely...
... tighten or repair as possible when lighting. Check each season, or every time your gas supplier for gas to light burner. 6. WARNING: Always keep your fire department for 3 to 5 seconds to clear. Do not smoke while lighting grill or checking gas supply connections. 2. Be sure that could result in the solution the connections are securely...
Use and Care Guide
Page 14
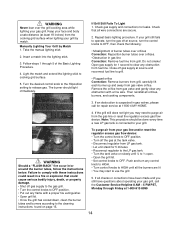
...; Turn control knobs to HIGH until ¼ to ½ open. • Open the grill lid. • Set control knobs to grill. • Plugged orifice Correction: Remove burners from grill, carefully lift each burner up and away from LP gas tank. • Let unit stand for leaks. If Grill Still Fails To Light 1. Repeat basic lighting procedure. Open...
...; Turn control knobs to HIGH until ¼ to ½ open. • Open the grill lid. • Set control knobs to grill. • Plugged orifice Correction: Remove burners from grill, carefully lift each burner up and away from LP gas tank. • Let unit stand for leaks. If Grill Still Fails To Light 1. Repeat basic lighting procedure. Open...
Use and Care Guide
Page 15
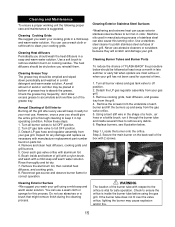
... orifice. 5. Remove and clean heat diffusers, cooking grids and grill burners. 5. Never use will scratch and damage your grill. Cleaning Burner Tubes and Burner Ports To reduce the chance of your grill using the gas grill. Remove the screws from the underside of Grill Interior Burning-off position. 2. Cleaning and Maintenance To ensure a proper working unit the following proper...
... orifice. 5. Remove and clean heat diffusers, cooking grids and grill burners. 5. Never use will scratch and damage your grill. Cleaning Burner Tubes and Burner Ports To reduce the chance of your grill using the gas grill. Remove the screws from the underside of Grill Interior Burning-off position. 2. Cleaning and Maintenance To ensure a proper working unit the following proper...
Use and Care Guide
Page 16
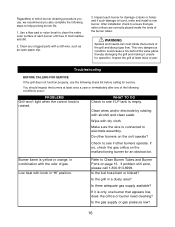
...holes) and if such damage is yellow or orange, in combination with the odor of gas. Inspect each burner until free of food residue and dirt. 2. Troubleshooting BEFORE CALLING FOR SERVICE If the grill does not function properly, use , we recommend you also complete the following steps to ... for operation. WARNING Spiders and insects can nest inside the ends of the burner tubes. ! Make sure the wire is only one burner that gas valve orifices are correctly placed inside the burners of the grill and disrupt gas flow. If problem still exist, please call 1-800-913-8999. Is the...
...holes) and if such damage is yellow or orange, in combination with the odor of gas. Inspect each burner until free of food residue and dirt. 2. Troubleshooting BEFORE CALLING FOR SERVICE If the grill does not function properly, use , we recommend you also complete the following steps to ... for operation. WARNING Spiders and insects can nest inside the ends of the burner tubes. ! Make sure the wire is only one burner that gas valve orifices are correctly placed inside the burners of the grill and disrupt gas flow. If problem still exist, please call 1-800-913-8999. Is the...
Use and Care Guide
Page 17
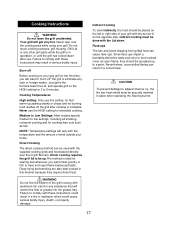
... death, or property damage. Nevertheless, uncontrolled flaring can cause flare-ups. Just ignite the burners,lower the Lid, and operate grill on your grill. Cooking Instructions ! Never lean over the lit grill Burners. Failure to eliminate any odor or foreign matter. Never use the HIGH setting for the...this manner because they should be used with the burner lit on the left or right side of wind outside your grill with the supplied cooking grids and food placed directly over the cooking area while using your gas grill for extended cooking. Medium to Low Settings: Most...
... death, or property damage. Nevertheless, uncontrolled flaring can cause flare-ups. Just ignite the burners,lower the Lid, and operate grill on your grill. Cooking Instructions ! Never lean over the lit grill Burners. Failure to eliminate any odor or foreign matter. Never use the HIGH setting for the...this manner because they should be used with the burner lit on the left or right side of wind outside your grill with the supplied cooking grids and food placed directly over the cooking area while using your gas grill for extended cooking. Medium to Low Settings: Most...
Use and Care Guide
Page 18
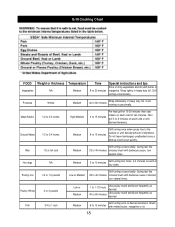
...heavy duty foil. Do not leave hamburgers unattended since a flare-up could occur quickly. During last few 20 to 15 minutes Pre heat grill for two minutes. Next grill 3 to 40 minutes minutes brush with butter or margarine. Poultry Whole 2 to 3 pounds Low or Medium 1 to 1-1/2 hours Use poultry...in heavy duty foil. Hot dogs NA Medium 5 to 15 minutes with barbecue sauce if desired, turn several times. Brush 8 to 10 minutes Grill turning four times. 2-4 minutes on each side for 15-20 minutes then sear steaks on each side or until desired amount of four sides....
...heavy duty foil. Do not leave hamburgers unattended since a flare-up could occur quickly. During last few 20 to 15 minutes Pre heat grill for two minutes. Next grill 3 to 40 minutes minutes brush with butter or margarine. Poultry Whole 2 to 3 pounds Low or Medium 1 to 1-1/2 hours Use poultry...in heavy duty foil. Hot dogs NA Medium 5 to 15 minutes with barbecue sauce if desired, turn several times. Brush 8 to 10 minutes Grill turning four times. 2-4 minutes on each side for 15-20 minutes then sear steaks on each side or until desired amount of four sides....


