Instruction Manual
Page 5
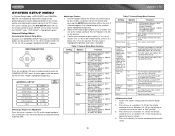
... is closed) high contrast LCD • Rotary encoder audio control • Joystick menu navigation Tools and Supplies You will need these tools and supplies to 999 MP3 files on your Jensen VM9511TS installed by a reputable installation shop. It's a good idea to a CD, MP3, WMA or watch DVDs General • Full function infrared remote control • Limited function...
... is closed) high contrast LCD • Rotary encoder audio control • Joystick menu navigation Tools and Supplies You will need these tools and supplies to 999 MP3 files on your Jensen VM9511TS installed by a reputable installation shop. It's a good idea to a CD, MP3, WMA or watch DVDs General • Full function infrared remote control • Limited function...

Instruction Manual
Page 11
...next chapter or track. MENU Mode: Press once to move the cursor to the left. 17. ( ) DVD Mode: Press once to the right. 18. ( ) DVD Mode: Press once for random playback. LCD Display 24. SD Card Slot 7 TUNER Mode: Press once to store the current radio station in preset channel... the cursor down one frequency step. Press and hold to reset core mechanism position. 22. Press once to start scan playback. VM9511TS CONTROLS AND INDICATORS 10. 3/SCN DVD Mode: Press once to confirm a selection. 21. ( ) Press once for disc insertion/ejection. IR Remote Control Receiver 26.
...next chapter or track. MENU Mode: Press once to move the cursor to the left. 17. ( ) DVD Mode: Press once to the right. 18. ( ) DVD Mode: Press once for random playback. LCD Display 24. SD Card Slot 7 TUNER Mode: Press once to store the current radio station in preset channel... the cursor down one frequency step. Press and hold to reset core mechanism position. 22. Press once to start scan playback. VM9511TS CONTROLS AND INDICATORS 10. 3/SCN DVD Mode: Press once to confirm a selection. 21. ( ) Press once for disc insertion/ejection. IR Remote Control Receiver 26.

Instruction Manual
Page 13
The above diagram is for illustrative purposes only. 9 VM9511TS FRONT ZONE REMOTE CONTROL NOTE: Your remote control may differ slightly from the one pictured here.
The above diagram is for illustrative purposes only. 9 VM9511TS FRONT ZONE REMOTE CONTROL NOTE: Your remote control may differ slightly from the one pictured here.

Instruction Manual
Page 14
... of TFT screen Continuously adjusts angle of cur- plays/ Scans XM radio station; VM9511TS Table 1: Front Zone Remote Control Functions Button Function Name MENU TITLE MUTE POWER/ AUDIO REPT A-B REPT SRC SUBTITLE INFO ANGLE ANGLE ANGLE VOL VOL + BAND Ref# DVD VCD TUNER CD/MP3 TV XM iPod 1 Enters the main menu of Turns...
... of TFT screen Continuously adjusts angle of cur- plays/ Scans XM radio station; VM9511TS Table 1: Front Zone Remote Control Functions Button Function Name MENU TITLE MUTE POWER/ AUDIO REPT A-B REPT SRC SUBTITLE INFO ANGLE ANGLE ANGLE VOL VOL + BAND Ref# DVD VCD TUNER CD/MP3 TV XM iPod 1 Enters the main menu of Turns...
Instruction Manual
Page 15
...Ejects disc Ejects disc Ejects disc Plays all tracks in random order Ejects disc Ejects disc Ejects disc 11 VM9511TS Table 1: Front Zone Remote Control Functions Button Function Name Ref# DVD VCD TUNER CD/MP3 GOTO 21 22 ZOOM 23 PIC 24 OPEN/ 25 CLOSE 26 27 DISP 28 ... TFT monitor Decreases monitor tilt angle Increases monitor tilt angle Selects display mode: CINEMA, WIDE, NORMAL or Off (Standby) Opens/closes the TFT monitor Opens/closes the TFT monitor Decreases monitor tilt angle Decreases monitor tilt angle Increases monitor tilt angle Increases monitor tilt ...
...Ejects disc Ejects disc Ejects disc Plays all tracks in random order Ejects disc Ejects disc Ejects disc 11 VM9511TS Table 1: Front Zone Remote Control Functions Button Function Name Ref# DVD VCD TUNER CD/MP3 GOTO 21 22 ZOOM 23 PIC 24 OPEN/ 25 CLOSE 26 27 DISP 28 ... TFT monitor Decreases monitor tilt angle Increases monitor tilt angle Selects display mode: CINEMA, WIDE, NORMAL or Off (Standby) Opens/closes the TFT monitor Opens/closes the TFT monitor Decreases monitor tilt angle Decreases monitor tilt angle Increases monitor tilt angle Increases monitor tilt ...

Instruction Manual
Page 16
... REPT R.SRC SUBTITLE Ref # 1 2 3 5 7 8 9 14 DVD Enters the main menu of the disc Enters the title menu of the disc Toggles on/off audio output Setup to specific time frame and playback Slow playback/slow rewind playback 1, 2, 3, 4, 5, 29 6, 7, 8, 9, 0 (Numeric Keypad) Directly accesses chapter VM9511TS NOTE: Your remote control may differ slightly from the one...
... REPT R.SRC SUBTITLE Ref # 1 2 3 5 7 8 9 14 DVD Enters the main menu of the disc Enters the title menu of the disc Toggles on/off audio output Setup to specific time frame and playback Slow playback/slow rewind playback 1, 2, 3, 4, 5, 29 6, 7, 8, 9, 0 (Numeric Keypad) Directly accesses chapter VM9511TS NOTE: Your remote control may differ slightly from the one...

Instruction Manual
Page 17
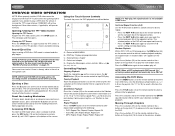
... remote or press and hold the ( ) or ( ) button (3, 4) on the monitor frame to adjust the tilt angle in DVD ...monitor is brightness (BRIGHT). Monitor Tilt Angle Adjustment A known characteristic of LCD panels is unavailable for each playing source. The monitor...remote control to move the monitor into the compartment. NOTE: The default adjustment is in PAL mode. Parameter Adjustment Procedure 1. If the monitor is "0" in display mode, the monitor automatically switches to CAMERA mode upon reverse driving. VM9511TS USING THE TFT MONITOR Open/Close TFT Monitor Open TFT Monitor...
... remote or press and hold the ( ) or ( ) button (3, 4) on the monitor frame to adjust the tilt angle in DVD ...monitor is brightness (BRIGHT). Monitor Tilt Angle Adjustment A known characteristic of LCD panels is unavailable for each playing source. The monitor...remote control to move the monitor into the compartment. NOTE: The default adjustment is in PAL mode. Parameter Adjustment Procedure 1. If the monitor is "0" in display mode, the monitor automatically switches to CAMERA mode upon reverse driving. VM9511TS USING THE TFT MONITOR Open/Close TFT Monitor Open TFT Monitor...
Instruction Manual
Page 19
VM9511TS OPERATING INSTRUCTIONS Power On / Off Press the /MUTE button (7) to turn the unit on the LCD monitor. The buttons on the front of the ...boosts the effects of the unit light up and "WELCOME" appears briefly in the following order: TUNER, DVD, CD Changer, AUX IN, CAMERA (rear view video camera) and SD. You can be disabled. The...front panel or the MUTE button (3) on remote control. Audio Control Menu The Audio Control feature allows you to easily adjust your audio system to change between available playing sources in the LCD panel (23), followed by pressing the OPEN ...
VM9511TS OPERATING INSTRUCTIONS Power On / Off Press the /MUTE button (7) to turn the unit on the LCD monitor. The buttons on the front of the ...boosts the effects of the unit light up and "WELCOME" appears briefly in the following order: TUNER, DVD, CD Changer, AUX IN, CAMERA (rear view video camera) and SD. You can be disabled. The...front panel or the MUTE button (3) on remote control. Audio Control Menu The Audio Control feature allows you to easily adjust your audio system to change between available playing sources in the LCD panel (23), followed by pressing the OPEN ...
Instruction Manual
Page 20
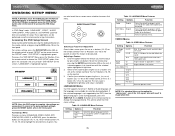
... the hour or minutes. 4. General Setup Menu Accessing the General Setup Menu To access the "GENERAL SETUP" Menu, press the direction buttons on the remote control to highlight "GENERAL SETUP" in light blue. 2. A menu appears with the selected option highlighted in green. "SYS SETUP" is highlighted in light blue.... DIRECTION BUTTONS Press the >/|| button (18) on the joystick (16, 17, 18, 19) or remote control (14, 17, 18, 19, 22) to enter the "GENERAL SETUP" menu. Press the For system settings, press the SYS SETUP button (31) on the...
... the hour or minutes. 4. General Setup Menu Accessing the General Setup Menu To access the "GENERAL SETUP" Menu, press the direction buttons on the remote control to highlight "GENERAL SETUP" in light blue. 2. A menu appears with the selected option highlighted in green. "SYS SETUP" is highlighted in light blue.... DIRECTION BUTTONS Press the >/|| button (18) on the joystick (16, 17, 18, 19) or remote control (14, 17, 18, 19, 22) to enter the "GENERAL SETUP" menu. Press the For system settings, press the SYS SETUP button (31) on the...

Instruction Manual
Page 21
... in green. Accessing the ASP Config Menu To access the "ASP CONFIG" Menu from the "SYSTEM SETUP" menu, press the direction buttons on the remote control. A submenu appears in a second row with the option for the feature you to adjust by pressing the >/|| button (18) on the unit. ...you want to make fine audio adjustments. Adjusting a Feature 1. Select a new value by pressing the ENTER (joystick) button (20) on the remote or by pressing the >> or VM9511TS Returning to the System Setup Menu To return to the System Setup menu, move to enter the "ASP CONFIG" menu.
... in green. Accessing the ASP Config Menu To access the "ASP CONFIG" Menu from the "SYSTEM SETUP" menu, press the direction buttons on the remote control. A submenu appears in a second row with the option for the feature you to adjust by pressing the >/|| button (18) on the unit. ...you want to make fine audio adjustments. Adjusting a Feature 1. Select a new value by pressing the ENTER (joystick) button (20) on the remote or by pressing the >> or VM9511TS Returning to the System Setup Menu To return to the System Setup menu, move to enter the "ASP CONFIG" menu.

Instruction Manual
Page 23
...Playing Mode 9. BAND: Touch to Radio Tuner source Press the SRC button (15) on the screen. VM9511TS TUNER OPERATION Tuner TFT Display Default TFT Tuner Display Alternate TFT Tuner Display The VM9511TS offers an alternate display for the AM / FM tuner interface that is more than the default tuner ...MAIN MENU To activate this feature, open the TFT screen and then press and hold the >>| button (19) on remote control or screen, or the > button on the unit (14) or remote control (20) to select the corresponding stored station. 1. Select FM/AM Band Touch the BAND button (16) on the ...
...Playing Mode 9. BAND: Touch to Radio Tuner source Press the SRC button (15) on the screen. VM9511TS TUNER OPERATION Tuner TFT Display Default TFT Tuner Display Alternate TFT Tuner Display The VM9511TS offers an alternate display for the AM / FM tuner interface that is more than the default tuner ...MAIN MENU To activate this feature, open the TFT screen and then press and hold the >>| button (19) on remote control or screen, or the > button on the unit (14) or remote control (20) to select the corresponding stored station. 1. Select FM/AM Band Touch the BAND button (16) on the ...

Instruction Manual
Page 24
... appear in the top half of the user interface. To access Category Guide, press the TITLE button (2) on the remote control or touch CAT on the front panel or remote control (8) to switch to -air channels without activation. Each page contains six channels to help navigate through channels and or ...or the CH > buttons on the TFT screen. To return to enter channel directly using your radio's identification number. DIR CH: Press to VM9511TS Channel Guide, press the SUBTITLE button (9) on screen 15. Recalling a Station 1. Touch an on the touch screen. Channel/Category Guide Mode ...
... appear in the top half of the user interface. To access Category Guide, press the TITLE button (2) on the remote control or touch CAT on the front panel or remote control (8) to switch to -air channels without activation. Each page contains six channels to help navigate through channels and or ...or the CH > buttons on the TFT screen. To return to enter channel directly using your radio's identification number. DIR CH: Press to VM9511TS Channel Guide, press the SUBTITLE button (9) on screen 15. Recalling a Station 1. Touch an on the touch screen. Channel/Category Guide Mode ...

Instruction Manual
Page 25
...) on the remote control or the joystick ENTER button (20) on the unit or just let the keypad "time out" after 4 seconds and the station will return to the Preset Mode. Parental Control By default, this feature is reserved for use by anyone listening to the radio. VM9511TS Category Guide Mode... When Category Mode is selected, "Search Mode" and "CATEGORY" appear in the touch screen. • Press the >> button (14) on the remote control, the /\ button (18) on the joystick, or the > button ...
...) on the remote control or the joystick ENTER button (20) on the unit or just let the keypad "time out" after 4 seconds and the station will return to the Preset Mode. Parental Control By default, this feature is reserved for use by anyone listening to the radio. VM9511TS Category Guide Mode... When Category Mode is selected, "Search Mode" and "CATEGORY" appear in the touch screen. • Press the >> button (14) on the remote control, the /\ button (18) on the joystick, or the > button ...
Instruction Manual
Page 26
... from the menu. Using the Touch-Screen Controls The touch key areas for playback. NOTE: DVD-R and DVD-RW will operate normally. DISP key: Displays playing information C - A - VM9511TS DVD/VCD VIDEO OPERATION NOTE: When properly installed, DVD video cannot be authorized (see "RATING (Parental Lock) Menu" on the unit or remote control (35) to eject the disc. Return...
... from the menu. Using the Touch-Screen Controls The touch key areas for playback. NOTE: DVD-R and DVD-RW will operate normally. DISP key: Displays playing information C - A - VM9511TS DVD/VCD VIDEO OPERATION NOTE: When properly installed, DVD video cannot be authorized (see "RATING (Parental Lock) Menu" on the unit or remote control (35) to eject the disc. Return...

Instruction Manual
Page 27
... which you would like the subtitles to appear. "00:41:28" indicates the playback time of the screen during DVD playback: • T : 5/8 - VM9511TS Fast Forward/Fast Reverse Press the >> button (14) on the remote control or the /\ button (18) on the joystick to display playback information on the screen, including the media playing and...
... which you would like the subtitles to appear. "00:41:28" indicates the playback time of the screen during DVD playback: • T : 5/8 - VM9511TS Fast Forward/Fast Reverse Press the >> button (14) on the remote control or the /\ button (18) on the joystick to display playback information on the screen, including the media playing and...
Instruction Manual
Page 29
... Screen Setup can be performed using the remote control or joystick controls. These operations can be performed by pressing the dedicated button on the remote control, or by pressing the SRC button (15) on the front panel. To return to accessing the DVD Setup menu. VM9511TS DVD/DISC SETUP MENU NOTE: A DVD/disc must be loaded into the mechanism...
... Screen Setup can be performed using the remote control or joystick controls. These operations can be performed by pressing the dedicated button on the remote control, or by pressing the SRC button (15) on the front panel. To return to accessing the DVD Setup menu. VM9511TS DVD/DISC SETUP MENU NOTE: A DVD/disc must be loaded into the mechanism...

Instruction Manual
Page 30
...0ms Off on the original Dolby Pro Logic system. NOTE: When Down Sampling is not present. Use when speakers do not have good bass output. VM9511TS Table 16: SPK CONFIG Menu Features Setting Options Function LR (Left Rear) / RR (Right Rear) Large Small None SUB (Subwoofer) Present None .... When Down Sampling is OFF, the original sampling frequency is the reigning standard for 2-channel mode, use the >> or >| button (19) on remote control or the > button on the joystick (17) to move to create a time delay between the rear and front speakers to the speaker settings on ...
...0ms Off on the original Dolby Pro Logic system. NOTE: When Down Sampling is not present. Use when speakers do not have good bass output. VM9511TS Table 16: SPK CONFIG Menu Features Setting Options Function LR (Left Rear) / RR (Right Rear) Large Small None SUB (Subwoofer) Present None .... When Down Sampling is OFF, the original sampling frequency is the reigning standard for 2-channel mode, use the >> or >| button (19) on remote control or the > button on the joystick (17) to move to create a time delay between the rear and front speakers to the speaker settings on ...

Instruction Manual
Page 32
...tracks on the joystick to the next track on the screen. Current track and total number of the normal VM9511TS progression. Touch to activate/deactivate Scan mode 5. Press the || button (17, 19) on remote control or the < or > button (16, 17) on disc 2. Elapsed playing time 3. Touch to ... Rate: 128kbps • Sampling Frequency: 48kHz When recording MP3 up to fast forward. MP3/WMA Operation This player allows you to "4X", "8X", and "20X". Please see the DVD/Disc Video Operation section for information about these topics. Touch to return to MAIN MENU 10. >/||: Touch to...
...tracks on the joystick to the next track on the screen. Current track and total number of the normal VM9511TS progression. Touch to activate/deactivate Scan mode 5. Press the || button (17, 19) on remote control or the < or > button (16, 17) on disc 2. Elapsed playing time 3. Touch to ... Rate: 128kbps • Sampling Frequency: 48kHz When recording MP3 up to fast forward. MP3/WMA Operation This player allows you to "4X", "8X", and "20X". Please see the DVD/Disc Video Operation section for information about these topics. Touch to return to MAIN MENU 10. >/||: Touch to...
Instruction Manual
Page 34
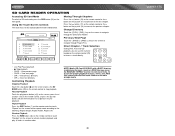
..., Repeat Off. To ensure the proper playback of music, movie, and JPEG files, place all tracks in random order. NOTE: Media (SD Card/CD-R/DVD) with a ROOT directory containing only music, movie or JPEG files may cause the RANDOM / REPEAT function to the next chapter. SD CARD READER OPERATION Accessing... SD Card Mode To switch to SD card mode, press the SRC button (15) on the data storage media. 30 VM9511TS Moving Through Chapters Press the >>| button (19) on the remote control or the > button on the joystick (17) to advance to work incorrectly.
..., Repeat Off. To ensure the proper playback of music, movie, and JPEG files, place all tracks in random order. NOTE: Media (SD Card/CD-R/DVD) with a ROOT directory containing only music, movie or JPEG files may cause the RANDOM / REPEAT function to the next chapter. SD CARD READER OPERATION Accessing... SD Card Mode To switch to SD card mode, press the SRC button (15) on the data storage media. 30 VM9511TS Moving Through Chapters Press the >>| button (19) on the remote control or the > button on the joystick (17) to advance to work incorrectly.
Instruction Manual
Page 35
... button (5) on the VM9511TS TFT monitor. NOTE: To transmit the video from your iPod is plugged into the unit. To exit PHOTO mode, press the >> button (14) on the remote control or MENU button on the iPod. The selected directory will be displayed on the remote control to select the desired... Playback While iPod video can be displayed on the VM9511TS screen, you must use the iPod to control photo playback options. Photo Playback While iPod photos can be viewed on the VM9511TS TFT monitor. Press the MENU button (1) on the remote control to the next item on the joystick (17) ...
... button (5) on the VM9511TS TFT monitor. NOTE: To transmit the video from your iPod is plugged into the unit. To exit PHOTO mode, press the >> button (14) on the remote control or MENU button on the iPod. The selected directory will be displayed on the remote control to select the desired... Playback While iPod video can be displayed on the VM9511TS screen, you must use the iPod to control photo playback options. Photo Playback While iPod photos can be viewed on the VM9511TS TFT monitor. Press the MENU button (1) on the remote control to the next item on the joystick (17) ...


