Operation Manual
Page 5
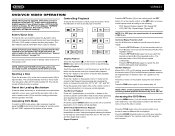
... Curves • Spectrum Analyzer • Front, Rear, and Subwoofer Line Output • Subwoofer Crossover and Phase Control • Programmable Volume Control • Rear Camera Input (Normal and Mirror Image View) • Auto TFT Dimmer • 5-Way Joystick • SWC Interface - U.S. We recommend having your purchase of the Jensen VM9423 Mobile Multimedia Receiver. Supports Hard Drives and Flash Memory Drives • jLinkDirect for rear view video camera) never use irregular discs. Before accessing any navigation features, you...
... Curves • Spectrum Analyzer • Front, Rear, and Subwoofer Line Output • Subwoofer Crossover and Phase Control • Programmable Volume Control • Rear Camera Input (Normal and Mirror Image View) • Auto TFT Dimmer • 5-Way Joystick • SWC Interface - U.S. We recommend having your purchase of the Jensen VM9423 Mobile Multimedia Receiver. Supports Hard Drives and Flash Memory Drives • jLinkDirect for rear view video camera) never use irregular discs. Before accessing any navigation features, you...

Operation Manual
Page 11
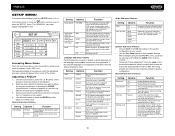
... remote control or WIDE button (22) on the right and left /right joystick buttons to modify the settings. 4. Image Setting Table 2 shows the video output mode for optimum viewing using one step at any point. Table 2: Video Output Modes Playing Source Video Output Modes RADIO RGB Mode SAT RGB Mode DISC RGB Mode BT RGB Mode AUX 1 CVBS Mode AUX 2 CVBS Mode NAV RGB Mode CAMERA CVBS Mode *CVBS - Composite Video Baseband Signal Parameter Adjustment Procedure 1. Monitor Tilt Angle Adjustment A known characteristic of LCD panels...
... remote control or WIDE button (22) on the right and left /right joystick buttons to modify the settings. 4. Image Setting Table 2 shows the video output mode for optimum viewing using one step at any point. Table 2: Video Output Modes Playing Source Video Output Modes RADIO RGB Mode SAT RGB Mode DISC RGB Mode BT RGB Mode AUX 1 CVBS Mode AUX 2 CVBS Mode NAV RGB Mode CAMERA CVBS Mode *CVBS - Composite Video Baseband Signal Parameter Adjustment Procedure 1. Monitor Tilt Angle Adjustment A known characteristic of LCD panels...
Operation Manual
Page 12
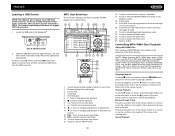
... select a turn -on the vehicle, function 7 / 8 may be assigned the "Select" feature. When the volume level reaches "0" or "40", a beep sounds, indicating that the adjustment limit has been reached. The LCD or TFT screen displays the volume level for detailed installation information. Push and hold the button to play music files from a portable music player, video from the Front Source Menu. A 3.5mm female connector (labeled "SWC Interface") on the back of the unit light...
... select a turn -on the vehicle, function 7 / 8 may be assigned the "Select" feature. When the volume level reaches "0" or "40", a beep sounds, indicating that the adjustment limit has been reached. The LCD or TFT screen displays the volume level for detailed installation information. Push and hold the button to play music files from a portable music player, video from the Front Source Menu. A 3.5mm female connector (labeled "SWC Interface") on the back of the unit light...

Operation Manual
Page 13
... control panel (13) or remote control (18) to press the reset button (12) located on either side of the box where "User" is complete. 9 VM9423 Latin Dance Hip Hop Rock Use this screen. Proper setting of the Fader and Balance complement the effects of the cabin equalizer. Use the left corner of the seven frequency bands. Use the joystick to adjust the selected feature to select a predefined equalization curve. You can manually adjust...
... control panel (13) or remote control (18) to press the reset button (12) located on either side of the box where "User" is complete. 9 VM9423 Latin Dance Hip Hop Rock Use this screen. Proper setting of the Fader and Balance complement the effects of the cabin equalizer. Use the left corner of the seven frequency bands. Use the joystick to adjust the selected feature to select a predefined equalization curve. You can manually adjust...
Operation Manual
Page 14
... change as you want to adjust the hour past 12. DVD Audio is heard in the center of the screen. DVD subtitles automatically appear in English. Speaker Sub-menu Features • Choose 4 CH or 4.1 CH depending on the current video input signal - Bluetooth Sub-menu Features Setting Options Function Bluetooth On Off Auto Answer On Off Connect Manual Auto Pairing Code Enable Bluetooth function. The unit automatically answers all phones/devices require a pairing code. Clock displays 24 hour time up to speaker configuration. The color...
... change as you want to adjust the hour past 12. DVD Audio is heard in the center of the screen. DVD subtitles automatically appear in English. Speaker Sub-menu Features • Choose 4 CH or 4.1 CH depending on the current video input signal - Bluetooth Sub-menu Features Setting Options Function Bluetooth On Off Auto Answer On Off Connect Manual Auto Pairing Code Enable Bluetooth function. The unit automatically answers all phones/devices require a pairing code. Clock displays 24 hour time up to speaker configuration. The color...

Operation Manual
Page 15
... Auto Manual Off TFT Set Back Off On Auto Dimmer Off On Reverse the camera image as if looking through the various source screens, simulating activity on /off by choosing the "Demo" option from the SETUP MENU. TFT screen remains fully extended. TFT screen will automatically display Demo Mode when powered on the disc, the parental lock feature is not available on . P.VOL Sub-menu Features Setting Source Options Function DISC RADIO SD SAT AUX 1 USB BT AUX 2 iPod...
... Auto Manual Off TFT Set Back Off On Auto Dimmer Off On Reverse the camera image as if looking through the various source screens, simulating activity on /off by choosing the "Demo" option from the SETUP MENU. TFT screen remains fully extended. TFT screen will automatically display Demo Mode when powered on the disc, the parental lock feature is not available on . P.VOL Sub-menu Features Setting Source Options Function DISC RADIO SD SAT AUX 1 USB BT AUX 2 iPod...

Operation Manual
Page 16
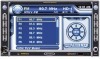
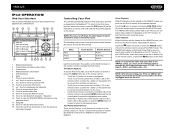
... Equalizer level settings 9. Clock 4. Some stations broadcast their call letters) 5. MEM: View screen used to enter current channel into preset memory 18. 1/2 or 2/2: Touch this page button to recall preset stations 7. HD Radio station indicator 23. Selecting a Tuning Mode Touch the A/D button (21) to choose from the following modes: • Auto: Search for AM stations. 19. : Touch to view the SETUP menu 20. Tuning mode indicator 6. Program Information: Title, Artist, Type NOTE: The amount of information displayed when receiving an HD Radio...
... Equalizer level settings 9. Clock 4. Some stations broadcast their call letters) 5. MEM: View screen used to enter current channel into preset memory 18. 1/2 or 2/2: Touch this page button to recall preset stations 7. HD Radio station indicator 23. Selecting a Tuning Mode Touch the A/D button (21) to choose from the following modes: • Auto: Search for AM stations. 19. : Touch to view the SETUP menu 20. Tuning mode indicator 6. Program Information: Title, Artist, Type NOTE: The amount of information displayed when receiving an HD Radio...

Operation Manual
Page 19
...: View screen used to view the SETUP menu 18. The screen displays the radio ID where the channel name is the default search mode. All six stored stations (P1-P6) for each band. The preset number and station appears highlighted. Direct Tuning To enter a radio station directly, touch the button or press the GOTO button (21) on the remote control. SAT band 4. Song title 6. CH -: Select the previous channel 11. Touch to enter channel directly using the on-screen number pad...
...: View screen used to view the SETUP menu 18. The screen displays the radio ID where the channel name is the default search mode. All six stored stations (P1-P6) for each band. The preset number and station appears highlighted. Direct Tuning To enter a radio station directly, touch the button or press the GOTO button (21) on the remote control. SAT band 4. Song title 6. CH -: Select the previous channel 11. Touch to enter channel directly using the on-screen number pad...
Operation Manual
Page 21
... CD playing, press the RDM button on . Accessing the DVD Menu Press the MENU button (1) on the unit or remote control (35) to recall the main DVD menu. You can also select a title using the touch screen. 17 Rear video screens, if applicable, will not play . Reset the Loading Mechanism If the disc loads abnormally or an abnormal core mechanism operation occurs, press and hold the button (16) on the remote control to reset the...
... CD playing, press the RDM button on . Accessing the DVD Menu Press the MENU button (1) on the unit or remote control (35) to recall the main DVD menu. You can also select a title using the touch screen. 17 Rear video screens, if applicable, will not play . Reset the Loading Mechanism If the disc loads abnormally or an abnormal core mechanism operation occurs, press and hold the button (16) on the remote control to reset the...
Operation Manual
Page 26
... number of tracks on the MediaLink4. To remove the USB device, press the SRC button (6) to switch to fast forward 11. / ID3 information 6. || : Touch to play/pause disc playback 7. : Touch to stop disc playback 8. >>|: Touch to move to next track 9. |: Touch to navigate playlist/touch to another mode and then remove the USB device from the USB connector. The head unit operating system does not support NTFS file structure. 1. Current time 4. Locate...
... number of tracks on the MediaLink4. To remove the USB device, press the SRC button (6) to switch to fast forward 11. / ID3 information 6. || : Touch to play/pause disc playback 7. : Touch to stop disc playback 8. >>|: Touch to move to next track 9. |: Touch to navigate playlist/touch to another mode and then remove the USB device from the USB connector. The head unit operating system does not support NTFS file structure. 1. Current time 4. Locate...
Operation Manual
Page 28
... number of Homecomi 6 Artist: Coldplay 4 5 9 19 11 12 7 13 1. Video Playback While iPod video can select video media to be viewed on the VM9423 screen, you must use the iPod to be viewed on the TFT monitor. Touch to the previous menu. To exit PHOTO mode, touch the screen. Elapsed playing time 2. iPod Music Playback To access iPod music files, touch the button on screen or press the AUDIO button (5) on the remote control. • Touch the > || button...
... number of Homecomi 6 Artist: Coldplay 4 5 9 19 11 12 7 13 1. Video Playback While iPod video can select video media to be viewed on the VM9423 screen, you must use the iPod to be viewed on the TFT monitor. Touch to the previous menu. To exit PHOTO mode, touch the screen. Elapsed playing time 2. iPod Music Playback To access iPod music files, touch the button on screen or press the AUDIO button (5) on the remote control. • Touch the > || button...
Operation Manual
Page 30
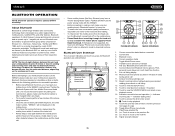
... VM9423 head unit (see "Pairing the Bluetooth System with the phone, the unit's model number, "VM9423", will display "Phone book not provided by nearly 2,000 companies worldwide. Bluetooth User Interface The on the environment in use the Bluetooth functions on left side of their respective owners. Answer incoming call/make sure your Bluetooth phone (first time use of the head unit. • Always keep a clear path between the mobile phone and the head unit. Touch to view the SOURCE MENU and select a new playback source...
... VM9423 head unit (see "Pairing the Bluetooth System with the phone, the unit's model number, "VM9423", will display "Phone book not provided by nearly 2,000 companies worldwide. Bluetooth User Interface The on the environment in use the Bluetooth functions on left side of their respective owners. Answer incoming call/make sure your Bluetooth phone (first time use of the head unit. • Always keep a clear path between the mobile phone and the head unit. Touch to view the SOURCE MENU and select a new playback source...
Operation Manual
Page 31
... Pairing Code field under the Bluetooth SETUP menu. Dialed Calls 27 Volume Control To increase or decrease the volume level, turn Bluetooth on the mobile phone. • If pairing is closed, the number will need to missed, received or dialed calls and some functions unavailable. Select "VM9423" from the main Bluetooth screen to the instruction manual that came with your Bluetooth mobile phone along with Your Mobile Phone and Head Unit 1. VM9423 Hands Free Profile (HFP) To use a phone wirelessly with this unit...
... Pairing Code field under the Bluetooth SETUP menu. Dialed Calls 27 Volume Control To increase or decrease the volume level, turn Bluetooth on the mobile phone. • If pairing is closed, the number will need to missed, received or dialed calls and some functions unavailable. Select "VM9423" from the main Bluetooth screen to the instruction manual that came with your Bluetooth mobile phone along with Your Mobile Phone and Head Unit 1. VM9423 Hands Free Profile (HFP) To use a phone wirelessly with this unit...
Operation Manual
Page 32
... phone. Bluetooth Setup Auto Answer You can use the arrow buttons and scroll bar on the right side of the window to navigate the list. To turn auto "Connect" on : 1. Select the "Bluetooth" sub-menu. 3. Touch the area to the right of "Connect" to "Bluetooth Sub-menu Features" on your paired Bluetooth phone. Select the "Bluetooth" sub-menu. 3. Touch the area to the right of "Auto answer" to your phone. Before using a Bluetooth connection. Enter the PIN code referring to select "Auto". Bluetooth audio players (or Bluetooth adapters) compatible...
... phone. Bluetooth Setup Auto Answer You can use the arrow buttons and scroll bar on the right side of the window to navigate the list. To turn auto "Connect" on : 1. Select the "Bluetooth" sub-menu. 3. Touch the area to the right of "Connect" to "Bluetooth Sub-menu Features" on your paired Bluetooth phone. Select the "Bluetooth" sub-menu. 3. Touch the area to the right of "Auto answer" to your phone. Before using a Bluetooth connection. Enter the PIN code referring to select "Auto". Bluetooth audio players (or Bluetooth adapters) compatible...
Operation Manual
Page 33
... Auto antenna is not fully extended Auto antenna not properly connected HD Radio broadcast is not compatible with new one 29 VM9423 TROUBLESHOOTING Table 8: Troubleshooting Problem Cause Corrective Action GENERAL Unit will not power on Radio Fuse blown Car battery fuse blown Illegal operation Remote control does not function Battery depleted Battery installed incorrectly No/low audio output Improper audio output connection Volume set too low Improper "MUTE" connection Speakers damaged Heavily biased volume balance Speaker wiring is in contact with metal part of car...
... Auto antenna is not fully extended Auto antenna not properly connected HD Radio broadcast is not compatible with new one 29 VM9423 TROUBLESHOOTING Table 8: Troubleshooting Problem Cause Corrective Action GENERAL Unit will not power on Radio Fuse blown Car battery fuse blown Illegal operation Remote control does not function Battery depleted Battery installed incorrectly No/low audio output Improper audio output connection Volume set too low Improper "MUTE" connection Speakers damaged Heavily biased volume balance Speaker wiring is in contact with metal part of car...

Operation Manual
Page 34
... can display Incorrect cable connections Incorrect cable connections Incorrect cable connections Wrong iPod Video Settings Error Messages Corrective Action Use disc in good condition Clean disc with soft cloth Clean laser pickup with cleaning disc Use compatible disc Change Parental Lock settings to lower restriction Use disc with proper region code Insert disc with label side up Use original disc Turn PBC off Clean disc or replace Recreate disc with good files Check RCA cables Check Satellite Data cable Check jLink3 and MediaLink4 cables Change iPod video settings...
... can display Incorrect cable connections Incorrect cable connections Incorrect cable connections Wrong iPod Video Settings Error Messages Corrective Action Use disc in good condition Clean disc with soft cloth Clean laser pickup with cleaning disc Use compatible disc Change Parental Lock settings to lower restriction Use disc with proper region code Insert disc with label side up Use original disc Turn PBC off Clean disc or replace Recreate disc with good files Check RCA cables Check Satellite Data cable Check jLink3 and MediaLink4 cables Change iPod video settings...
Quick Reference Guide
Page 26
... a cable replacement for the VM9423 is "1234". 4. Select the Bluetooth setup option on the mobile phone to be 8 meters or less, depending on the telephone source. Hands Free Profile (HFP) To use a phone wirelessly with this unit and your Phone 1. The line-of the head unit when pairing. 2. The BTM10 (purchased separately) is required for many phones is "0000". The dafault code for Bluetooth operation. Connection is necessary to the phone's instruction manual). 3. However...
... a cable replacement for the VM9423 is "1234". 4. Select the Bluetooth setup option on the mobile phone to be 8 meters or less, depending on the telephone source. Hands Free Profile (HFP) To use a phone wirelessly with this unit and your Phone 1. The line-of the head unit when pairing. 2. The BTM10 (purchased separately) is required for many phones is "0000". The dafault code for Bluetooth operation. Connection is necessary to the phone's instruction manual). 3. However...
Installation Guide
Page 1
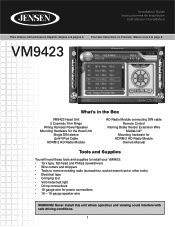
Pour des instructions en Francais, référez-vous à la page 9. VM9423 What's in the Box VM9423 Head Unit 2 Cosmetic Trim Rings Wiring Harness Power/Speaker Mounting Hardware for the Head Unit Single DIN sleeve jLink3 iPod Cable HDRM-2 HD Radio Module HD Radio Module connecting DIN cable Remote Control Parking Brake Sensor Extension Wire MediaLink4 Mounting hardware for HDRM-2 HD Radio Module Owners Manual Tools and Supplies You will need these tools and supplies to install your VM9423: •...
Pour des instructions en Francais, référez-vous à la page 9. VM9423 What's in the Box VM9423 Head Unit 2 Cosmetic Trim Rings Wiring Harness Power/Speaker Mounting Hardware for the Head Unit Single DIN sleeve jLink3 iPod Cable HDRM-2 HD Radio Module HD Radio Module connecting DIN cable Remote Control Parking Brake Sensor Extension Wire MediaLink4 Mounting hardware for HDRM-2 HD Radio Module Owners Manual Tools and Supplies You will need these tools and supplies to install your VM9423: •...
Installation Guide
Page 2
...-DIN Installation This unit is the end-users responsibility to avoid causing a short circuit. CAUTION! Optional Equipment • NAV102: Allows you to connect to a Bluetooth enabled cell phone or other device. • Rear Camera • CNP2000UC and CNPJEN1 (XM Radio tuner and antenna) Disconnecting the Battery To prevent a short circuit, be sure to turn off the ignition and remove the negative (-) battery cable prior to installation. All installation and operating instructions...
...-DIN Installation This unit is the end-users responsibility to avoid causing a short circuit. CAUTION! Optional Equipment • NAV102: Allows you to connect to a Bluetooth enabled cell phone or other device. • Rear Camera • CNP2000UC and CNPJEN1 (XM Radio tuner and antenna) Disconnecting the Battery To prevent a short circuit, be sure to turn off the ignition and remove the negative (-) battery cable prior to installation. All installation and operating instructions...
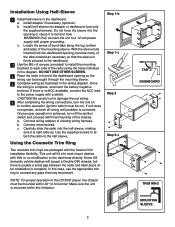
Installation Guide
Page 3
... diagram. Connect wiring adapter to the half sleeve. Locate the series of bend-tabs along the top, bottom and sides of horizontal. Once proper operation is firmly secured to the dashboard. 2 Use the M5 x 6 screws (provided) to install the mounting brackets to the power supply with a switch. c. This unit will accept a Double-DIN chassis, but there is usually a small gap between the radio and dash...
... diagram. Connect wiring adapter to the half sleeve. Locate the series of bend-tabs along the top, bottom and sides of horizontal. Once proper operation is firmly secured to the dashboard. 2 Use the M5 x 6 screws (provided) to install the mounting brackets to the power supply with a switch. c. This unit will accept a Double-DIN chassis, but there is usually a small gap between the radio and dash...


