Owners Manual
Page 2
... Remote Control 7 Rear Zone Remote COntrol 9 Using the TFT Monitor 10 Open/Close TFT Monitor 10 TFT Monitor Auto Open 10 Reverse Driving Use 10 Monitor Tilt Angle Adjustment 10 Aspect Ratio...10 Image Setting ...10 Parking Brake Inhibit 10 Monitor Movement Mechanism 10 operating instructions 11 Power On / Off ...11 Audible Beep Confirmation 11 Mute ...11 Playing Source Selection 11 Volume Adjustment ...11 Audio Control Menu ...11 Six-Channel Audio Control 11 Rear Zone ...11 System Reset...11 Line Mute ...11 System Setup Menu 12 General Setup Menu 12 ASP (Audio Sound...
... Remote Control 7 Rear Zone Remote COntrol 9 Using the TFT Monitor 10 Open/Close TFT Monitor 10 TFT Monitor Auto Open 10 Reverse Driving Use 10 Monitor Tilt Angle Adjustment 10 Aspect Ratio...10 Image Setting ...10 Parking Brake Inhibit 10 Monitor Movement Mechanism 10 operating instructions 11 Power On / Off ...11 Audible Beep Confirmation 11 Mute ...11 Playing Source Selection 11 Volume Adjustment ...11 Audio Control Menu ...11 Six-Channel Audio Control 11 Rear Zone ...11 System Reset...11 Line Mute ...11 System Setup Menu 12 General Setup Menu 12 ASP (Audio Sound...
Owners Manual
Page 3
... setting and playing status remains the same as when the unit was powered off the ignition and remove the negative (-) battery cable prior to installation. FULL, WIDE, and NORMAL screen modes. 12. Reverse driving automatically activates the TFT monitor and the rear view video camera; Joystick (5-way) control - The operating voltage of the Jensen VM9410 Mobile Multimedia AM/FM/DVD Receiver. Mechanical anti-vibration system + electronic shock protection - Tools and Supplies You will need...
... setting and playing status remains the same as when the unit was powered off the ignition and remove the negative (-) battery cable prior to installation. FULL, WIDE, and NORMAL screen modes. 12. Reverse driving automatically activates the TFT monitor and the rear view video camera; Joystick (5-way) control - The operating voltage of the Jensen VM9410 Mobile Multimedia AM/FM/DVD Receiver. Mechanical anti-vibration system + electronic shock protection - Tools and Supplies You will need...

Owners Manual
Page 4
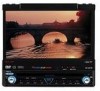
... the power supply with the main wire harness. The VM9410 uses one end of the chassis using the hex nut provided. NOTE: For proper operation of the CD/DVD player, the chassis must be on the rear of the perforated support strap (supplied) to avoid damaging the radio. FINAL INSTALLATION 5 4 1 77--IINNBCCAHHNDDTIFGTITAL TFT AS/PS VM9510 Push MUTE PWR AM/FM/DVD/MP3 RECEIVER DISP OPEN MODE AV AUX...
... the power supply with the main wire harness. The VM9410 uses one end of the chassis using the hex nut provided. NOTE: For proper operation of the CD/DVD player, the chassis must be on the rear of the perforated support strap (supplied) to avoid damaging the radio. FINAL INSTALLATION 5 4 1 77--IINNBCCAHHNDDTIFGTITAL TFT AS/PS VM9510 Push MUTE PWR AM/FM/DVD/MP3 RECEIVER DISP OPEN MODE AV AUX...
Owners Manual
Page 5
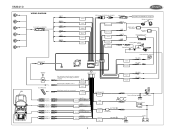
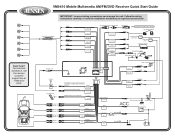
...BLACK GND BATTERY Ground Battery VM9410 Car WIRING DIAGRAM External Power Amplifier Antenna Jack Antenna Car Phone FRONT L+ FRONT LFRONT R+ FRONT RREAR R+ REAR RREAR L+ REAR L- GREY BLUE RED WHITE RED WHITE CENTER SUB.W SURROUND REAR R SURROUND REAR L FRONT R FRONT L CD Changer IP-BUS Cable / BLACK HEADPHONE L HEADPHONE R AUX IN/L AUX IN/R PINK PRK SW CD Changer WHITE compatible with SANYO disc changers Wireless Headphone RED WHITE RED Additional Rear Zone Video Rear Zone Video 1 External AV System Parking Brake Switch Parking Brake Light Ground AUX IN VIDEO Rear View Video...
...BLACK GND BATTERY Ground Battery VM9410 Car WIRING DIAGRAM External Power Amplifier Antenna Jack Antenna Car Phone FRONT L+ FRONT LFRONT R+ FRONT RREAR R+ REAR RREAR L+ REAR L- GREY BLUE RED WHITE RED WHITE CENTER SUB.W SURROUND REAR R SURROUND REAR L FRONT R FRONT L CD Changer IP-BUS Cable / BLACK HEADPHONE L HEADPHONE R AUX IN/L AUX IN/R PINK PRK SW CD Changer WHITE compatible with SANYO disc changers Wireless Headphone RED WHITE RED Additional Rear Zone Video Rear Zone Video 1 External AV System Parking Brake Switch Parking Brake Light Ground AUX IN VIDEO Rear View Video...
Owners Manual
Page 6
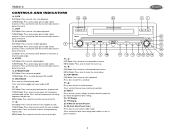
... button to activate the Local (LOC) setting. 7. Press and hold to display system information on . POWER/MUTE Press the POWER/MUTE button (7) once to play the previous disc. 9. 2/DISC+ DVD Mode: Press once to select audio language during playback. TUNER Mode: Press once to turn the unit off. 8. 1/DISC- Press and hold to enter/exit System Function set-up. 6. Press and hold to store the current radio station in preset channel 2. DSP Press the DSP button...
... button to activate the Local (LOC) setting. 7. Press and hold to display system information on . POWER/MUTE Press the POWER/MUTE button (7) once to play the previous disc. 9. 2/DISC+ DVD Mode: Press once to select audio language during playback. TUNER Mode: Press once to turn the unit off. 8. 1/DISC- Press and hold to enter/exit System Function set-up. 6. Press and hold to store the current radio station in preset channel 2. DSP Press the DSP button...
Owners Manual
Page 7
... to play preset radio station channel 3. TUNER Mode: Press once to the right. Press and hold to stop playback. TUNER Mode: Press to switch between 2 channel & 6 channel audio output. 7 8 9 10 11 12 13 15 25 16 19 22 13. 6/STOP 18. ( ) DVD Mode: Press once to switch between FM and AM. 15. IR Remote Control Receiver 26. VM9410 12. 5/2-6CH/RDM DVD Mode: Press once for fast forward/fast reverse. Press...
... to play preset radio station channel 3. TUNER Mode: Press once to the right. Press and hold to stop playback. TUNER Mode: Press to switch between 2 channel & 6 channel audio output. 7 8 9 10 11 12 13 15 25 16 19 22 13. 6/STOP 18. ( ) DVD Mode: Press once to switch between FM and AM. 15. IR Remote Control Receiver 26. VM9410 12. 5/2-6CH/RDM DVD Mode: Press once for fast forward/fast reverse. Press...
Owners Manual
Page 8
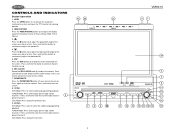
..., 14 segment LCD which displays the disc number or radio channel indicators when the corresponding function is active: • CH: radio is activated • DISC: DVD or CDC mode is activated. 4. Stereo/Local Indicator The stereo/local indicator illuminates one of the following DVD playback indicators become Illuminated when the corresponding function is activated VM9410 5 6 6 Main Display The main display is loaded 2. Channel/Disc Display The channel/disc display is a 2 digit, 7 segment LCD display which displays the time, tuning...
..., 14 segment LCD which displays the disc number or radio channel indicators when the corresponding function is active: • CH: radio is activated • DISC: DVD or CDC mode is activated. 4. Stereo/Local Indicator The stereo/local indicator illuminates one of the following DVD playback indicators become Illuminated when the corresponding function is activated VM9410 5 6 6 Main Display The main display is loaded 2. Channel/Disc Display The channel/disc display is a 2 digit, 7 segment LCD display which displays the time, tuning...
Owners Manual
Page 9
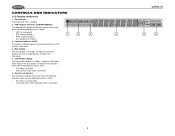
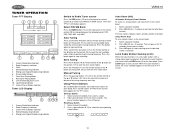
... radio station 19 Selects the next chap- Plays back Picture CD Plays back disc in dif- Selects the next track Searches an available ter for playback ter for playback for illustrative purposes only. 7 VM9410 FRONT ZONE REMOTE CONTROL Table 1: Front Zone Remote Control Functions Button Function Name MENU TITLE MUTE POWER/ AUDIO REPT A-B REPT SRC SUBTITLE DISP DISC DISC ANGLE VOL VOL + BAND GOTO Ref # DVD VCD CDC TUNER 1 Enters the main menu Turns...
... radio station 19 Selects the next chap- Plays back Picture CD Plays back disc in dif- Selects the next track Searches an available ter for playback ter for playback for illustrative purposes only. 7 VM9410 FRONT ZONE REMOTE CONTROL Table 1: Front Zone Remote Control Functions Button Function Name MENU TITLE MUTE POWER/ AUDIO REPT A-B REPT SRC SUBTITLE DISP DISC DISC ANGLE VOL VOL + BAND GOTO Ref # DVD VCD CDC TUNER 1 Enters the main menu Turns...

Owners Manual
Page 12
... AUX or CAMERA mode. If "TFT Auto Open" is "off" when the unit is turned on, press the OPEN button (1) or ( ) button (25) on , the front monitor displays "Parking Is On", preventing the driver from watching content while driving. Parking Brake Inhibit • When the "PRK SW" cable is connected to the brake switch, the display on the TFT monitor will display video only when the vehicle is parked. • Parking cable function is overridden when the video source is set to CAMERA...
... AUX or CAMERA mode. If "TFT Auto Open" is "off" when the unit is turned on, press the OPEN button (1) or ( ) button (25) on , the front monitor displays "Parking Is On", preventing the driver from watching content while driving. Parking Brake Inhibit • When the "PRK SW" cable is connected to the brake switch, the display on the TFT monitor will display video only when the vehicle is parked. • Parking cable function is overridden when the video source is set to CAMERA...
Owners Manual
Page 13
... playing sources in the following order: TUNER, DVD, CD Changer, AUX IN or CAMERA (rear view video camera). Press the MUTE button again to mute the volume from "0" to meet the acoustical characteristics of the cabin equalizer. Adjusting the volume or using the rear zone remote control. To install a rear view video camera, connect the video input cable to adjust the settings for deficiencies in the LCD panel (17), followed by the car phone or when verbal navigation is received by the current mode status. The LCD or TFT screen displays...
... playing sources in the following order: TUNER, DVD, CD Changer, AUX IN or CAMERA (rear view video camera). Press the MUTE button again to mute the volume from "0" to meet the acoustical characteristics of the cabin equalizer. Adjusting the volume or using the rear zone remote control. To install a rear view video camera, connect the video input cable to adjust the settings for deficiencies in the LCD panel (17), followed by the car phone or when verbal navigation is received by the current mode status. The LCD or TFT screen displays...
Owners Manual
Page 14
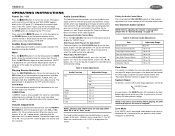
... disc. Table 7: General Setup Menu Features Setting Radio Clock Mode TV System TFT Auto Open OSD Language Clock Options USA1 USA2 Arabia China S-America Europe 12H 24H Auto NTSC PAL On Off English (HH:MM) Function Select the appropriate setting based on the joystick. Press the DISP button (5) on the remote control to open : 1. A menu appears with the selected option highlighted in light blue. 12 You must press the OPEN button (1) to confirm setup...
... disc. Table 7: General Setup Menu Features Setting Radio Clock Mode TV System TFT Auto Open OSD Language Clock Options USA1 USA2 Arabia China S-America Europe 12H 24H Auto NTSC PAL On Off English (HH:MM) Function Select the appropriate setting based on the joystick. Press the DISP button (5) on the remote control to open : 1. A menu appears with the selected option highlighted in light blue. 12 You must press the OPEN button (1) to confirm setup...
Owners Manual
Page 16
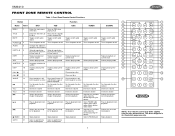
... Signal Broadcasting Indicator 6. Auto Store (AS) Automatic Storing of Preset Stations To select six strong stations and store them in the current band: 1. Using Preset Scan To scan stored stations in the current band: 1. To activate the Local function, press and hold the button (17) on the remote control or the button on , only radio stations with a strong radio signal are played. User Defined Equalizer Level 10. The Tuner TFT or LCD display appears. Using Preset Stations Six numbered preset buttons...
... Signal Broadcasting Indicator 6. Auto Store (AS) Automatic Storing of Preset Stations To select six strong stations and store them in the current band: 1. Using Preset Scan To scan stored stations in the current band: 1. To activate the Local function, press and hold the button (17) on the remote control or the button on , only radio stations with a strong radio signal are played. User Defined Equalizer Level 10. The Tuner TFT or LCD display appears. Using Preset Stations Six numbered preset buttons...
Owners Manual
Page 17
... or remote control (25) to suspend or resume disc play unless the recording session is moving, the TFT screen displays "PARKING" with a blue background. Rear video screens, if applicable, will not play . Opening/Closing the TFT Video Screen Opening the TFT Screen To open . Once the TFT screen is playing with the power off and the unit remains off . SC - Scan Playback; Press (18) to switch between 2-channel (DownMix Mode) and 6-channel (Full 6CH Mode) speaker output. 2-Channel audio...
... or remote control (25) to suspend or resume disc play unless the recording session is moving, the TFT screen displays "PARKING" with a blue background. Rear video screens, if applicable, will not play . Opening/Closing the TFT Video Screen Opening the TFT Screen To open . Once the TFT screen is playing with the power off and the unit remains off . SC - Scan Playback; Press (18) to switch between 2-channel (DownMix Mode) and 6-channel (Full 6CH Mode) speaker output. 2-Channel audio...
Owners Manual
Page 18
... zone. 16 Table 9: Speaker Output Options Speaker Setup 2CH mode Play 2CH audio in 6CH mode with Surround "Off" Play 2CH audio in 6CH mode with subtitles, press the SUBTITLE button (9) on , playback starts from different angles. Changing Subtitle Language If you are set to use the numeric keypad on -screen image. "00:41:28" indicates the playback time of the on the remote control (29) to specific time in current title...
... zone. 16 Table 9: Speaker Output Options Speaker Setup 2CH mode Play 2CH audio in 6CH mode with Surround "Off" Play 2CH audio in 6CH mode with subtitles, press the SUBTITLE button (9) on , playback starts from different angles. Changing Subtitle Language If you are set to use the numeric keypad on -screen image. "00:41:28" indicates the playback time of the on the remote control (29) to specific time in current title...

Owners Manual
Page 20
... the remote control or the or buttons (18, 19) on the unit. Enter the option field for low volumes. Table 14: AUDIO Menu Features Setting Options Function Pink Noise DRC Surround Mode CNTR CTRL Off Left Center Right Left Surr Right Surr Subwoofer Off On Off Surround I Surround II SURR Matrix SURR Movie SURR Music 5ms 4ms 3ms 2ms 1ms 0ms Stop output...
... the remote control or the or buttons (18, 19) on the unit. Enter the option field for low volumes. Table 14: AUDIO Menu Features Setting Options Function Pink Noise DRC Surround Mode CNTR CTRL Off Left Center Right Left Surr Right Surr Subwoofer Off On Off Surround I Surround II SURR Matrix SURR Movie SURR Music 5ms 4ms 3ms 2ms 1ms 0ms Stop output...
Owners Manual
Page 22
... appear lit on the screen. VM9410 CD PLAYER/CHANGER OPERATION Instructions for Insert/Eject, Play/Pause, Stopping Playback, Track Selection, Fast Forward/Fast Reverse, Scan, and Random Play are the same for information about these topics. For CD-RW discs, please make sure it is capable of the "Root' directory. Use the numeric keypad (29) on the remote control to access files directly. Press the STOP button...
... appear lit on the screen. VM9410 CD PLAYER/CHANGER OPERATION Instructions for Insert/Eject, Play/Pause, Stopping Playback, Track Selection, Fast Forward/Fast Reverse, Scan, and Random Play are the same for information about these topics. For CD-RW discs, please make sure it is capable of the "Root' directory. Use the numeric keypad (29) on the remote control to access files directly. Press the STOP button...

Owners Manual
Page 23
... fuse blown Illegal operation Remote control does not function Battery depleted Battery installed incorrectly No/low audio output Improper audio output connection Volume set too low Improper "MUTE" connection Speakers damaged Heavily biased volume balance Speaker wiring is in use Speaker power rating not compatible with unit Speaker is shorted Tel-Mute malfunction "MUTE" wire is grounded Unit resets itself when engine is off Incorrect connection between ACC and positive battery wire TFT MONITOR Monitor does not open automatically TFT Auto Open is turned off No image...
... fuse blown Illegal operation Remote control does not function Battery depleted Battery installed incorrectly No/low audio output Improper audio output connection Volume set too low Improper "MUTE" connection Speakers damaged Heavily biased volume balance Speaker wiring is in use Speaker power rating not compatible with unit Speaker is shorted Tel-Mute malfunction "MUTE" wire is grounded Unit resets itself when engine is off Incorrect connection between ACC and positive battery wire TFT MONITOR Monitor does not open automatically TFT Auto Open is turned off No image...

Owners Manual
Page 24
... compatible with or without an adaptor, as alcohol) may appear on the LCD panel. If this occur, the screen will not operate properly until the moisture has evaporated. 8. If such conditions occur, allow the unit to use a cleaning disc in this unit DVD is not covered by foreign objects. 5. VM9410 Table 18: Troubleshooting Problem Disc does not play of the disc. If the temperature inside the player...
... compatible with or without an adaptor, as alcohol) may appear on the LCD panel. If this occur, the screen will not operate properly until the moisture has evaporated. 8. If such conditions occur, allow the unit to use a cleaning disc in this unit DVD is not covered by foreign objects. 5. VM9410 Table 18: Troubleshooting Problem Disc does not play of the disc. If the temperature inside the player...
Owners Manual
Page 25
....1mm) W X 3.42" (87mm) H Screen Type: TFT Liquid Crystal Display (LCD) active matrix Response Time: 30mSec rise time, 50mSec fall time Resolution: • DVD/Composite Video in: 336,960 sub pixels, 1440 (W) X 234 (H) Viewing angle: • 65 degrees left or right • 40 degrees up • 65 degrees down General Auxiliary Input impedance: 10k Power Supply: 11 to 16VDC, negative ground Fuse: 10-amp, mini ATM type DIN...
....1mm) W X 3.42" (87mm) H Screen Type: TFT Liquid Crystal Display (LCD) active matrix Response Time: 30mSec rise time, 50mSec fall time Resolution: • DVD/Composite Video in: 336,960 sub pixels, 1440 (W) X 234 (H) Viewing angle: • 65 degrees left or right • 40 degrees up • 65 degrees down General Auxiliary Input impedance: 10k Power Supply: 11 to 16VDC, negative ground Fuse: 10-amp, mini ATM type DIN...
Quick Start Guide
Page 1
... Battery For technical assistance, call the Jensen customer support line at 1-800-3234815. External Power Amplifier GREY BLUE RED WHITE RED WHITE Antenna Jack CENTER SUB.W SURROUND REAR R SURROUND REAR L FRONT R FRONT L CD Changer IP-BUS Cable / BLACK HEADPHONE L HEADPHONE R AUX IN/L AUX IN/R PINK PRK SW CD Changer WHITE compatible with SANYO disc changers Wireless Headphone RED WHITE RED Additional Rear Zone Video Rear Zone Video 1 External AV System Parking Brake Switch Parking Brake Light Ground CAMERA AUX IN VIDEO Rear View Video Camera YELLOW YELLOW Antenna Car Phone...
... Battery For technical assistance, call the Jensen customer support line at 1-800-3234815. External Power Amplifier GREY BLUE RED WHITE RED WHITE Antenna Jack CENTER SUB.W SURROUND REAR R SURROUND REAR L FRONT R FRONT L CD Changer IP-BUS Cable / BLACK HEADPHONE L HEADPHONE R AUX IN/L AUX IN/R PINK PRK SW CD Changer WHITE compatible with SANYO disc changers Wireless Headphone RED WHITE RED Additional Rear Zone Video Rear Zone Video 1 External AV System Parking Brake Switch Parking Brake Light Ground CAMERA AUX IN VIDEO Rear View Video Camera YELLOW YELLOW Antenna Car Phone...


