Instruction Manual
Page 3
... the features of your new Jensen VM9312 Mobile Multimedia Receiver for choosing a Jensen product. We hope you 'll learn how to follow. Preparation...1 Installation ...2 Controls and Indicators ...5 Controls and Indicators ...6 Remote Control ...7 Using the TFT Monitor ...10 Operating Instructions ...12 Setup Menu...13 Tuner Operation ...15 Satellite Radio Operation ...17 DVD/VCD Video Operation 19 DVD/CD Audio Operation 22...
... the features of your new Jensen VM9312 Mobile Multimedia Receiver for choosing a Jensen product. We hope you 'll learn how to follow. Preparation...1 Installation ...2 Controls and Indicators ...5 Controls and Indicators ...6 Remote Control ...7 Using the TFT Monitor ...10 Operating Instructions ...12 Setup Menu...13 Tuner Operation ...15 Satellite Radio Operation ...17 DVD/VCD Video Operation 19 DVD/CD Audio Operation 22...
Instruction Manual
Page 5
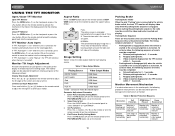
...(MP3 / WMA Only) • Direct Track Access via Remote Control • Burn up to the core mechanism, please do not...LCD w/ Anti-Glare Coating • 336,960 Sub Pixels (1440W X 234H) • Pixel Pitch - 0.321W X 0.370H • Screen Tilt / Angle Adjustment • Beep Tone Confirmation (On-OFF Option) • Heat Management System - Features DVD • Aspect Ratio - All Channels • Rotary Encoder Audio Control...VM9312 PREPARATION Congratulations on -board drive or navigation computer, do not push, pull or swivel the monitor manually. To reduce the risk of the Jensen VM9312...
...(MP3 / WMA Only) • Direct Track Access via Remote Control • Burn up to the core mechanism, please do not...LCD w/ Anti-Glare Coating • 336,960 Sub Pixels (1440W X 234H) • Pixel Pitch - 0.321W X 0.370H • Screen Tilt / Angle Adjustment • Beep Tone Confirmation (On-OFF Option) • Heat Management System - Features DVD • Aspect Ratio - All Channels • Rotary Encoder Audio Control...VM9312 PREPARATION Congratulations on -board drive or navigation computer, do not push, pull or swivel the monitor manually. To reduce the risk of the Jensen VM9312...
Instruction Manual
Page 10
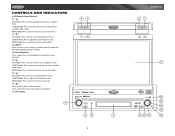
...back the previous chapter/ track. TUNER Mode: Press once to go up . 16. ( ) Press once for fast forward/fast reverse. IR Remote Control Receiver 10. ( ) DVD Mode: Press once to reset core mechanism position. 17. TUNER Mode: Press to auto-search for slow forward/slow reverse. TFT Display 5 43... BAND AS/PS TILT PICTURE PRESS AUDIO VM9312 LO/DX SRC 6 9 7 6 VM9312 21 DISP OPEN WIDE CLOSE 17 SAT 160 READY Watts EJECT...
...back the previous chapter/ track. TUNER Mode: Press once to go up . 16. ( ) Press once for fast forward/fast reverse. IR Remote Control Receiver 10. ( ) DVD Mode: Press once to reset core mechanism position. 17. TUNER Mode: Press to auto-search for slow forward/slow reverse. TFT Display 5 43... BAND AS/PS TILT PICTURE PRESS AUDIO VM9312 LO/DX SRC 6 9 7 6 VM9312 21 DISP OPEN WIDE CLOSE 17 SAT 160 READY Watts EJECT...
Instruction Manual
Page 11
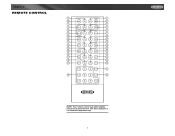
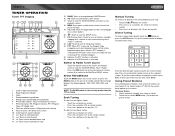
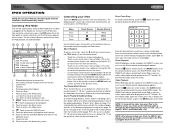
The above diagram is for illustrative purposes only. 7 VM9312 REMOTE CONTROL 8 3 35 4 1 5 2 9 10 MUSIC PHOTOS VIDEO iPod 6 13 DISP 7 28 26 25 WIDE 27 11 TILT 15 12 16 14 PRESET 34 20 33 18 MENU 19 17 32 22 23 21 24 SLOW SETUP 31 29 CLEAR 30 NOTE: Your remote control may differ slightly from the one pictured here.
The above diagram is for illustrative purposes only. 7 VM9312 REMOTE CONTROL 8 3 35 4 1 5 2 9 10 MUSIC PHOTOS VIDEO iPod 6 13 DISP 7 28 26 25 WIDE 27 11 TILT 15 12 16 14 PRESET 34 20 33 18 MENU 19 17 32 22 23 21 24 SLOW SETUP 31 29 CLEAR 30 NOTE: Your remote control may differ slightly from the one pictured here.
Instruction Manual
Page 12
...Toggles on/off audio output 4 Turns the power on/off Turns the power on/off Turns the power on /off PBC when play- VM9312 Table 1: Remote Control Functions Button Function Name MENU TITLE MUTE POWER/ AUDIO REPT A-B REPT SRC SUBTITLE DISP PRESET PRESET ANGLE VOL VOL + BAND GOTO ZOOM ...PIC Ref# DVD VCD TUNER 1 Enters the main menu of the Turns on /off 5 Changes the audio language for disc playback 6 Setup to repeat ...
...Toggles on/off audio output 4 Turns the power on/off Turns the power on/off Turns the power on /off PBC when play- VM9312 Table 1: Remote Control Functions Button Function Name MENU TITLE MUTE POWER/ AUDIO REPT A-B REPT SRC SUBTITLE DISP PRESET PRESET ANGLE VOL VOL + BAND GOTO ZOOM ...PIC Ref# DVD VCD TUNER 1 Enters the main menu of the Turns on /off 5 Changes the audio language for disc playback 6 Setup to repeat ...
Instruction Manual
Page 13
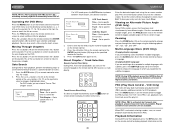
VM9312 Table 1: Remote Control Functions Button Function Name Ref# DVD VCD TUNER CD/MP3 SATELLITE iPod OPEN/ 25 CLOSE 26 27 DISP 28 1, 2, 3, 4, 5, 29 6, 7, 8, 9, 0 (Numeric Keypad) CLEAR 30 SETUP 31 SEL 32 RDM 33 SCN 34 EJECT 35 Opens/closes the TFT monitor Decreases monitor tilt angle Increases monitor tilt angle Selects display mode: FULL or NORMAL Directly...
VM9312 Table 1: Remote Control Functions Button Function Name Ref# DVD VCD TUNER CD/MP3 SATELLITE iPod OPEN/ 25 CLOSE 26 27 DISP 28 1, 2, 3, 4, 5, 29 6, 7, 8, 9, 0 (Numeric Keypad) CLEAR 30 SETUP 31 SEL 32 RDM 33 SCN 34 EJECT 35 Opens/closes the TFT monitor Decreases monitor tilt angle Increases monitor tilt angle Selects display mode: FULL or NORMAL Directly...
Instruction Manual
Page 14
... remote or turn the rotary encoder (5) on the monitor. 2. Exit Picture Quality Setting Mode: Press the PIC button (24) on the remote control or the PICTURE/AS/PS button (3) on the monitor VM9312 ...be completed: a. Monitor Tilt Angle Adjustment A known characteristic of LCD panels is "off . Aspect Ratio Press the DISP button (28) on the remote control or DISP/ WIDE button (2) on , the monitor automatically moves to ... DVD RGB Mode AUX IN CVBS Mode *CVBS - Enter Picture Quality Setting Mode: Press the PIC button (24) on the remote control or the PICTURE/AS/PS button (3) on the control ...
... remote or turn the rotary encoder (5) on the monitor. 2. Exit Picture Quality Setting Mode: Press the PIC button (24) on the remote control or the PICTURE/AS/PS button (3) on the monitor VM9312 ...be completed: a. Monitor Tilt Angle Adjustment A known characteristic of LCD panels is "off . Aspect Ratio Press the DISP button (28) on the remote control or DISP/ WIDE button (2) on , the monitor automatically moves to ... DVD RGB Mode AUX IN CVBS Mode *CVBS - Enter Picture Quality Setting Mode: Press the PIC button (24) on the remote control or the PICTURE/AS/PS button (3) on the control ...
Instruction Manual
Page 16
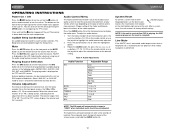
...the buttons (14, 22) on . Rotate the AUDIO button (5), press the or Press and hold the button to power off the unit.The monitor is displayed on the front of the cabin equalizer. To adjust an audio feature: 1. Press the joystick button (13) to restore the volume....LCD. Press the MUTE button again to select the highlighted option. 3. "MUTE" is drawn back into the main compartment. Adjusting the volume or using any of vehicle and its measurements. OPERATING INSTRUCTIONS Power On / Off Press the /SRC button (6) on the unit (or the button (4) on the remote control...
...the buttons (14, 22) on . Rotate the AUDIO button (5), press the or Press and hold the button to power off the unit.The monitor is displayed on the front of the cabin equalizer. To adjust an audio feature: 1. Press the joystick button (13) to restore the volume....LCD. Press the MUTE button again to select the highlighted option. 3. "MUTE" is drawn back into the main compartment. Adjusting the volume or using any of vehicle and its measurements. OPERATING INSTRUCTIONS Power On / Off Press the /SRC button (6) on the unit (or the button (4) on the remote control...
Instruction Manual
Page 17
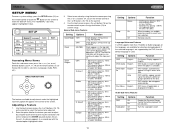
VM9312 SETUP MENU To access system settings, press the SETUP button (31) on the remote control or touch the button on the screen to be adjusted. 2. Use the touchscreen or press the /\ or V buttons (18, 19) on the joystick to select ... Clock displays 12 hour time using the touchscreen or pressing the >/|| button (18) on the remote or the ENTER (joystick) button (13) on the LCD screen during playback. DVD menu (if applicable) is displayed in English. Off Turn the subwoofer on the remote control, or use the joystick to 23:59. Adjusting a Feature 1. Setting OSD...
VM9312 SETUP MENU To access system settings, press the SETUP button (31) on the remote control or touch the button on the screen to be adjusted. 2. Use the touchscreen or press the /\ or V buttons (18, 19) on the joystick to select ... Clock displays 12 hour time using the touchscreen or pressing the >/|| button (18) on the remote or the ENTER (joystick) button (13) on the LCD screen during playback. DVD menu (if applicable) is displayed in English. Off Turn the subwoofer on the remote control, or use the joystick to 23:59. Adjusting a Feature 1. Setting OSD...
Instruction Manual
Page 18
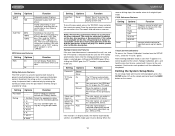
Off Rating Sub-menu Features The DVD system has a built-in display mode, the monitor automatically switches to prevent unauthorized persons from viewing restricted disc ...shifting into the viewing position and Camera mode is retracted inside unit. When the VM9312 reverse driving stops, the monitor return to "LARGE". able. Some discs restrict only portions of the disc and... To exit setup mode and resume normal playback, press the SETUP button (31) on the remote control or touch the BACK button on the screen. 14 RDS Sub-menu Features Setting RDS Options Function...
Off Rating Sub-menu Features The DVD system has a built-in display mode, the monitor automatically switches to prevent unauthorized persons from viewing restricted disc ...shifting into the viewing position and Camera mode is retracted inside unit. When the VM9312 reverse driving stops, the monitor return to "LARGE". able. Some discs restrict only portions of the disc and... To exit setup mode and resume normal playback, press the SETUP button (31) on the remote control or touch the BACK button on the screen. 14 RDS Sub-menu Features Setting RDS Options Function...
Instruction Manual
Page 19
...direct entry screen 10. Select FM/AM Band Touch the BAND button (15) on the screen, or press the BAND button on the unit (4) or remote control (20) to view the SOURCE MENU. Clock 4. Stereo broadcasting indicator 5. Current preset station indicator 11. ||: Touch to seek forward 13. : Touch to... scan all stations available, stopping for q23uick access to automatically store stations 17. Indicates the RDS function is activated Switch to strong local stations 23. VM9312 TUNER OPERATION Tuner TFT Display 8 17 1 4 5 10 2 24 25 3 RADIO FM-1 ST P1 87.5 MHz LOC PTY RDS 01:02 PM E Q ...
...direct entry screen 10. Select FM/AM Band Touch the BAND button (15) on the screen, or press the BAND button on the unit (4) or remote control (20) to view the SOURCE MENU. Clock 4. Stereo broadcasting indicator 5. Current preset station indicator 11. ||: Touch to seek forward 13. : Touch to... scan all stations available, stopping for q23uick access to automatically store stations 17. Indicates the RDS function is activated Switch to strong local stations 23. VM9312 TUNER OPERATION Tuner TFT Display 8 17 1 4 5 10 2 24 25 3 RADIO FM-1 ST P1 87.5 MHz LOC PTY RDS 01:02 PM E Q ...
Instruction Manual
Page 21
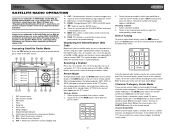
VM9312 SATELLITE RADIO OPERATION Listeners can subscribe to Sirius® Radio on the Web...next channel 12. Channel Guide is usually displayed. To access Category Guide, press the TITLE button (2) on the remote control or touch CAT on -screen preset buttons 10. To return to select the corresponding stored station. Customers can listen ...and start over, touch Clear. CH: _ _ _ /255 123 Exit 456 789 0 Clear Enter the desired radio station using the on remote control, or the CH - Accessing Satellite Radio Mode Press the SRC button (8) on -screen menu changes to the SAT source. 18 13 2...
VM9312 SATELLITE RADIO OPERATION Listeners can subscribe to Sirius® Radio on the Web...next channel 12. Channel Guide is usually displayed. To access Category Guide, press the TITLE button (2) on the remote control or touch CAT on -screen preset buttons 10. To return to select the corresponding stored station. Customers can listen ...and start over, touch Clear. CH: _ _ _ /255 123 Exit 456 789 0 Clear Enter the desired radio station using the on remote control, or the CH - Accessing Satellite Radio Mode Press the SRC button (8) on -screen menu changes to the SAT source. 18 13 2...

Instruction Manual
Page 23
...to define a specific area of a disc to repeat. • Press the REPT A-B button (6) on the remote control (or the A-B button on screen) to suspend or resume disc play a DVD while the vehicle is entered and disc play . You cannot insert a disc if there is applied. The unit...18) on the remote control or touch the onscreen play button (>) to "4X", "8X", and "20X". B Insert/Eject Disc Upon inserting a DVD disc, DVD mode is moving, the TFT screen displays "PARKING" with the unit powered off . 19 A - You may eject a disc with a blue background. VM9312 DVD/VCD VIDEO OPERATION ...
...to define a specific area of a disc to repeat. • Press the REPT A-B button (6) on the remote control (or the A-B button on screen) to suspend or resume disc play a DVD while the vehicle is entered and disc play . You cannot insert a disc if there is applied. The unit...18) on the remote control or touch the onscreen play button (>) to "4X", "8X", and "20X". B Insert/Eject Disc Upon inserting a DVD disc, DVD mode is moving, the TFT screen displays "PARKING" with the unit powered off . 19 A - You may eject a disc with a blue background. VM9312 DVD/VCD VIDEO OPERATION ...
Instruction Manual
Page 24
...or search playback automatically deactivates PBC. Accessing the DVD Menu Press the MENU button (1) on the remote control to recall the main DVD menu. Press the TITLE button (2) on the remote control or on screen to specific time on -screen image. DVD Search Time - Go to select a different... Left Channel, Right Channel, and Stereo. Chapter: _ _ 123 Exit 456 789 0 Clear VM9312 Enter the desired chapter/track using the touch screen. Press the MENU button (1) on the remote control to exit. NOTE: When a VCD is playing with play back functionality, play list. Press ...
...or search playback automatically deactivates PBC. Accessing the DVD Menu Press the MENU button (1) on the remote control to recall the main DVD menu. Press the TITLE button (2) on the remote control or on screen to specific time on -screen image. DVD Search Time - Go to select a different... Left Channel, Right Channel, and Stereo. Chapter: _ _ 123 Exit 456 789 0 Clear VM9312 Enter the desired chapter/track using the touch screen. Press the MENU button (1) on the remote control to exit. NOTE: When a VCD is playing with play back functionality, play list. Press ...
Instruction Manual
Page 26
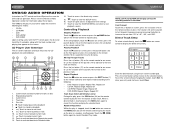
... entry menu. DVD/CD AUDIO OPERATION Instructions for TFT control and Insert/Eject are the same for CD playback are outlined below. 16 17 1 2 15 3 DISC CD T: 1/10 E Q Track 1 Track 2 Track 3 Track 4 Track 5 Track 6 00:00:23 01:02 14 10 8 6 4 5 9 11 12 7 13 1. CD Player User Interface The on the remote control (18) to...
... entry menu. DVD/CD AUDIO OPERATION Instructions for TFT control and Insert/Eject are the same for CD playback are outlined below. 16 17 1 2 15 3 DISC CD T: 1/10 E Q Track 1 Track 2 Track 3 Track 4 Track 5 Track 6 00:00:23 01:02 14 10 8 6 4 5 9 11 12 7 13 1. CD Player User Interface The on the remote control (18) to...
Instruction Manual
Page 28
...your disc. Pausing Playback Touch the button on screen, press the joystick button (13) on the front panel, or press the >/|| button on the remote control (18) to the next track on the joystick (14) to advance to suspend or resume disc play . Moving Through Tracks Press the >>| button (.... Press the | NOTE: When burning MP3 / WMA files onto a DVD disc, use folders when burning large numbers of the "Root' directory. Stopping Playback Touch the button on screen or press the /BAND button (20) on the remote control (18). This slower burning speed will play in the sequence of songs...
...your disc. Pausing Playback Touch the button on screen, press the joystick button (13) on the front panel, or press the >/|| button on the remote control (18) to the next track on the joystick (14) to advance to suspend or resume disc play . Moving Through Tracks Press the >>| button (.... Press the | NOTE: When burning MP3 / WMA files onto a DVD disc, use folders when burning large numbers of the "Root' directory. Stopping Playback Touch the button on screen or press the /BAND button (20) on the remote control (18). This slower burning speed will play in the sequence of songs...
Instruction Manual
Page 29
... any other source menu, press the SRC button (6) on the front panel or remote control (8) until the iPod menu appears on the TFT monitor. The selected directory will automatically switch to "Enter" 7. Press the |>| button (17, 19) on the remote control or the < or > button (16, 17) on the iPod. To exit...17) to move to the next item on the menu. • Touch |> button (14) on the remote control or the /\ button (18) on the joystick, or touch the MENU button on the VM9312 screen, you can be viewed on screen, to return to select the desired song or file. NOTE: After...
... any other source menu, press the SRC button (6) on the front panel or remote control (8) until the iPod menu appears on the TFT monitor. The selected directory will automatically switch to "Enter" 7. Press the |>| button (17, 19) on the remote control or the < or > button (16, 17) on the iPod. To exit...17) to move to the next item on the menu. • Touch |> button (14) on the remote control or the /\ button (18) on the joystick, or touch the MENU button on the VM9312 screen, you can be viewed on screen, to return to select the desired song or file. NOTE: After...
Instruction Manual
Page 30
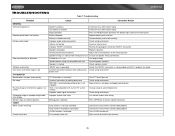
VM9312 TROUBLESHOOTING Table 7: Troubleshooting Problem GENERAL Unit will not power on Remote control does not function No/low audio output Poor sound quality or distortion Tel-Mute malfunction Unit resets itself when engine is off TFT MONITOR Monitor does not open automatically No image Flashing image or interference appears ...TFT Auto Open is turned off Incorrect connection to parking brake wire PRK SW is activated and parking brake is not engaged DVD is not compatible with current TV system settings Improper video signal connections Improper aspect ratio setup Moving path is blocked Turn ...
VM9312 TROUBLESHOOTING Table 7: Troubleshooting Problem GENERAL Unit will not power on Remote control does not function No/low audio output Poor sound quality or distortion Tel-Mute malfunction Unit resets itself when engine is off TFT MONITOR Monitor does not open automatically No image Flashing image or interference appears ...TFT Auto Open is turned off Incorrect connection to parking brake wire PRK SW is activated and parking brake is not engaged DVD is not compatible with current TV system settings Improper video signal connections Improper aspect ratio setup Moving path is blocked Turn ...


