Operation Manual
Page 26
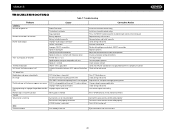
VM9213 TROUBLESHOOTING Table 7: Troubleshooting Problem Cause Corrective Action GENERAL Unit will not power on Check wiring and correct Stop vehicle in use Speaker... Replace battery with new one Remove battery and install correctly Check wiring and correct Increase volume level Review wiring diagram and check "MUTE" connection Replace speakers Adjust the channel balance to the ...parking brake is not engaged Flashing image or interference appears on screen DVD is not grounded and that it's properly insulated Check wiring and correct Turn TFT Auto Open on Radio Fuse blown Car...
VM9213 TROUBLESHOOTING Table 7: Troubleshooting Problem Cause Corrective Action GENERAL Unit will not power on Check wiring and correct Stop vehicle in use Speaker... Replace battery with new one Remove battery and install correctly Check wiring and correct Increase volume level Review wiring diagram and check "MUTE" connection Replace speakers Adjust the channel balance to the ...parking brake is not engaged Flashing image or interference appears on screen DVD is not grounded and that it's properly insulated Check wiring and correct Turn TFT Auto Open on Radio Fuse blown Car...
Installation Guide
Page 3
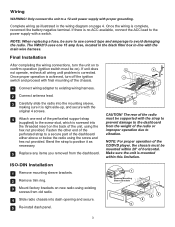
NOTE: When replacing a fuse, be on). The VM9213 uses one end of the perforated support strap (supplied) to the ... mounting sleeve brackets. 2 Remove trim ring. 3 Mount factory brackets on page 4. Only connect the unit to vibration. Complete wiring as necessary. 5 Replace any items you removed from old radio. 4 Slide radio chassis into the mounting sleeve, making sure...with the original 4 screws. 4 Attach one 15 amp fuse, located in the black filter box in the wiring diagram on new radio using the screw and hex nut provided. Fasten the other end of the perforated strap to a...
NOTE: When replacing a fuse, be on). The VM9213 uses one end of the perforated support strap (supplied) to the ... mounting sleeve brackets. 2 Remove trim ring. 3 Mount factory brackets on page 4. Only connect the unit to vibration. Complete wiring as necessary. 5 Replace any items you removed from old radio. 4 Slide radio chassis into the mounting sleeve, making sure...with the original 4 screws. 4 Attach one 15 amp fuse, located in the black filter box in the wiring diagram on new radio using the screw and hex nut provided. Fasten the other end of the perforated strap to a...

Installation Guide
Page 4
... amplifier) BLUE/WHITE External power amplifier control P.CONT BROWN MUTE Mute (leave open if not connected) Antenna Car Phone WHITE + FRONT L WHITE/BLACK - AUX IN 2 Wiring Diagram External AV System YELLOW WHITE RED (Requires PAC SWI-PS Interface Adapter, Sold Separately) Rear Video YELLOW Rear View Video Camera YELLOW PARKING BRAKE PINK...
... amplifier) BLUE/WHITE External power amplifier control P.CONT BROWN MUTE Mute (leave open if not connected) Antenna Car Phone WHITE + FRONT L WHITE/BLACK - AUX IN 2 Wiring Diagram External AV System YELLOW WHITE RED (Requires PAC SWI-PS Interface Adapter, Sold Separately) Rear Video YELLOW Rear View Video Camera YELLOW PARKING BRAKE PINK...


