Operation Manual
Page 10
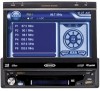
VM9213 USING THE TFT MONITOR Open/Close TFT Monitor Open TFT Monitor Press the OPEN button (4) on the front panel ...the mechanism that moves the display panel into the compartment. If "TFT Auto Open" is set to adjust the tilt angle of the screen one step at a time or press and hold the ( ) or ( ) button on the remote control or the WIDE/| ...Close TFT Monitor Press the OPEN button (4) on the front panel or press the ( ) button (25) on the TFT screen. The monitor angle can also adjust the tilt by pressing the TILT button (1) and then using one of the following methods: Step...
VM9213 USING THE TFT MONITOR Open/Close TFT Monitor Open TFT Monitor Press the OPEN button (4) on the front panel ...the mechanism that moves the display panel into the compartment. If "TFT Auto Open" is set to adjust the tilt angle of the screen one step at a time or press and hold the ( ) or ( ) button on the remote control or the WIDE/| ...Close TFT Monitor Press the OPEN button (4) on the front panel or press the ( ) button (25) on the TFT screen. The monitor angle can also adjust the tilt by pressing the TILT button (1) and then using one of the following methods: Step...
Operation Manual
Page 26
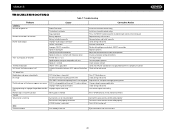
... automatically TFT Auto Open is turned off No image Incorrect connection to parking brake wire PRK SW is activated and parking brake is not engaged Flashing image or interference appears on screen DVD is in safe place and apply parking brake Change setup to accommodate disc ... control cable properly Turn LOCAL function off Eject current disc and insert new one 22 VM9213 TROUBLESHOOTING Table 7: Troubleshooting Problem Cause Corrective Action GENERAL Unit will not power on Check wiring and correct Stop vehicle in use Speaker power rating not compatible with current TV system ...
... automatically TFT Auto Open is turned off No image Incorrect connection to parking brake wire PRK SW is activated and parking brake is not engaged Flashing image or interference appears on screen DVD is in safe place and apply parking brake Change setup to accommodate disc ... control cable properly Turn LOCAL function off Eject current disc and insert new one 22 VM9213 TROUBLESHOOTING Table 7: Troubleshooting Problem Cause Corrective Action GENERAL Unit will not power on Check wiring and correct Stop vehicle in use Speaker power rating not compatible with current TV system ...

Installation Guide
Page 1
...237;jase a la página 5. VM9213 What's in the Box VM9213 Head Unit Cosmetic Trim Ring Wiring Harness Power/Speaker Mounting Hardware Single DIN Sleeve Remote Control Parking Brake Sensor Extension Wire 3.5mm Media Cable SD Card to USB Adaptor Touch Screen Cleaning Cloth Owners Manual Quick Reference Guide ...Tools and Supplies You will need these tools and supplies to install your VM9213: Ÿ Torx type, flat-head and ...
...237;jase a la página 5. VM9213 What's in the Box VM9213 Head Unit Cosmetic Trim Ring Wiring Harness Power/Speaker Mounting Hardware Single DIN Sleeve Remote Control Parking Brake Sensor Extension Wire 3.5mm Media Cable SD Card to USB Adaptor Touch Screen Cleaning Cloth Owners Manual Quick Reference Guide ...Tools and Supplies You will need these tools and supplies to install your VM9213: Ÿ Torx type, flat-head and ...
Installation Guide
Page 2
... sleeve to a Bluetooth enabled device, you must purchase and install the Jensen BTM10. Ÿ Rear Camera: Before accessing any navigation features, you must purchase and install a rear video camera. c. NOTE: If the VM9213 is to bend or bow. Under these conditions, use extra caution during... installation to damage the car wiring. 2 2a TAB TAB DASHBOARD DASHBOARD Do not force the sleeve into the dashboard or ...
... sleeve to a Bluetooth enabled device, you must purchase and install the Jensen BTM10. Ÿ Rear Camera: Before accessing any navigation features, you must purchase and install a rear video camera. c. NOTE: If the VM9213 is to bend or bow. Under these conditions, use extra caution during... installation to damage the car wiring. 2 2a TAB TAB DASHBOARD DASHBOARD Do not force the sleeve into the dashboard or ...
Installation Guide
Page 3
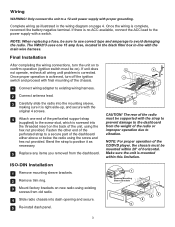
...a switch. NOTE: When replacing a fuse, be supported with final mounting of the chassis. 1 Connect wiring adapter to confirm operation (ignition switch must be mounted within this limitation. The VM9213 uses one end of the unit, using the hex nut provided. Final Installation After completing the... wiring connections, turn off the ignition 1 switch and proceed with the strap to prevent damage to ...
...a switch. NOTE: When replacing a fuse, be supported with final mounting of the chassis. 1 Connect wiring adapter to confirm operation (ignition switch must be mounted within this limitation. The VM9213 uses one end of the unit, using the hex nut provided. Final Installation After completing the... wiring connections, turn off the ignition 1 switch and proceed with the strap to prevent damage to ...

Installation Guide
Page 4
... R- GREY + FRONT R GREY/BLACK - GREEN/WHITE REVERSE + RED ACC ACC YELLOW BATT BATTERY + FUSE (15A) BLACK GND BATTERY Ground REVERSE + Ignition Switch Battery AUX IN 2 Wiring Diagram External AV System YELLOW WHITE RED (Requires PAC SWI-PS Interface Adapter, Sold Separately) Rear Video YELLOW Rear View Video Camera YELLOW PARKING BRAKE...
... R- GREY + FRONT R GREY/BLACK - GREEN/WHITE REVERSE + RED ACC ACC YELLOW BATT BATTERY + FUSE (15A) BLACK GND BATTERY Ground REVERSE + Ignition Switch Battery AUX IN 2 Wiring Diagram External AV System YELLOW WHITE RED (Requires PAC SWI-PS Interface Adapter, Sold Separately) Rear Video YELLOW Rear View Video Camera YELLOW PARKING BRAKE...


