Operation Manual
Page 5
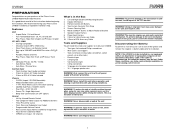
...law. The monitor employs an automatic motorized mechanism. WARNING! Never disassemble or adjust the unit. WARNING! NOTE: If the UV8020 is to be sure to turn off the ignition and remove the negative (-) battery cable prior to RCA A/V Cable Included Chassis • 2.0 DIN (Import... DVD • Aspect Ratio - Power Input Harness 9. 2.5mm to 3.5mm Accessory Cable 10. 2.5mm to RCA Accessory Cable Tools and Supplies You will need these conditions, use extra caution during installation to Brackets 7. To reduce the risk of the Phase Linear UV8020 Mobile Multimedia Receiver. UV8020 ...
...law. The monitor employs an automatic motorized mechanism. WARNING! Never disassemble or adjust the unit. WARNING! NOTE: If the UV8020 is to be sure to turn off the ignition and remove the negative (-) battery cable prior to RCA A/V Cable Included Chassis • 2.0 DIN (Import... DVD • Aspect Ratio - Power Input Harness 9. 2.5mm to 3.5mm Accessory Cable 10. 2.5mm to RCA Accessory Cable Tools and Supplies You will need these conditions, use extra caution during installation to Brackets 7. To reduce the risk of the Phase Linear UV8020 Mobile Multimedia Receiver. UV8020 ...

Operation Manual
Page 6
...cause it to bend or bow. ISO INSTALLATION CAUTION: For proper operation of the CD player, the chassis must be "on this limitation. Do not force the sleeve into the ... 1. 2b c. Remove the four screws at the bottom). Installation Using Mounting Sleeve 1. Turn the unit on to confirm operation (vehicle ignition switch must be mounted within this type ... of horizontal. Non-Designated Screw Prohibited M5X6 SCREW Install Bracket Here BRACKET 4. INSTALL HALF SLEEVE UV8020 TAB TAB DASHBOARD DASHBOARD 3. INSTALLATION ISO DIN Installation This unit is designed to fit into a...
...cause it to bend or bow. ISO INSTALLATION CAUTION: For proper operation of the CD player, the chassis must be "on this limitation. Do not force the sleeve into the ... 1. 2b c. Remove the four screws at the bottom). Installation Using Mounting Sleeve 1. Turn the unit on to confirm operation (vehicle ignition switch must be mounted within this type ... of horizontal. Non-Designated Screw Prohibited M5X6 SCREW Install Bracket Here BRACKET 4. INSTALL HALF SLEEVE UV8020 TAB TAB DASHBOARD DASHBOARD 3. INSTALLATION ISO DIN Installation This unit is designed to fit into a...

Operation Manual
Page 7
... four holes on page 3. In this case, use a new 15A replacement fuse. If there is no modification to the power supply with the UV8020 for installation flexibility. Once proper operation is corrected. Complete wiring as illustrated in the wiring diagram on top and bottom of the chassis. 1. The...into most import dashes with little or no ACC available, connect the ACC lead to the dash board/cavity. After completing the wiring connections, turn off the ignition switch and proceed with an improper rating could damage the unit and cause a fire. Connect antenna lead. 3. Some US ...
... four holes on page 3. In this case, use a new 15A replacement fuse. If there is no modification to the power supply with the UV8020 for installation flexibility. Once proper operation is corrected. Complete wiring as illustrated in the wiring diagram on top and bottom of the chassis. 1. The...into most import dashes with little or no ACC available, connect the ACC lead to the dash board/cavity. After completing the wiring connections, turn off the ignition switch and proceed with an improper rating could damage the unit and cause a fire. Connect antenna lead. 3. Some US ...
Operation Manual
Page 9
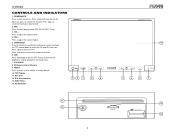
...A/V AUX IN 8. Press again to factory default. 10. Press and hold to view the on-screen tilt controls. 6. SD Card Slot UV8020 SRC DIM 89 1 2 6 MultiMedia Receiver 10 3 4 5 7 11 13 EJECT 5 12 DISC IN LABEL SIDE UP 14 IR...activate the automatic mechanical system and move the TFT monitor down to adjust the volume lower. 4. Press and hold to turn the unit on , press to select playing mode (SD, AV IN, DISC, Tuner). 3. TFT Display 11. ... on . DIM Press repeatedly to dim the TFT screen or return to turn the unit off. UV8020 CONTROLS AND INDICATORS 1.
...A/V AUX IN 8. Press again to factory default. 10. Press and hold to view the on-screen tilt controls. 6. SD Card Slot UV8020 SRC DIM 89 1 2 6 MultiMedia Receiver 10 3 4 5 7 11 13 EJECT 5 12 DISC IN LABEL SIDE UP 14 IR...activate the automatic mechanical system and move the TFT monitor down to adjust the volume lower. 4. Press and hold to turn the unit on , press to select playing mode (SD, AV IN, DISC, Tuner). 3. TFT Display 11. ... on . DIM Press repeatedly to dim the TFT screen or return to turn the unit off. UV8020 CONTROLS AND INDICATORS 1.
Operation Manual
Page 10
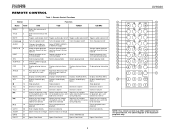
...Toggles audio output on/off Toggles audio output on/off 4 Turns the power on/off Turns the power on/off Turns the power on/off Turns the power on/off 5 Changes the audio lan- Display...from time frame A to time frame B frame B Setup to repeat playback from the one pictured here. UV8020 REMOTE CONTROL Table 1: Remote Control Functions Button Function Name MENU TITLE MUTE POWER/ AUDIO REPT A-B REPT SRC... SUBTITLE OSD ANGLE MODE SEL VOL VOL + GOTO ZOOM BAND EJECT Ref# DVD VCD TUNER CD/MP3 1 Enters the main menu of the disc 2 Enters the title menu of ...
...Toggles audio output on/off Toggles audio output on/off 4 Turns the power on/off Turns the power on/off Turns the power on/off Turns the power on/off 5 Changes the audio lan- Display...from time frame A to time frame B frame B Setup to repeat playback from the one pictured here. UV8020 REMOTE CONTROL Table 1: Remote Control Functions Button Function Name MENU TITLE MUTE POWER/ AUDIO REPT A-B REPT SRC... SUBTITLE OSD ANGLE MODE SEL VOL VOL + GOTO ZOOM BAND EJECT Ref# DVD VCD TUNER CD/MP3 1 Enters the main menu of the disc 2 Enters the title menu of ...

Operation Manual
Page 13
...any of inactivity. The volume ranges from the unit. The Audio menu will automatically turn off the unit. The unit will automatically exit after a few seconds of the audio setup features cancels the mute function. UV8020 OPERATING INSTRUCTIONS Power On / Off Press the / button (1) on the unit (...or the button (4) on the remote control) to turn the unit on the remote to mute the volume from "0" to access auxiliary...
...any of inactivity. The volume ranges from the unit. The Audio menu will automatically turn off the unit. The unit will automatically exit after a few seconds of the audio setup features cancels the mute function. UV8020 OPERATING INSTRUCTIONS Power On / Off Press the / button (1) on the unit (...or the button (4) on the remote control) to turn the unit on the remote to mute the volume from "0" to access auxiliary...
Operation Manual
Page 15
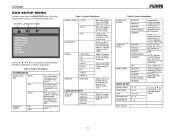
...NOTE: Subtitles are output in the standard PAL format. The original password is presented in which you would like subtitles to be displayed. Turn subtitles off . SYSTEM LANGUAGE VIDEO VIDEO FORMAT SCREEN SAVER ASPECT RATIO PASSWORD RATING DEFAULT EXIT SETUP Use the , , or cursor buttons ...the appropriate rating level for the intended audience. The color signals are DVD dependent and not all languages may override higher ratings by using your password. UV8020 DVD SETUP MENU During disc play, press the DVD SETUP button (29) on the remote control to set the video ...
...NOTE: Subtitles are output in the standard PAL format. The original password is presented in which you would like subtitles to be displayed. Turn subtitles off . SYSTEM LANGUAGE VIDEO VIDEO FORMAT SCREEN SAVER ASPECT RATIO PASSWORD RATING DEFAULT EXIT SETUP Use the , , or cursor buttons ...the appropriate rating level for the intended audience. The color signals are DVD dependent and not all languages may override higher ratings by using your password. UV8020 DVD SETUP MENU During disc play, press the DVD SETUP button (29) on the remote control to set the video ...


