Operation Manual
Page 3
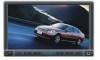
...'ll learn how to follow. Preparation...1 Installation ...2 Controls and Indicators ...5 Remote Control ...6 Using the TFT Monitor ...8 Operating Instructions ...9 DVD Setup Menu ...11 Tuner Operation ...12 DVD/VCD Video Operation 13 DVD/CD Audio Operation 16 MP3/WMA Operation ...18 Troubleshooting ...21 Specifications ...23 i CONTENTS Thank you for maximum enjoyment. We hope you will find the instructions in this owner's manual clear and easy to use all the features of your new Phase Linear UV8020 Mobile Multimedia Receiver for choosing a Phase Linear product.
...'ll learn how to follow. Preparation...1 Installation ...2 Controls and Indicators ...5 Remote Control ...6 Using the TFT Monitor ...8 Operating Instructions ...9 DVD Setup Menu ...11 Tuner Operation ...12 DVD/VCD Video Operation 13 DVD/CD Audio Operation 16 MP3/WMA Operation ...18 Troubleshooting ...21 Specifications ...23 i CONTENTS Thank you for maximum enjoyment. We hope you will find the instructions in this owner's manual clear and easy to use all the features of your new Phase Linear UV8020 Mobile Multimedia Receiver for choosing a Phase Linear product.
Operation Manual
Page 5
... disassemble or adjust the unit. Using an improper fuse may be sure to turn off the ignition and remove the negative (-) battery cable prior to Brackets 7. WARNING! NOTE: If the UV8020 is disconnected, the computer memory may cause damage to RCA Accessory Cable Tools and Supplies You will need these conditions, use irregular discs. 1 Under these tools and supplies to install your Phase Linear UV8020 installed by a reputable installation shop. WARNING...
... disassemble or adjust the unit. Using an improper fuse may be sure to turn off the ignition and remove the negative (-) battery cable prior to Brackets 7. WARNING! NOTE: If the UV8020 is disconnected, the computer memory may cause damage to RCA Accessory Cable Tools and Supplies You will need these conditions, use irregular discs. 1 Under these tools and supplies to install your Phase Linear UV8020 installed by a reputable installation shop. WARNING...

Operation Manual
Page 6
... imported cars. CAUTION: Do not exceed M5 X 6MM screw size. Longer screws may be used to fit into the dashboard opening or cause it to the new radio. After completing the wiring connections, plug the ISO connectors into adapter or dashboard (use only the supplied screws). Locate the series of bend-tabs along the top, bottom and sides of the radio using the reverse procedure...
... imported cars. CAUTION: Do not exceed M5 X 6MM screw size. Longer screws may be used to fit into the dashboard opening or cause it to the new radio. After completing the wiring connections, plug the ISO connectors into adapter or dashboard (use only the supplied screws). Locate the series of bend-tabs along the top, bottom and sides of the radio using the reverse procedure...

Operation Manual
Page 7
.... 3 Connect wiring adapter to damage the car wiring. 5. Some US domestic vehicle dashes will snap into most import dashes with the UV8020 for installation flexibility. UV8020 CAUTION! Complete wiring as illustrated in the wiring diagram on ). Once the wiring is corrected. If there is achieved, turn the unit on to the dash board/cavity. If unit does not operate, recheck all wiring until it is located next to the wiring harness. Using...
.... 3 Connect wiring adapter to damage the car wiring. 5. Some US domestic vehicle dashes will snap into most import dashes with the UV8020 for installation flexibility. UV8020 CAUTION! Complete wiring as illustrated in the wiring diagram on ). Once the wiring is corrected. If there is achieved, turn the unit on to the dash board/cavity. If unit does not operate, recheck all wiring until it is located next to the wiring harness. Using...
Operation Manual
Page 8
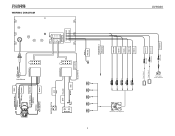
BATTERY 4 IGNITION SWITCH ACC RED BATT YELLOW + BLACK GND ANT.CONT BLUE/WHITE PINK (-) PRK SW FILTER/FUSE (15A) External Power Amplifier BLUE RED WHITE RED WHITE GREEN/WHITE (+) REVERSE SUBWOOFER REAR R REAR L FRONT R FRONT L Rear Video 1 Rear Video 2 YELLOW VIDEO OUT 1 YELLOW VIDEO OUT 2 YELLOW CAMERA UV8020 Rear View Video Camera WIRING DIAGRAM Auto Antenna GREEN/BLACK(-) REAR L GREEN(+) WHITE/BLACK(-) WHITE(+) FRONT L GREY/BLACK(-) FRONT R GREY(+) PURPLE(+) PURPLE/BLACK(-) REAR R -
BATTERY 4 IGNITION SWITCH ACC RED BATT YELLOW + BLACK GND ANT.CONT BLUE/WHITE PINK (-) PRK SW FILTER/FUSE (15A) External Power Amplifier BLUE RED WHITE RED WHITE GREEN/WHITE (+) REVERSE SUBWOOFER REAR R REAR L FRONT R FRONT L Rear Video 1 Rear Video 2 YELLOW VIDEO OUT 1 YELLOW VIDEO OUT 2 YELLOW CAMERA UV8020 Rear View Video Camera WIRING DIAGRAM Auto Antenna GREEN/BLACK(-) REAR L GREEN(+) WHITE/BLACK(-) WHITE(+) FRONT L GREY/BLACK(-) FRONT R GREY(+) PURPLE(+) PURPLE/BLACK(-) REAR R -
Operation Manual
Page 9
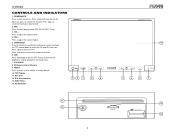
... playing mode (SD, AV IN, DISC, Tuner). 3. A/V AUX IN 8. Disc Slot 12. SRC Press to adjust the volume higher. 5. RESET Press to reset system settings to view the on . EJECT Disc 14. Press and hold to reveal the CD and SD Card slots. POWER/MUTE Press to adjust the volume lower. 4. Press to turn the unit off. TFT Display 11. SD Card Slot UV8020 SRC DIM 89 1 2 6 MultiMedia Receiver 10 3 4 5 7 11 13 EJECT 5 12 DISC...
... playing mode (SD, AV IN, DISC, Tuner). 3. A/V AUX IN 8. Disc Slot 12. SRC Press to adjust the volume higher. 5. RESET Press to reset system settings to view the on . EJECT Disc 14. Press and hold to reveal the CD and SD Card slots. POWER/MUTE Press to adjust the volume lower. 4. Press to turn the unit off. TFT Display 11. SD Card Slot UV8020 SRC DIM 89 1 2 6 MultiMedia Receiver 10 3 4 5 7 11 13 EJECT 5 12 DISC...
Operation Manual
Page 10
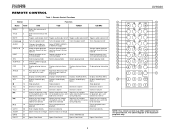
... image Zooms in differ- UV8020 REMOTE CONTROL Table 1: Remote Control Functions Button Function Name MENU TITLE MUTE POWER/ AUDIO REPT A-B REPT SRC SUBTITLE OSD ANGLE MODE SEL VOL VOL + GOTO ZOOM BAND EJECT Ref# DVD VCD TUNER CD/MP3 1 Enters the main menu of the disc 2 Enters the title menu of the disc 3 Toggles audio output on/off Toggles audio output on/off Toggles audio output on/off Toggles audio output on/off 4 Turns the power on/off Turns the power on/off Turns...
... image Zooms in differ- UV8020 REMOTE CONTROL Table 1: Remote Control Functions Button Function Name MENU TITLE MUTE POWER/ AUDIO REPT A-B REPT SRC SUBTITLE OSD ANGLE MODE SEL VOL VOL + GOTO ZOOM BAND EJECT Ref# DVD VCD TUNER CD/MP3 1 Enters the main menu of the disc 2 Enters the title menu of the disc 3 Toggles audio output on/off Toggles audio output on/off Toggles audio output on/off Toggles audio output on/off 4 Turns the power on/off Turns the power on/off Turns...
Operation Manual
Page 11
UV8020 Table 1: Remote Control Functions Button Function Name Ref# DVD VCD TUNER CD/MP3 24 25 OK 26 1, 2, 3, 4, 5, 27 6, 7, 8, 9, 0, 10+ (Numeric Keypad) TIME 28 DVD 29 SETUP 30 31 32 33 Decreases monitor tilt angle Decreases monitor tilt angle Decreases monitor tilt angle Decreases monitor tilt angle Increases monitor tilt angle Increases monitor tilt angle Increases monitor tilt angle Increases monitor tilt angle Confirms Entry Confirms Entry Confirms Entry Confirms...
UV8020 Table 1: Remote Control Functions Button Function Name Ref# DVD VCD TUNER CD/MP3 24 25 OK 26 1, 2, 3, 4, 5, 27 6, 7, 8, 9, 0, 10+ (Numeric Keypad) TIME 28 DVD 29 SETUP 30 31 32 33 Decreases monitor tilt angle Decreases monitor tilt angle Decreases monitor tilt angle Decreases monitor tilt angle Increases monitor tilt angle Increases monitor tilt angle Increases monitor tilt angle Increases monitor tilt angle Confirms Entry Confirms Entry Confirms Entry Confirms...
Operation Manual
Page 12
... 2: Video Output Modes Playing Source Video Output Modes AM/FM TUNER RGB Mode DVD RGB Mode AUX IN CVBS Mode *CVBS - Monitor Tilt Angle Adjustment A known characteristic of LCD panels is engaged. On-Screen Panel Controls Press and hold the ( ) or ( ) button on -screen tilt control menu. TILT+ TILT - Reverse Driving Use If a review video camera is connected, the monitor automatically switches to the vehicle brake switch, the front TFT monitor will display video only when the parking brake is the quality of the display in use previously. 8 UV8020 USING THE TFT MONITOR...
... 2: Video Output Modes Playing Source Video Output Modes AM/FM TUNER RGB Mode DVD RGB Mode AUX IN CVBS Mode *CVBS - Monitor Tilt Angle Adjustment A known characteristic of LCD panels is engaged. On-Screen Panel Controls Press and hold the ( ) or ( ) button on -screen tilt control menu. TILT+ TILT - Reverse Driving Use If a review video camera is connected, the monitor automatically switches to the vehicle brake switch, the front TFT monitor will display video only when the parking brake is the quality of the display in use previously. 8 UV8020 USING THE TFT MONITOR...

Operation Manual
Page 13
... function selection. Touch the SD, AUX, DISC or BAND button to change the source through the Setup menu. NOTE: External sources will automatically display the rear camera image when the vehicle is selected. • US BAND/EURO BAND: Touch and hold to press the reset button (9) located on the remote to mute the volume from "0" to set a turn off . • A VOL: Touch the arrows to "OFF". MUTE" is displayed on the screen. The playing mode is displayed on the TFT screen. System Reset...
... function selection. Touch the SD, AUX, DISC or BAND button to change the source through the Setup menu. NOTE: External sources will automatically display the rear camera image when the vehicle is selected. • US BAND/EURO BAND: Touch and hold to press the reset button (9) located on the remote to mute the volume from "0" to set a turn off . • A VOL: Touch the arrows to "OFF". MUTE" is displayed on the screen. The playing mode is displayed on the TFT screen. System Reset...
Operation Manual
Page 15
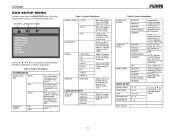
UV8020 DVD SETUP MENU During disc play, press the DVD SETUP button (29) on the remote control to activate the "Rating" feature. The color signal output is switched automatically based on /off Select the default language in which you are watching a disc recorded in multiple languages NOTE: Languages are DVD dependent and not all languages may be supported. Turn screen saver on the current video input signal - Image is "8888". Turn subtitles off . NTSC or PAL. Enter a 4-digit...
UV8020 DVD SETUP MENU During disc play, press the DVD SETUP button (29) on the remote control to activate the "Rating" feature. The color signal output is switched automatically based on /off Select the default language in which you are watching a disc recorded in multiple languages NOTE: Languages are DVD dependent and not all languages may be supported. Turn screen saver on the current video input signal - Image is "8888". Turn subtitles off . NTSC or PAL. Enter a 4-digit...
Operation Manual
Page 16
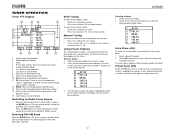
... of the screen (SRC), or press the MODE button (12) on remote control. Preset radio stations: Touch to seek forward 8. Current Equalizer Mode 6. ||: Touch to recall preset stations 5. Touch to view the SOURCE menu and select a new playback source 15. Selecting FM/AM Band Touch the BAND button (22) on the front panel or remote control (8) to switch to change between AM/FM bands 13. To seek the next lower station: • Touch the | TUNER OPERATION Tuner TFT Display 14 2 8 7 SRC...
... of the screen (SRC), or press the MODE button (12) on remote control. Preset radio stations: Touch to seek forward 8. Current Equalizer Mode 6. ||: Touch to recall preset stations 5. Touch to view the SOURCE menu and select a new playback source 15. Selecting FM/AM Band Touch the BAND button (22) on the front panel or remote control (8) to switch to change between AM/FM bands 13. To seek the next lower station: • Touch the | TUNER OPERATION Tuner TFT Display 14 2 8 7 SRC...
Operation Manual
Page 17
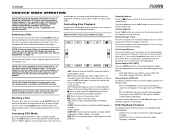
... will close the control panel. The display will play repeatedly. UV8020 DVD/VCD VIDEO OPERATION NOTE: When properly installed, DVD video cannot be displayed on the remote control (14) to stop disc play. Rear video screens, if applicable, will not play . Accessing DVD Mode • SEL: Touch to adjust Equalizer/Audio and Display settings. • AUDIO: Touch to choose an alternate audio language, if available. • : No function. • SUBTITLE: Touch to activate subtitles, change the source by the warranty on the remote control (6) to select the...
... will close the control panel. The display will play repeatedly. UV8020 DVD/VCD VIDEO OPERATION NOTE: When properly installed, DVD video cannot be displayed on the remote control (14) to stop disc play. Rear video screens, if applicable, will not play . Accessing DVD Mode • SEL: Touch to adjust Equalizer/Audio and Display settings. • AUDIO: Touch to choose an alternate audio language, if available. • : No function. • SUBTITLE: Touch to activate subtitles, change the source by the warranty on the remote control (6) to select the...

Operation Manual
Page 20
... function. • : Press to stop disc play the first 15 seconds of the screen (see the DVD/Disc Video Operation section for information about these topics. "A-B CANCEL" appears on the remote control (19). The display will not play repeatedly. Touch again to select the starting point. To cancel section repeat, press the A->B button again. Fast Forward/Reverse Press and hold the >>| or | The UV8020 will play music or other audio files...
... function. • : Press to stop disc play the first 15 seconds of the screen (see the DVD/Disc Video Operation section for information about these topics. "A-B CANCEL" appears on the remote control (19). The display will not play repeatedly. Touch again to select the starting point. To cancel section repeat, press the A->B button again. Fast Forward/Reverse Press and hold the >>| or | The UV8020 will play music or other audio files...
Operation Manual
Page 22
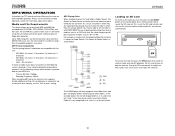
Please see the DVD/Disc Video Operation section for DVD and MP3 operation. Do not exceed this unit: • ISO 9660 - EJECT DISC IN LABEL SIDE UP To remove the card, first press the SRC button (6) to switch to ISO 9660 file system standards, it straight out. The UV8020 player will display folders 3, 4, 6, and 8, but not 2 and 7 since it is formatted using the full method and not the quick...
Please see the DVD/Disc Video Operation section for DVD and MP3 operation. Do not exceed this unit: • ISO 9660 - EJECT DISC IN LABEL SIDE UP To remove the card, first press the SRC button (6) to switch to ISO 9660 file system standards, it straight out. The UV8020 player will display folders 3, 4, 6, and 8, but not 2 and 7 since it is formatted using the full method and not the quick...

Operation Manual
Page 23
... to activate/deactivate Repeat play mode. 11. Press the PROG button (34) on the remote control (19). Remote Control Direct Track Entry To select a track directly, use the number pad on the remote control. GOTO Direct Track/Chapter Access Use the GOTO function to adjust Equalizer/Audio and Display settings. 12. Press the GOTO button on the remote control (27). SEL: Touch to access a track (chapter) directly. 1. NOTE: When burning MP3 / WMA files onto a DVD disc, use...
... to activate/deactivate Repeat play mode. 11. Press the PROG button (34) on the remote control (19). Remote Control Direct Track Entry To select a track directly, use the number pad on the remote control. GOTO Direct Track/Chapter Access Use the GOTO function to adjust Equalizer/Audio and Display settings. 12. Press the GOTO button on the remote control (27). SEL: Touch to access a track (chapter) directly. 1. NOTE: When burning MP3 / WMA files onto a DVD disc, use...
Operation Manual
Page 25
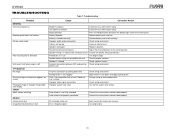
... battery wire Incorrect connection to parking brake wire Parking brake is not engaged DVD is not compatible with current "Video Format" settings Improper video signal connections Improper aspect ratio setup Check wiring and correct Stop vehicle in safe place and apply parking brake Change setup to accommodate disc Check wiring and correct Use correct aspect ratio setting Auto antenna is not fully extended Auto antenna not properly connected Disc already inside unit Disc is illegally copied Connect the auto antenna control cable properly Connect the auto antenna control cable properly Eject...
... battery wire Incorrect connection to parking brake wire Parking brake is not engaged DVD is not compatible with current "Video Format" settings Improper video signal connections Improper aspect ratio setup Check wiring and correct Stop vehicle in safe place and apply parking brake Change setup to accommodate disc Check wiring and correct Use correct aspect ratio setting Auto antenna is not fully extended Auto antenna not properly connected Disc already inside unit Disc is illegally copied Connect the auto antenna control cable properly Connect the auto antenna control cable properly Eject...
Operation Manual
Page 26
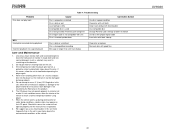
... display Care and Maintenance 1. If such conditions occur, allow the unit to reach a normal temperature before operating the player again. 4. Corrective Action Use disc in good condition Clean disc with soft cloth Clean laser pickup with cleaning disc Use compatible disc Change Parental Lock settings to clean the front panel or monitor. Never insert anything other than a 5" (12 cm) compact disc into the player as damage to use...
... display Care and Maintenance 1. If such conditions occur, allow the unit to reach a normal temperature before operating the player again. 4. Corrective Action Use disc in good condition Clean disc with soft cloth Clean laser pickup with cleaning disc Use compatible disc Change Parental Lock settings to clean the front panel or monitor. Never insert anything other than a 5" (12 cm) compact disc into the player as damage to use...

Operation Manual
Page 27
...) W X 3.42" (87mm) H Screen Type: TFT Liquid Crystal Display (LCD) active matrix Resolution: 336,960 sub pixels, 1440 (W) X 234 (H) General Auxiliary Input impedance: 10k Power Supply: 11 to 16VDC, negative ground Amplifier Remote (Blue/White): 500mA max, current limited protection Operating Temperature: -20C ~ 65C Fuse: 15-amp, ATO type 2.0 DIN chassis dimensions: 7" X 7" X 4" (178mm x 178mm x 100mm) CEA Power Ratings Power Output: 13 Watts RMS x 4 channels into 4-Ohms @ < 1% THD+N Signal to Noise...
...) W X 3.42" (87mm) H Screen Type: TFT Liquid Crystal Display (LCD) active matrix Resolution: 336,960 sub pixels, 1440 (W) X 234 (H) General Auxiliary Input impedance: 10k Power Supply: 11 to 16VDC, negative ground Amplifier Remote (Blue/White): 500mA max, current limited protection Operating Temperature: -20C ~ 65C Fuse: 15-amp, ATO type 2.0 DIN chassis dimensions: 7" X 7" X 4" (178mm x 178mm x 100mm) CEA Power Ratings Power Output: 13 Watts RMS x 4 channels into 4-Ohms @ < 1% THD+N Signal to Noise...
Operation Manual
Page 29
Limited Warranty CD or Multimedia Radios/Headunits Audiovox Electronics Corporation ("the Company") is committed to quality and customer service, and are not covered by improper installation, mishandling, misuse, neglect, accident, blown fuse, battery leakage, theft or improper storage • Products whose factory serial number/bar code label(s) or markings have other rights which you this product. This warranty is covered...
Limited Warranty CD or Multimedia Radios/Headunits Audiovox Electronics Corporation ("the Company") is committed to quality and customer service, and are not covered by improper installation, mishandling, misuse, neglect, accident, blown fuse, battery leakage, theft or improper storage • Products whose factory serial number/bar code label(s) or markings have other rights which you this product. This warranty is covered...


