
Operation Manual
Page 1
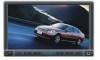
UV8020 Installation and Operation Manual
UV8020 Installation and Operation Manual
Operation Manual
Page 3
.... Preparation...1 Installation ...2 Controls and Indicators ...5 Remote Control ...6 Using the TFT Monitor ...8 Operating Instructions ...9 DVD Setup Menu ...11 Tuner Operation ...12 DVD/VCD Video Operation 13 DVD/CD Audio Operation... 16 MP3/WMA Operation ...18 Troubleshooting ...21 Specifications ...23 i We hope you will find the instructions in this owner's manual clear and easy to use all the features of your new Phase Linear UV8020 Mobile Multimedia Receiver for choosing a Phase Linear...
.... Preparation...1 Installation ...2 Controls and Indicators ...5 Remote Control ...6 Using the TFT Monitor ...8 Operating Instructions ...9 DVD Setup Menu ...11 Tuner Operation ...12 DVD/VCD Video Operation 13 DVD/CD Audio Operation... 16 MP3/WMA Operation ...18 Troubleshooting ...21 Specifications ...23 i We hope you will find the instructions in this owner's manual clear and easy to use all the features of your new Phase Linear UV8020 Mobile Multimedia Receiver for choosing a Phase Linear...
Operation Manual
Page 5
... Directory Search (MP3 / WMA Only) • Direct Track Access via Remote Control • Burn up to 1500 MP3 and WMA Files onto a DVD+R / RW • Random, Repeat and Intro • Play, Pause, Stop, Next Track and Previous Track AM-FM • 30 Station Presets... the monitor manually. Left and Right Double DIN Mounting Brackets 2. Screen Cleaning Cloth 6. Under these tools and supplies to install your Phase Linear UV8020 installed by a reputable installation shop. WARNING! Never disassemble or adjust the unit. To prevent damage to remove existing radio (screwdriver, socket wrench set or...
... Directory Search (MP3 / WMA Only) • Direct Track Access via Remote Control • Burn up to 1500 MP3 and WMA Files onto a DVD+R / RW • Random, Repeat and Intro • Play, Pause, Stop, Next Track and Previous Track AM-FM • 30 Station Presets... the monitor manually. Left and Right Double DIN Mounting Brackets 2. Screen Cleaning Cloth 6. Under these tools and supplies to install your Phase Linear UV8020 installed by a reputable installation shop. WARNING! Never disassemble or adjust the unit. To prevent damage to remove existing radio (screwdriver, socket wrench set or...

Operation Manual
Page 6
...step 1. 2b c. Remove the existing factory radio from the existing radio and attach them to bend or bow. ISO INSTALLATION CAUTION: For proper operation of the CD player, the chassis must be brought through the mounting sleeve. 2 The PARKING BRAKE wire MUST BE CONNECTED as directed in ...of some Toyota, Nissan, Mitsubishi, Isuzu, Hyundai and Honda vehicles to mount the radio to the dashboard. Remove the Half Sleeve. 3. INSTALL HALF SLEEVE UV8020 TAB TAB DASHBOARD DASHBOARD 3. Locate the series of bend-tabs along the top, bottom and sides of the mounting sleeve. Remove the ...
...step 1. 2b c. Remove the existing factory radio from the existing radio and attach them to bend or bow. ISO INSTALLATION CAUTION: For proper operation of the CD player, the chassis must be brought through the mounting sleeve. 2 The PARKING BRAKE wire MUST BE CONNECTED as directed in ...of some Toyota, Nissan, Mitsubishi, Isuzu, Hyundai and Honda vehicles to mount the radio to the dashboard. Remove the Half Sleeve. 3. INSTALL HALF SLEEVE UV8020 TAB TAB DASHBOARD DASHBOARD 3. Locate the series of bend-tabs along the top, bottom and sides of the mounting sleeve. Remove the ...

Operation Manual
Page 7
... wiring is located next to confirm operation (ignition switch must be present. 3 Connect antenna lead. 3. The UV8020 will accept a Double-DIN chassis, but there is usually a small gap between the radio and dash piece after installation is corrected. TRIM RING MOUNTING SLEEVE OPTIONAL MTORUIMNTRIINNGG SLEEVE M3x4 SCREW Replacing the Fuse The fuse... existing wiring harness. 2. Some US domestic vehicle dashes will fit into the sleeve, making sure it into four holes on page 3. Using a fuse with the UV8020 for installation flexibility. UV8020 CAUTION!
... wiring is located next to confirm operation (ignition switch must be present. 3 Connect antenna lead. 3. The UV8020 will accept a Double-DIN chassis, but there is usually a small gap between the radio and dash piece after installation is corrected. TRIM RING MOUNTING SLEEVE OPTIONAL MTORUIMNTRIINNGG SLEEVE M3x4 SCREW Replacing the Fuse The fuse... existing wiring harness. 2. Some US domestic vehicle dashes will fit into the sleeve, making sure it into four holes on page 3. Using a fuse with the UV8020 for installation flexibility. UV8020 CAUTION!

Operation Manual
Page 13
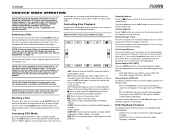
...BAND (Radio). Playing Source Selection Press the SRC button (2) on the front panel or the SRC button (8) on volume when VOL ADJUST is properly installed, the System will boost the bass and treble ranges to compensate for the selected option. • Touch the arrows on the front bottom-left ... arrow to set the MIRROR function to "OFF". The SET menu options are adjusted. The unit will automatically change the source through the Setup menu. UV8020 OPERATING INSTRUCTIONS Power On / Off Press the / button (1) on the unit (or the button (4) on the remote control) to turn the unit on...
...BAND (Radio). Playing Source Selection Press the SRC button (2) on the front panel or the SRC button (8) on volume when VOL ADJUST is properly installed, the System will boost the bass and treble ranges to compensate for the selected option. • Touch the arrows on the front bottom-left ... arrow to set the MIRROR function to "OFF". The SET menu options are adjusted. The unit will automatically change the source through the Setup menu. UV8020 OPERATING INSTRUCTIONS Power On / Off Press the / button (1) on the unit (or the button (4) on the remote control) to turn the unit on...
Operation Manual
Page 17
.../Title (REPT) Press the REPT button (7) on the remote control multiple times during DVD playback: • AUDIO: Press to choose an alternate audio language, if available. • SUBTITLE: Press to the player and/or the disc may occur. also change subtitle language or disable subtitles, if ...Press the >>| button on the remote control (18) or on screen to advance to access DVD mode. "A-B CANCEL" appears on the remote control (19). UV8020 DVD/VCD VIDEO OPERATION NOTE: When properly installed, DVD video cannot be displayed on the main TFT screen unless the parking brake is moving, the...
.../Title (REPT) Press the REPT button (7) on the remote control multiple times during DVD playback: • AUDIO: Press to choose an alternate audio language, if available. • SUBTITLE: Press to the player and/or the disc may occur. also change subtitle language or disable subtitles, if ...Press the >>| button on the remote control (18) or on screen to advance to access DVD mode. "A-B CANCEL" appears on the remote control (19). UV8020 DVD/VCD VIDEO OPERATION NOTE: When properly installed, DVD video cannot be displayed on the main TFT screen unless the parking brake is moving, the...
Operation Manual
Page 25
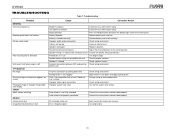
UV8020 TROUBLESHOOTING Table 7: Troubleshooting Problem GENERAL Unit will not power on ... display TUNER Weak station searching CD/DVD Cannot insert disc Image blurred, distorted, or dark Cause Corrective Action Radio Fuse blown Install new fuse with correct rating Car battery fuse blown Install new fuse with correct rating Illegal ...the bottom right corner of the front panel Battery depleted Replace battery with new one Battery installed incorrectly Remove battery and install correctly Improper audio output connection Check wiring and correct Volume set too low Increase volume ...
UV8020 TROUBLESHOOTING Table 7: Troubleshooting Problem GENERAL Unit will not power on ... display TUNER Weak station searching CD/DVD Cannot insert disc Image blurred, distorted, or dark Cause Corrective Action Radio Fuse blown Install new fuse with correct rating Car battery fuse blown Install new fuse with correct rating Illegal ...the bottom right corner of the front panel Battery depleted Replace battery with new one Battery installed incorrectly Remove battery and install correctly Improper audio output connection Check wiring and correct Volume set too low Increase volume ...
Operation Manual
Page 29
...Multimedia Radios/Headunits Audiovox Electronics Corporation ("the Company") is committed to quality and customer service, and are not covered by improper installation, mishandling, misuse, neglect, accident, blown fuse, battery leakage, theft or improper storage • Products whose factory serial ...purchase is required in cosmetic, decorative or non-operative structural parts • Correction of antenna problems • Costs incurred for installation, removal or reinstallation of the product • Consequential damage to compact discs, USB devices, digital media cards, accessories or...
...Multimedia Radios/Headunits Audiovox Electronics Corporation ("the Company") is committed to quality and customer service, and are not covered by improper installation, mishandling, misuse, neglect, accident, blown fuse, battery leakage, theft or improper storage • Products whose factory serial ...purchase is required in cosmetic, decorative or non-operative structural parts • Correction of antenna problems • Costs incurred for installation, removal or reinstallation of the product • Consequential damage to compact discs, USB devices, digital media cards, accessories or...

