
User Manual
Page 3
... Select Display 17 Channel Add/Skip Display 18 Data Service 19 Display Button 24 XM Ready and Navigation Dual Operation 24 C. Media Mode 29 Store Demo 30 Photo Mode 30 F. Remote Control Configuration 36 H. Troubleshooting 39 2 Hardware and Subscription 9 2. Activate Your Satellite Radio Service 10 5. Back-Up Cam Mode (Optional Cradle Required) Available Late 2007 28 Getting Started 28 Back-Up View 29 E. Specifications 39 K. Modes of Operation 8 A. Online Activation Process 11 6. Setup Mode...
... Select Display 17 Channel Add/Skip Display 18 Data Service 19 Display Button 24 XM Ready and Navigation Dual Operation 24 C. Media Mode 29 Store Demo 30 Photo Mode 30 F. Remote Control Configuration 36 H. Troubleshooting 39 2 Hardware and Subscription 9 2. Activate Your Satellite Radio Service 10 5. Back-Up Cam Mode (Optional Cradle Required) Available Late 2007 28 Getting Started 28 Back-Up View 29 E. Specifications 39 K. Modes of Operation 8 A. Online Activation Process 11 6. Setup Mode...

User Manual
Page 4
... internal GPS device. This arrow returns to the previous screen or directly to do not need to deviate from the recommended direction, the unit will be incurred as these functions cannot be able to go . You always have a Return button ( ) in -car use the NVXM1000. Most of the screens have complete freedom to track you find your way to turn on the memory card...
... internal GPS device. This arrow returns to the previous screen or directly to do not need to deviate from the recommended direction, the unit will be incurred as these functions cannot be able to go . You always have a Return button ( ) in -car use the NVXM1000. Most of the screens have complete freedom to track you find your way to turn on the memory card...
User Manual
Page 5
... NVXM1000 exhibits other features, such as Back-Up Camera input using an appropriate cradle and interconnect cable, and Music input from an external source such as your door-to clearly understand the exact function of the software. Introduction Thank you read through this manual to -door incar navigator complete with XM® Ready operation can be obtained easily by user...
... NVXM1000 exhibits other features, such as Back-Up Camera input using an appropriate cradle and interconnect cable, and Music input from an external source such as your door-to clearly understand the exact function of the software. Introduction Thank you read through this manual to -door incar navigator complete with XM® Ready operation can be obtained easily by user...
User Manual
Page 6
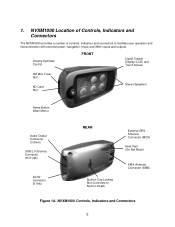
... Slot SD Card Slot Stereo Speakers Home Button (Main Menu) Audio Output Connector (3.5mm) USB 2.0 (Device) Connector (mini-usb) DC IN Connector (5 Vdc) REAR External GPS Antenna Connector (MCX) Heat Vent (Do Not Block) Suction Cup Locking Slot (Connects to facilitate user operation and interconnection with external power, navigation, music and XM® inputs and outputs. NVXM1000 Location of Controls, Indicators and Connectors The NVXM1000 provides a number of controls...
... Slot SD Card Slot Stereo Speakers Home Button (Main Menu) Audio Output Connector (3.5mm) USB 2.0 (Device) Connector (mini-usb) DC IN Connector (5 Vdc) REAR External GPS Antenna Connector (MCX) Heat Vent (Do Not Block) Suction Cup Locking Slot (Connects to facilitate user operation and interconnection with external power, navigation, music and XM® inputs and outputs. NVXM1000 Location of Controls, Indicators and Connectors The NVXM1000 provides a number of controls...
User Manual
Page 7
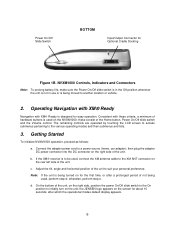
... prolong battery life, make sure the Power On/Off slide switch is in the Off position whenever the unit is not in use or is designed for the first time, or after which the operational modes default display appears. 6 Operating Navigation with XM® Ready Navigation with these consist of the unit. If the XM® receiver is used , perform step d; otherwise, perform step e. Connect the adapter power...
... prolong battery life, make sure the Power On/Off slide switch is in the Off position whenever the unit is not in use or is designed for the first time, or after which the operational modes default display appears. 6 Operating Navigation with XM® Ready Navigation with these consist of the unit. If the XM® receiver is used , perform step d; otherwise, perform step e. Connect the adapter power...
User Manual
Page 8
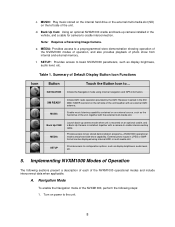
... MINI TUNER slot on the left side of : a. Jensen Logo at Power On e. If the NVXM1000 was recently on the unit and the operational modes default display appears. Modes of Operation Default Display Note that the Operational Modes Default Display resembles a tool box containing six features for 2 seconds again turns on and being used, and has been turned off (standby mode) using the Home button ( ), pressing the Home button for touchscreen selection; Figure 2. NAVIGATION: Using GPS information and preprogrammed navigation information.
... MINI TUNER slot on the left side of : a. Jensen Logo at Power On e. If the NVXM1000 was recently on the unit and the operational modes default display appears. Modes of Operation Default Display Note that the Operational Modes Default Display resembles a tool box containing six features for 2 seconds again turns on and being used, and has been turned off (standby mode) using the Home button ( ), pressing the Home button for touchscreen selection; Figure 2. NAVIGATION: Using GPS information and preprogrammed navigation information.
User Manual
Page 9
...-to a preprogrammed store demonstration showing operation of the NVXM1000 modes of operation, and also provides playback of Default Display Button Icon Functions Icon Button Touch the Button Icon to basic NVXM1000 parameters, such as display brightness, audio level, etc. e. NAVIGATION Initiate the Navigation mode using internal HDD or multi-media slot. Back Up CAM MEDIA Launch back-up camera installed in the vehicle, and a cable for camera-to the unit. 8 d. XM READY MUSIC Initiate...
...-to a preprogrammed store demonstration showing operation of the NVXM1000 modes of operation, and also provides playback of Default Display Button Icon Functions Icon Button Touch the Button Icon to basic NVXM1000 parameters, such as display brightness, audio level, etc. e. NAVIGATION Initiate the Navigation mode using internal HDD or multi-media slot. Back Up CAM MEDIA Launch back-up camera installed in the vehicle, and a cable for camera-to the unit. 8 d. XM READY MUSIC Initiate...
User Manual
Page 10
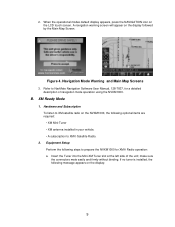
... Tuner slot at the left side of navigation mode operation using the NVXM1000. Navigation Mode Warning and Main Map Screens 3. Refer to XM® Satellite Radio. 2. Hardware and Subscription To listen to XM satellite radio on the display followed by the Main Map Screen. If no tuner is installed, the following message appears on the LCD touch screen. 2. Figure 4. Equipment Setup Perform the following optional items are required...
... Tuner slot at the left side of navigation mode operation using the NVXM1000. Navigation Mode Warning and Main Map Screens 3. Refer to XM® Satellite Radio. 2. Hardware and Subscription To listen to XM satellite radio on the display followed by the Main Map Screen. If no tuner is installed, the following message appears on the LCD touch screen. 2. Figure 4. Equipment Setup Perform the following optional items are required...
User Manual
Page 11
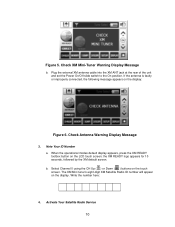
... Mini-Tuner Warning Display Message b. When the operational modes default display appears, press the XM READY toolbox button on the touch screen. Select Channel 0 using the CH Up ( ) or Down ( ) buttons on the LCD touch screen; Plug the external XM antenna cable into the XM ANT jack at the rear of the unit and set the Power On/Off slide switch to the On position. the XM...
... Mini-Tuner Warning Display Message b. When the operational modes default display appears, press the XM READY toolbox button on the touch screen. Select Channel 0 using the CH Up ( ) or Down ( ) buttons on the LCD touch screen; Plug the external XM antenna cable into the XM ANT jack at the rear of the unit and set the Power On/Off slide switch to the On position. the XM...

User Manual
Page 14
... to show the corresponding preset bank. b. The NVXM1000 also has the capability to search the current incoming XM signal, and thereby alert you to capture and store the current program data information (Channel Name & Number/ Artist & Song Title). This feature allows you if it is enabled; Display Mode change Return to Main Setup Menu (Set up screen.The screen will store 10 user-preferred channels. Tune Select Function Select "Tune Select" on...
... to show the corresponding preset bank. b. The NVXM1000 also has the capability to search the current incoming XM signal, and thereby alert you to capture and store the current program data information (Channel Name & Number/ Artist & Song Title). This feature allows you if it is enabled; Display Mode change Return to Main Setup Menu (Set up screen.The screen will store 10 user-preferred channels. Tune Select Function Select "Tune Select" on...

User Manual
Page 18
... number of sight satellite signal. Terrestrial signals may affect the line of bars in your geographic location. 2. Table 4. XM Setup Button Functions Exit Setup Mode Display Antenna Aiming Display Channel Add/Skip Display Tune Select Display Data Service 1. Position the antenna to optimize either the satellite or terrestrial signal. Antenna Aiming Display Terrestrial repeaters are displayed representing terrestrial (tower) and satellite transmitters. Tune Select Display 17 To exit this mode, two vertical bar graphs are typically used...
... number of sight satellite signal. Terrestrial signals may affect the line of bars in your geographic location. 2. Table 4. XM Setup Button Functions Exit Setup Mode Display Antenna Aiming Display Channel Add/Skip Display Tune Select Display Data Service 1. Position the antenna to optimize either the satellite or terrestrial signal. Antenna Aiming Display Terrestrial repeaters are displayed representing terrestrial (tower) and satellite transmitters. Tune Select Display 17 To exit this mode, two vertical bar graphs are typically used...

User Manual
Page 20
... buttons to navigate through direct channel number entry or by Artist, Song Title or Both 3. Upon adding a channel, the check mark is pressed, its color changes from white to the list. Selecting Clear by returning to this menu and repeating the same process to return the skipped channel to gray on the XM Ready Setup display, the Data Service screen appears and offers two information...
... buttons to navigate through direct channel number entry or by Artist, Song Title or Both 3. Upon adding a channel, the check mark is pressed, its color changes from white to the list. Selecting Clear by returning to this menu and repeating the same process to return the skipped channel to gray on the XM Ready Setup display, the Data Service screen appears and offers two information...
User Manual
Page 25
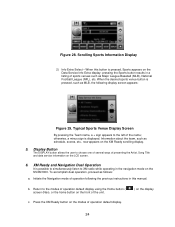
... Operation It is displayed. Information about the team, such as follows: a. Display Button The DISPLAY button allows the user to the modes of operation default display using the Home button ( screen (Nav), or the home button on the front of the name; pressing the Sports button results in the navigation mode on the XM Ready scrolling display. 5. Initiate the Navigation mode of presenting the Artist, Song Title and data service information on the display c. When this manual...
... Operation It is displayed. Information about the team, such as follows: a. Display Button The DISPLAY button allows the user to the modes of operation default display using the Home button ( screen (Nav), or the home button on the front of the name; pressing the Sports button results in the navigation mode on the XM Ready scrolling display. 5. Initiate the Navigation mode of presenting the Artist, Song Title and data service information on the display c. When this manual...

User Manual
Page 28
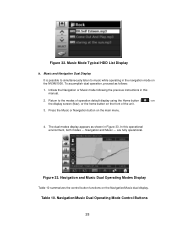
... display with the first (top) song currently playing. 7. Turn on the NVXM1000 hard disk (HDD), or from your local PC to Main Menu Display All Current Files in SD Memory Display All Current Files in the list. a list of the unit, and the other end into an available USB port on SD Memory, press the SD/HDD button; The PC will auto-detect the NVXM1000 and install the USB drivers automatically. 3. To change...
... display with the first (top) song currently playing. 7. Turn on the NVXM1000 hard disk (HDD), or from your local PC to Main Menu Display All Current Files in SD Memory Display All Current Files in the list. a list of the unit, and the other end into an available USB port on SD Memory, press the SD/HDD button; The PC will auto-detect the NVXM1000 and install the USB drivers automatically. 3. To change...
User Manual
Page 29
... or Navigation button on the Navigation/Music dual display. Navigation and Music --- Return to music while operating in Figure 33. Music and Navigation Dual Display It is possible to simultaneously listen to the modes of operation default display using the Home button ( ) on the display screen (Nav), or the home button on the NVXM1000. Initiate the Navigation or Music mode following the previous instructions in this operational environment, both modes --- The dual modes display appears...
... or Navigation button on the Navigation/Music dual display. Navigation and Music --- Return to music while operating in Figure 33. Music and Navigation Dual Display It is possible to simultaneously listen to the modes of operation default display using the Home button ( ) on the display screen (Nav), or the home button on the NVXM1000. Initiate the Navigation or Music mode following the previous instructions in this operational environment, both modes --- The dual modes display appears...

User Manual
Page 30
... NVXM1000 Cradle & Back up camera (reversed) installed in your vehicle (Recommend CCDLFR camera). • Interconnecting cable from the Back up camera display, while Table 11 describes the control button functions. Back Up CAM Mode (Optional Cradle Required) Available Late 2007 The NVXM1000 can be used in reverse. Typical Back-Up Camera Display 29 Getting Started To view the Back up camera screen...
... NVXM1000 Cradle & Back up camera (reversed) installed in your vehicle (Recommend CCDLFR camera). • Interconnecting cable from the Back up camera display, while Table 11 describes the control button functions. Back Up CAM Mode (Optional Cradle Required) Available Late 2007 The NVXM1000 can be used in reverse. Typical Back-Up Camera Display 29 Getting Started To view the Back up camera screen...

User Manual
Page 36
... can directly set the desired FM frequency as follows: - d. Direct: Audio Direct Setup: You can be broadcasting on the selected frequency. 35 Enter the desired FM frequency directly using the touch screen +/-button. Display System Menu. Press the FMT button. In order for 3 seconds. Quit and Exit Setup Mode Display General Menu. Increase Channel (88.1 - 107.9) Decrease Channel (88.1 - 107.9) Operate Speaker On (Green) Operate FM Modulation On (Green) Display Direct FM...
... can directly set the desired FM frequency as follows: - d. Direct: Audio Direct Setup: You can be broadcasting on the selected frequency. 35 Enter the desired FM frequency directly using the touch screen +/-button. Display System Menu. Press the FMT button. In order for 3 seconds. Quit and Exit Setup Mode Display General Menu. Increase Channel (88.1 - 107.9) Decrease Channel (88.1 - 107.9) Operate Speaker On (Green) Operate FM Modulation On (Green) Display Direct FM...

User Manual
Page 37
... on the Setup screen the display presents the Model Name of the unit (NVXM1000) plus the OS Version, Software (SW) Version, and the Navigation (NAV) Version of the current unit. Figure 41. FMT Mode: Directs the audio output to the NVXM1000 internal speakers. System Setup Button Functions Exit current mode FM Frequency and audio setting mode Show the system information 36 System Setup Display Table 16. Speaker Mode: Directs the audio output to your car using a wireless connection. Note...
... on the Setup screen the display presents the Model Name of the unit (NVXM1000) plus the OS Version, Software (SW) Version, and the Navigation (NAV) Version of the current unit. Figure 41. FMT Mode: Directs the audio output to the NVXM1000 internal speakers. System Setup Button Functions Exit current mode FM Frequency and audio setting mode Show the system information 36 System Setup Display Table 16. Speaker Mode: Directs the audio output to your car using a wireless connection. Note...

User Manual
Page 40
... instructions.) 7. Windows Typical Drive Screen 3. J. Therefore, the drive letter you need to the desired folder Music/Photo. 5. Open the drive associated with the NVXM1000. 4. 1. Figure 43. Specifications 39 Disconnect the USB cable. On the PC, open My Computer or Windows Explorer. Copy and paste from your system. Navigate to be different from the top menu: File/New/Folder. Confirm copy is present, select...
... instructions.) 7. Windows Typical Drive Screen 3. J. Therefore, the drive letter you need to the desired folder Music/Photo. 5. Open the drive associated with the NVXM1000. 4. 1. Figure 43. Specifications 39 Disconnect the USB cable. On the PC, open My Computer or Windows Explorer. Copy and paste from your system. Navigate to be different from the top menu: File/New/Folder. Confirm copy is present, select...
User Manual
Page 41
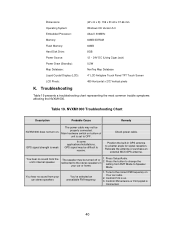
... power cable. You hear no sound from the unit's internal speaker. Press the button to change the setting from FMT Mode to the stereo speakers in GPS antenna to receive. Confirm XM antenna or Fmt pigtail is set to the correct FM frequency on . 3. The power cable may not be difficult to a better angle for signal reception. The speaker may be properly connected. Press Setup...
... power cable. You hear no sound from the unit's internal speaker. Press the button to change the setting from FMT Mode to the stereo speakers in GPS antenna to receive. Confirm XM antenna or Fmt pigtail is set to the correct FM frequency on . 3. The power cable may not be difficult to a better angle for signal reception. The speaker may be properly connected. Press Setup...
