Operation Manual
Page 1
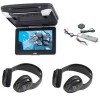
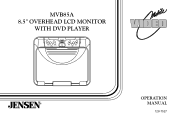
MVB85A 8.5" OVERHEAD LCD MONITOR WITH DVD PLAYER S POWER SOURCE SCREEN ON OFF AUTO STOP PLAY EJECT OPERATION ® MANUAL 128-7527
MVB85A 8.5" OVERHEAD LCD MONITOR WITH DVD PLAYER S POWER SOURCE SCREEN ON OFF AUTO STOP PLAY EJECT OPERATION ® MANUAL 128-7527

Operation Manual
Page 2
... dome light switch in the off or auto positions when the vehicle is unattended, as it is dirty. Warnings u Do not use . u Caution children to avoid touching or scratching the screen, as the dome lights, if left on headphones always adjust the volume setting to the lowest position. An LCD panel or video monitor used for vehicle information, system control, rear or side observation or navigation. u Lock the LCD screen in...
... dome light switch in the off or auto positions when the vehicle is unattended, as it is dirty. Warnings u Do not use . u Caution children to avoid touching or scratching the screen, as the dome lights, if left on headphones always adjust the volume setting to the lowest position. An LCD panel or video monitor used for vehicle information, system control, rear or side observation or navigation. u Lock the LCD screen in...
Operation Manual
Page 3
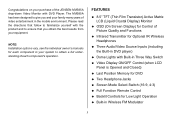
... Opened and Closed) u Last Position Memory for DVD u Two Headphone Jacks u Screen Mode Select Switch (16:9, 4:3) u Full Function Remote Control u Backlit Controls for each component's operation. Please read the directions that follow to familiarize yourself with the product and to ensure that you and your purchase of Picture Quality and Functions u Infrared Transmitter for Optional IR Wireless Headphones u Three Audio/Video Source Inputs (including the Built-in DVD player...
... Opened and Closed) u Last Position Memory for DVD u Two Headphone Jacks u Screen Mode Select Switch (16:9, 4:3) u Full Function Remote Control u Backlit Controls for each component's operation. Please read the directions that follow to familiarize yourself with the product and to ensure that you and your purchase of Picture Quality and Functions u Infrared Transmitter for Optional IR Wireless Headphones u Three Audio/Video Source Inputs (including the Built-in DVD player...
Operation Manual
Page 4
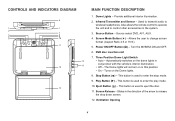
... the Dome lights. 8. CONTROLS AND INDICATORS DIAGRAM 1 2 3 4 5 COMPACT DIGITAL AUDIO VIDEO S POWER SOURCE SCREEN ON OFF AUTO STOP PLAY EJECT 6 1 7 8 9 10 11 14 15 12 13 MAIN FUNCTION DESCRIPTION 1. Also allows the remote control to operate the unit and to wireless headphones. Allows the user to change screen format ( Aspect Ratio 4:3 or 16:9 ). 5. Turns on in conjunction with the vehicle's interior illumination. • Off - Stop Button ( Provide additional interior illumination. 2. Screen Mode Button (=) - DVD disc insertion slot...
... the Dome lights. 8. CONTROLS AND INDICATORS DIAGRAM 1 2 3 4 5 COMPACT DIGITAL AUDIO VIDEO S POWER SOURCE SCREEN ON OFF AUTO STOP PLAY EJECT 6 1 7 8 9 10 11 14 15 12 13 MAIN FUNCTION DESCRIPTION 1. Also allows the remote control to operate the unit and to wireless headphones. Allows the user to change screen format ( Aspect Ratio 4:3 or 16:9 ). 5. Turns on in conjunction with the vehicle's interior illumination. • Off - Stop Button ( Provide additional interior illumination. 2. Screen Mode Button (=) - DVD disc insertion slot...
Operation Manual
Page 5
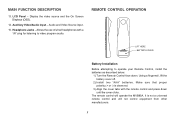
.... 5 Auxiliary Video/Audio Input - Allows the use of wired headphones with the remote control and press down . REMOTE CONTROL OPERATION LIFT HERE BATTERY COVER Battery Installation Before attempting to video program audio. Using a fingernail, lift the battery cover off. 2) Install two "AAA" batteries. It is observed. 3) Align the cover tabs with a 1/8" plug for listening to operate your Remote Control, install the batteries as described below. 1) Turn the Remote Control face down until the cover clicks. LCD Panel - Display the video source and the On Screen Displays...
.... 5 Auxiliary Video/Audio Input - Allows the use of wired headphones with the remote control and press down . REMOTE CONTROL OPERATION LIFT HERE BATTERY COVER Battery Installation Before attempting to video program audio. Using a fingernail, lift the battery cover off. 2) Install two "AAA" batteries. It is observed. 3) Align the cover tabs with a 1/8" plug for listening to operate your Remote Control, install the batteries as described below. 1) Turn the Remote Control face down until the cover clicks. LCD Panel - Display the video source and the On Screen Displays...
Operation Manual
Page 6
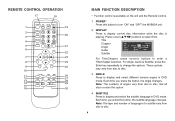
... different camera angles in DVD mode. Each time you press the button, the subtitle language changes. SUBTITLE Press to select from disc to turn "ON" and "OFF" the MVB85A unit. 2. Press cursor (pqtu) buttons to display and select the subtitle language in DVD mode. VOLUME + 11 26 12 27 SLOW PIX 13 28 14 II PAUSE STOP PLAY 29 15 16 30 MAIN FUNCTION DESCRIPTION * Function control is playing. DISPLAY Press...
... different camera angles in DVD mode. Each time you press the button, the subtitle language changes. SUBTITLE Press to select from disc to turn "ON" and "OFF" the MVB85A unit. 2. Press cursor (pqtu) buttons to display and select the subtitle language in DVD mode. VOLUME + 11 26 12 27 SLOW PIX 13 28 14 II PAUSE STOP PLAY 29 15 16 30 MAIN FUNCTION DESCRIPTION * Function control is playing. DISPLAY Press...
Operation Manual
Page 7
... function 7 Press ZOOM button DVD player perform Once Enlarge the picture 2 times of the original size Twice Enlarge the picture 3 times of the original size 3 times Enlarge the picture 4 times of the section to display and select Audio language in this button to access the disc menu. 9. ZOOM Press this model. 10. MENU Allow the user to enlarge the picture when playing a DVD disc. CURSOR (pqtu) Use these buttons to original size 7. RETURN Not used in DVD mode...
... function 7 Press ZOOM button DVD player perform Once Enlarge the picture 2 times of the original size Twice Enlarge the picture 3 times of the original size 3 times Enlarge the picture 4 times of the section to display and select Audio language in this button to access the disc menu. 9. ZOOM Press this model. 10. MENU Allow the user to enlarge the picture when playing a DVD disc. CURSOR (pqtu) Use these buttons to original size 7. RETURN Not used in DVD mode...
Operation Manual
Page 8
... the volume of the wired headphone jacks. When using these devices, the volume must be adjusted with the wireless headphone volume control or with the speed reduced to 1/7 of the adjustment items when the Volume Up and Volume Down buttons are used to normal speed 8 Description of normal speed 9 times Return to make picture adjustments in the picture select mode. SLOW Play a DVD in slow motion Press SLOW button DVD Player Perform Once Play a disc in...
... the volume of the wired headphone jacks. When using these devices, the volume must be adjusted with the wireless headphone volume control or with the speed reduced to 1/7 of the adjustment items when the Volume Up and Volume Down buttons are used to normal speed 8 Description of normal speed 9 times Return to make picture adjustments in the picture select mode. SLOW Play a DVD in slow motion Press SLOW button DVD Player Perform Once Play a disc in...
Operation Manual
Page 9
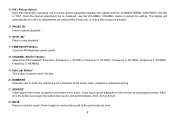
Once the desired adjustment bar is pressed, the on screen picture adjustment displays the "adjustment bar" for BRIGHTNESS, CONTRAST, COLOR or TINT. STOP ( PAUSE (II) Press to adjust the setting. button to pause playback. 16. 14. PIX ( Picture Select ) Each time this button is displayed, use the VOLUME+/ VOLUME- The display will automatically turn off if no adjustments are made within 6 seconds, or is any other button is pressed. 15.
Once the desired adjustment bar is pressed, the on screen picture adjustment displays the "adjustment bar" for BRIGHTNESS, CONTRAST, COLOR or TINT. STOP ( PAUSE (II) Press to adjust the setting. button to pause playback. 16. 14. PIX ( Picture Select ) Each time this button is displayed, use the VOLUME+/ VOLUME- The display will automatically turn off if no adjustments are made within 6 seconds, or is any other button is pressed. 15.
Operation Manual
Page 10
... Setup Menu which allows the user to repeat the playback in the disc compartment. * Function control is available on the unit and the Remote Control. 10 NEXT (:) Press to skip to the previous chapter or track. 26. REPEAT Allow the user to change the options. 24. PREVIOUS (9) Press to return to the next chapter or track. 25. Press repeatedly to activate the play mode...
... Setup Menu which allows the user to repeat the playback in the disc compartment. * Function control is available on the unit and the Remote Control. 10 NEXT (:) Press to skip to the previous chapter or track. 26. REPEAT Allow the user to change the options. 24. PREVIOUS (9) Press to return to the next chapter or track. 25. Press repeatedly to activate the play mode...
Operation Manual
Page 11
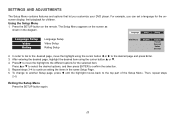
... continue setting the items in the diagram. For example, you customize your DVD player. Repeat steps 3~4 to the different options for the selected item. To change to another Setup page, press t until the highlight moves back to confirm the selection. 5. Press por q to select the desired options, and then press ENTER to the top part of the Setup Menu. screen display, limit...
... continue setting the items in the diagram. For example, you customize your DVD player. Repeat steps 3~4 to the different options for the selected item. To change to another Setup page, press t until the highlight moves back to confirm the selection. 5. Press por q to select the desired options, and then press ENTER to the top part of the Setup Menu. screen display, limit...
Operation Manual
Page 12
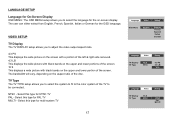
... TYPE setup allows you to adjust the video output aspect ratio. 4:3 PS This displays the wide picture on the screen with a portion of the left & right side removed. 4:3 LB This displays the wide picture with black bands on the upper and lower portions of the screen. 16:9 This displays a wide picture with black bands ...PAL MULTI 12 LANGUAGE SETUP Language for On-Screen Display OSD MENU: The OSD MENU setup allows you to select the language for NTSC TV PAL - VIDEO SETUP TV Display The TV DISPLAY setup allows you to select the system to fit to the color system of the disc. Select this type ...
... TYPE setup allows you to adjust the video output aspect ratio. 4:3 PS This displays the wide picture on the screen with a portion of the left & right side removed. 4:3 LB This displays the wide picture with black bands on the upper and lower portions of the screen. 16:9 This displays a wide picture with black bands ...PAL MULTI 12 LANGUAGE SETUP Language for On-Screen Display OSD MENU: The OSD MENU setup allows you to select the language for NTSC TV PAL - VIDEO SETUP TV Display The TV DISPLAY setup allows you to select the system to fit to the color system of the disc. Select this type ...
Operation Manual
Page 13
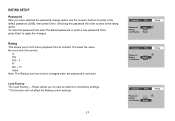
... Load Factory ---Adult Reset Language Video Rating Password Rating Load Factory ---Adult Reset 13 RATING SETUP Password After you to reset all options to the factory settings. * This function will allow access to the rating option To close the password lock enter the default password or enter a new password Then press Enter to apply the changes. Load Factory The Load Factory - Reset allows you have selected the password change option use the numeric buttons...
... Load Factory ---Adult Reset Language Video Rating Password Rating Load Factory ---Adult Reset 13 RATING SETUP Password After you to reset all options to the factory settings. * This function will allow access to the rating option To close the password lock enter the default password or enter a new password Then press Enter to apply the changes. Load Factory The Load Factory - Reset allows you have selected the password change option use the numeric buttons...
Operation Manual
Page 16
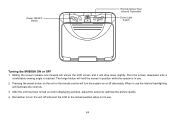
... drop down slightly. Sliding the screen release lock forward will unlock the LCD screen and it will turn the unit off alternately. Power ON/OFF Switch S POWER SOURCE SCREEN ON OFF AUTO STOP PLAY EJECT Remote Sensor Eye/ Infrared Transmitter Dome Light Switch Turning the MVB85A ON or OFF 1. Pressing the power button on or off and pivot the LCD to optimize the picture quality. 4. Pivot the screen downward until a comfortable viewing angle is in use . 2.
... drop down slightly. Sliding the screen release lock forward will unlock the LCD screen and it will turn the unit off alternately. Power ON/OFF Switch S POWER SOURCE SCREEN ON OFF AUTO STOP PLAY EJECT Remote Sensor Eye/ Infrared Transmitter Dome Light Switch Turning the MVB85A ON or OFF 1. Pressing the power button on or off and pivot the LCD to optimize the picture quality. 4. Pivot the screen downward until a comfortable viewing angle is in use . 2.
Operation Manual
Page 17
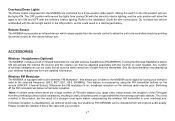
... use with buit-in your wireless headphones for wire connections. Whenever the FM modulator is the case with the controls on the vehicles radio may not be within direct line of sight from the remote control to the installation Guide for more detailed information. Overhead Dome Lights The Dome Lights integrated into the MVB85A are a large number of FM radio stations (e.g. Switching off the FM modulator will turn...
... use with buit-in your wireless headphones for wire connections. Whenever the FM modulator is the case with the controls on the vehicles radio may not be within direct line of sight from the remote control to the installation Guide for more detailed information. Overhead Dome Lights The Dome Lights integrated into the MVB85A are a large number of FM radio stations (e.g. Switching off the FM modulator will turn...
Operation Manual
Page 18
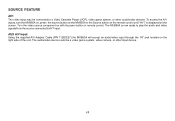
... video input may be a video game system, video camera, or other audio/video devices. Turn the video source component on the right side of the unit. The MVB85A is displayed on the screen. AUX A/V Input Using the supplied A/V Adapter Cable (P/N 112B3227) the MVB85A will accept an audio/video input through the 1/8" jack located on with its power button or remote control. The audio/video device could be connected to AV1 input. To access the A/V inputs, turn the MVB85A on, press the source button on the MVB85A or the Source button on the remote control...
... video input may be a video game system, video camera, or other audio/video devices. Turn the video source component on the right side of the unit. The MVB85A is displayed on the screen. AUX A/V Input Using the supplied A/V Adapter Cable (P/N 112B3227) the MVB85A will accept an audio/video input through the 1/8" jack located on with its power button or remote control. The audio/video device could be connected to AV1 input. To access the A/V inputs, turn the MVB85A on, press the source button on the MVB85A or the Source button on the remote control...
Operation Manual
Page 19
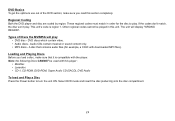
...), DVD Audio To load and Play a Disc Press the Power button to play. Types of the DVD section, make sure that contains audio files (for the disc to turn the unit ON. Select DVD mode and insert the disc (Label Up) into the disc compartment. 19 Regional Coding Both the DVD player and disc are coded by region. DVD Basics To get the optimum use out of Discs the MVB85A will display "WRONG REGION". The unit will play . These regional codes...
...), DVD Audio To load and Play a Disc Press the Power button to play. Types of the DVD section, make sure that contains audio files (for the disc to turn the unit ON. Select DVD mode and insert the disc (Label Up) into the disc compartment. 19 Regional Coding Both the DVD player and disc are coded by region. DVD Basics To get the optimum use out of Discs the MVB85A will display "WRONG REGION". The unit will play . These regional codes...
Operation Manual
Page 20
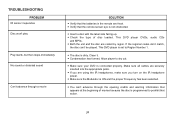
Both the unit and the disc are securely inserted into the appropriate jacks. - This DVD player is connected properly. Allow player to prohibit that the remote sensor eye is not obstructed. - Make sure your DVD is set to Region Number 1. - Make sure the Modulator is dirty. Clean it. - Make sure all cables are coded by region. This DVD player DVDs, audio CDs and MP3s. - You can 't be played. If the regional...
Both the unit and the disc are securely inserted into the appropriate jacks. - This DVD player is connected properly. Allow player to prohibit that the remote sensor eye is not obstructed. - Make sure your DVD is set to Region Number 1. - Make sure the Modulator is dirty. Clean it. - Make sure all cables are coded by region. This DVD player DVDs, audio CDs and MP3s. - You can 't be played. If the regional...
Operation Manual
Page 21
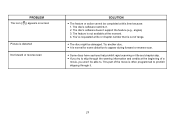
... this time because: 1. The disc's software doesn't support the feature (e.g., angles) 3. The disc might be able to. The feature is normal for some distortion to skip through it . 2. If you won't be damaged. This part of the movie is out of a movie, you try to appear during forward or reverse scan. - You've requested a title or chapter number that...
... this time because: 1. The disc's software doesn't support the feature (e.g., angles) 3. The disc might be able to. The feature is normal for some distortion to skip through it . 2. If you won't be damaged. This part of the movie is out of a movie, you try to appear during forward or reverse scan. - You've requested a title or chapter number that...
Operation Manual
Page 23
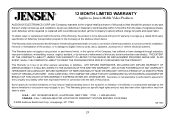
... This Warranty gives you specific legal rights and you . This Warranty does not extend to the elimination of externally generated static or noise, to correction of antenna problems, to costs incurred for parts and repair labor. To obtain repair or replacement within 12 months from ...the Company's option) without charge for installation, removal or reinstallation of the factory serial number/bar code label(s). U.S.A. : AEC 150 MARCUS BLVD., HAUPPAUGE, NEW YORK 11788 • 1-800-645-4994 CANADA : CALL 1-800-645-4994 FOR LOCATION OF WARRANTY STATION SERVING YOUR AREA © 2005 Audiovox...
... This Warranty gives you specific legal rights and you . This Warranty does not extend to the elimination of externally generated static or noise, to correction of antenna problems, to costs incurred for parts and repair labor. To obtain repair or replacement within 12 months from ...the Company's option) without charge for installation, removal or reinstallation of the factory serial number/bar code label(s). U.S.A. : AEC 150 MARCUS BLVD., HAUPPAUGE, NEW YORK 11788 • 1-800-645-4994 CANADA : CALL 1-800-645-4994 FOR LOCATION OF WARRANTY STATION SERVING YOUR AREA © 2005 Audiovox...


