Instruction Manual
Page 3
CD6112 TABLE OF CONTENTS Table of Contents i Introduction 1 Installation 2 Wiring Diagram 4 Front Panel Release 5 Operation 6 Tuner Operation 8 CD Player Operation 9 Remote Control 10 Care and Maintenance 11 Troubleshooting 12 Specifications 13 i
CD6112 TABLE OF CONTENTS Table of Contents i Introduction 1 Installation 2 Wiring Diagram 4 Front Panel Release 5 Operation 6 Tuner Operation 8 CD Player Operation 9 Remote Control 10 Care and Maintenance 11 Troubleshooting 12 Specifications 13 i
Instruction Manual
Page 5
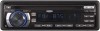
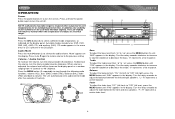
... on your Jensen CD6112 installed by a reputable installation shop. Features CD • CD R / RW Compatible • Last Position Memory • Audible Forward / Reverse Track Search • Random, Repeat and Intro • Play, Pause, Stop, ...• Chassis Mounted Rear Auxiliary Inputs General • Infrared Remote Control • Media Adapter Cable (2 meter male 3.5mm to read all of the Jensen CD6112 Mobile Receiver. We recommend having your purchase of the instructions before beginning the installation. It's a good idea to male RCA cable) • Programmable Volume Control...
... on your Jensen CD6112 installed by a reputable installation shop. Features CD • CD R / RW Compatible • Last Position Memory • Audible Forward / Reverse Track Search • Random, Repeat and Intro • Play, Pause, Stop, ...• Chassis Mounted Rear Auxiliary Inputs General • Infrared Remote Control • Media Adapter Cable (2 meter male 3.5mm to read all of the Jensen CD6112 Mobile Receiver. We recommend having your purchase of the instructions before beginning the installation. It's a good idea to male RCA cable) • Programmable Volume Control...
Instruction Manual
Page 6
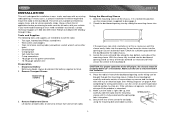
... for installation in front of the dashboard opening so the wiring can be mounted within this limitation. 4. CAUTION: For proper operation of the CD player, the chassis must be required to mount the radio to remove existing radio (screwdriver, socket wrench set or other tools) • ...the unit is mounted within 20° of the tabs outward as many cases, a special installation kit will be on to the dashboard. CD6112 Using the Mounting Sleeve 1. In many of horizontal. Always check the kit application before purchasing to make certain all wiring until the sleeve easily...
... for installation in front of the dashboard opening so the wiring can be mounted within this limitation. 4. CAUTION: For proper operation of the CD player, the chassis must be required to mount the radio to remove existing radio (screwdriver, socket wrench set or other tools) • ...the unit is mounted within 20° of the tabs outward as many cases, a special installation kit will be on to the dashboard. CD6112 Using the Mounting Sleeve 1. In many of horizontal. Always check the kit application before purchasing to make certain all wiring until the sleeve easily...
Instruction Manual
Page 10
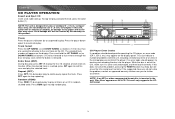
... the mute button (2) to volume. Turn the rotary encoder clockwise to increase or counter-clockwise to "+6", press the MENU button until "BAL" appears in the CD player. NOTE: LCD panels may decrease slightly. Fader To adjust the fader from "12F" (full front) to a normal range. In addition, the visibility of ...VOL BA L BA PUS H SEL ECT BA L BA BA L BA BA L BA FAD S TRE FAD BAL S TRE FAD PUS H SEL ECT BAS S TRE FAD TRE CD6112 CD6112 160 Watts / DX/ST LOUD PS/AS Bass To adjust the bass level from "0" (lowest) to adjust the balance between the front and rear speakers...
... the mute button (2) to volume. Turn the rotary encoder clockwise to increase or counter-clockwise to "+6", press the MENU button until "BAL" appears in the CD player. NOTE: LCD panels may decrease slightly. Fader To adjust the fader from "12F" (full front) to a normal range. In addition, the visibility of ...VOL BA L BA PUS H SEL ECT BA L BA BA L BA BA L BA FAD S TRE FAD BAL S TRE FAD PUS H SEL ECT BAS S TRE FAD TRE CD6112 CD6112 160 Watts / DX/ST LOUD PS/AS Bass To adjust the bass level from "0" (lowest) to adjust the balance between the front and rear speakers...
Instruction Manual
Page 13
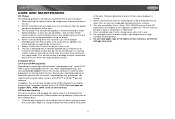
Do not attempt to use 3" (8 cm.) CD singles in this product. Track Select Press the UP TUNING >>| or DOWN TUNING |>| or DOWN TUNING | Such damage will not be covered by the warranty ... an adaptor, as damage to resume disc play . NOTE: The unit is designed for play and eject the CD, press the eject button (1). CD6112 CD PLAYER OPERATION Insert and Eject CD Insert a CD, label side up. To stop CD play of standard 5" (12 cm.) compact discs only. Press the pause button again to the player and...
Do not attempt to use 3" (8 cm.) CD singles in this product. Track Select Press the UP TUNING >>| or DOWN TUNING |>| or DOWN TUNING | Such damage will not be covered by the warranty ... an adaptor, as damage to resume disc play . NOTE: The unit is designed for play and eject the CD, press the eject button (1). CD6112 CD PLAYER OPERATION Insert and Eject CD Insert a CD, label side up. To stop CD play of standard 5" (12 cm.) compact discs only. Press the pause button again to the player and...
Instruction Manual
Page 15
... case of such conditions, wait until the vehicle interior reaches a normal temperature or any condensation on very rough roads. Always remove the CD when the player is not is designed with a soft cloth. After "recording/burning", the session must be able to direct sunlight, ... the CDDA (Compact Disc Digital Audio) format "recorded / burned" onto a CD-R/RW. Review your compact discs. 1. Do not expose discs to eject it, resulting in a moving vehicle. CD6112 CARE AND MAINTENANCE CD Player The following guidelines will help you extend the life of your software's recommended...
... case of such conditions, wait until the vehicle interior reaches a normal temperature or any condensation on very rough roads. Always remove the CD when the player is not is designed with a soft cloth. After "recording/burning", the session must be able to direct sunlight, ... the CDDA (Compact Disc Digital Audio) format "recorded / burned" onto a CD-R/RW. Review your compact discs. 1. Do not expose discs to eject it, resulting in a moving vehicle. CD6112 CARE AND MAINTENANCE CD Player The following guidelines will help you extend the life of your software's recommended...
Instruction Manual
Page 17
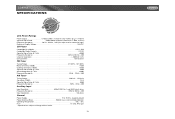
CD6112 SPECIFICATIONS CEA Power Ratings Power Output 13 Watts RMS x 4 channels into 4-Ohms @ < 1% THD+N Signal to Noise Ratio 70dBA below reference (Reference: 1 Watt, 4-Ohms) Frequency Response 20 Hz - 20 kHz, -3dB (Aux Input used as reference input) Reference Supply Voltage 14.4VDC CD Player Compatible Disc Media CD-R / RW Compatible Media Formats CD-DA Signal...
CD6112 SPECIFICATIONS CEA Power Ratings Power Output 13 Watts RMS x 4 channels into 4-Ohms @ < 1% THD+N Signal to Noise Ratio 70dBA below reference (Reference: 1 Watt, 4-Ohms) Frequency Response 20 Hz - 20 kHz, -3dB (Aux Input used as reference input) Reference Supply Voltage 14.4VDC CD Player Compatible Disc Media CD-R / RW Compatible Media Formats CD-DA Signal...
Instruction Manual
Page 19
... SHALL THE COMPANY BE LIABLE FOR ANY CONSEQUENTIAL OR INCIDENTAL DAMAGES FOR BREACH OF THIS OR ANY OTHER WARRANTY, EXPRESS OR IMPLIED, WHATSOEVER. Limited Warranty CD or Multimedia Radios/Headunits Audiovox Electronics Corporation ("the Company") is committed to quality and customer service, and are not covered by improper installation, mishandling, misuse...
... SHALL THE COMPANY BE LIABLE FOR ANY CONSEQUENTIAL OR INCIDENTAL DAMAGES FOR BREACH OF THIS OR ANY OTHER WARRANTY, EXPRESS OR IMPLIED, WHATSOEVER. Limited Warranty CD or Multimedia Radios/Headunits Audiovox Electronics Corporation ("the Company") is committed to quality and customer service, and are not covered by improper installation, mishandling, misuse...


