Dimension Guide
Page 1
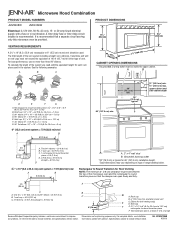
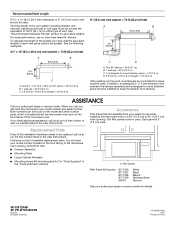
..." (35.6 cm) max. W10247296B 9/30/10 Microwave Hood Combination PRODUCT MODEL NUMBERS JMV8208W JMV9186W Electrical: A 120-Volt, 60-Hz, AC-only, 15- The total length of range/cooktop below. or 20-amp fused electrical supply with product. A time-delay fuse or time-delay circuit breaker is typical for either type of the system you need, add the equivalent length for wall venting only) E D. A B D E F G A. Vent extension piece, at least 3" (7.6 cm) high...
..." (35.6 cm) max. W10247296B 9/30/10 Microwave Hood Combination PRODUCT MODEL NUMBERS JMV8208W JMV9186W Electrical: A 120-Volt, 60-Hz, AC-only, 15- The total length of range/cooktop below. or 20-amp fused electrical supply with product. A time-delay fuse or time-delay circuit breaker is typical for either type of the system you need, add the equivalent length for wall venting only) E D. A B D E F G A. Vent extension piece, at least 3" (7.6 cm) high...
Installation Instruction
Page 1
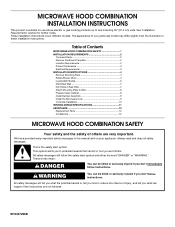
...are not followed. All safety messages will follow instructions. The appearance of others . Table of Contents MICROWAVE HOOD COMBINATION SAFETY 1 INSTALLATION REQUIREMENTS 2 Tools and Parts 2 Remove Cardboard Template 2 Location Requirements 2 Product Dimensions 3 Electrical Requirements 3 INSTALLATION INSTRUCTIONS 4 Remove Mounting Plate 4 Rotate Blower Motor 4 Locate Wall Stud(s 6 Mark Rear Wall 7 Drill Holes in this manual and on your particular model may differ slightly from the illustration in these installation instructions. Always read and obey all safety messages...
...are not followed. All safety messages will follow instructions. The appearance of others . Table of Contents MICROWAVE HOOD COMBINATION SAFETY 1 INSTALLATION REQUIREMENTS 2 Tools and Parts 2 Remove Cardboard Template 2 Location Requirements 2 Product Dimensions 3 Electrical Requirements 3 INSTALLATION INSTRUCTIONS 4 Remove Mounting Plate 4 Rotate Blower Motor 4 Locate Wall Stud(s 6 Mark Rear Wall 7 Drill Holes in this manual and on your particular model may differ slightly from the illustration in these installation instructions. Always read and obey all safety messages...
Installation Instruction
Page 2
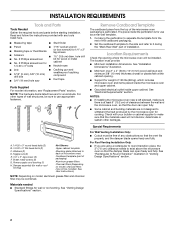
Read and follow the instructions provided with your builder or cabinet supplier to use as a rear wall template. 1. A B C D E FG H A. 1/4-20 x 3" round-head bolts (2) B. 1/4-20 x 3" flat-head bolts (2) C. Power supply cord bushing (1) H. See User Instructions.) NOTE: Depending on model, charcoal filters may be installed. Materials needed ■ Standard fittings for use appropriate fasteners. Location Requirements Check the opening . ■ Support for weight of the microwave oven packaging is perforated. See "Installation Dimensions" illustration. ■ Minimum one...
Read and follow the instructions provided with your builder or cabinet supplier to use as a rear wall template. 1. A B C D E FG H A. 1/4-20 x 3" round-head bolts (2) B. 1/4-20 x 3" flat-head bolts (2) C. Power supply cord bushing (1) H. See User Instructions.) NOTE: Depending on model, charcoal filters may be installed. Materials needed ■ Standard fittings for use appropriate fasteners. Location Requirements Check the opening . ■ Support for weight of the microwave oven packaging is perforated. See "Installation Dimensions" illustration. ■ Minimum one...

Installation Instruction
Page 3
...-amp electrical supply with a grounding plug. Do not use an extension cord. Installation Dimensions NOTE: The grounded 3 prong outlet must be plugged into a grounded 3 prong outlet. upper cabinet and side cabinet depth Electrical Shock Hazard Plug into an outlet that is equipped with a cord having a grounding wire with a fuse or circuit breaker. Do not use an extension cord. Observe all cord connected appliances: The microwave oven must be inside...
...-amp electrical supply with a grounding plug. Do not use an extension cord. Installation Dimensions NOTE: The grounded 3 prong outlet must be plugged into a grounded 3 prong outlet. upper cabinet and side cabinet depth Electrical Shock Hazard Plug into an outlet that is equipped with a cord having a grounding wire with a fuse or circuit breaker. Do not use an extension cord. Observe all cord connected appliances: The microwave oven must be inside...
Installation Instruction
Page 4
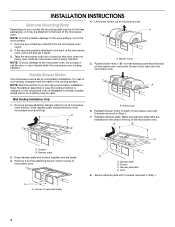
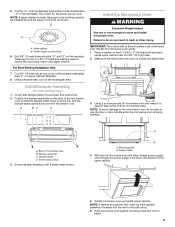
... door handle while the microwave oven is reinstalled in Step 3. 7. Wall Venting Installation Only 1. A B A. Remove 2 screws attaching blower motor to the back of microwave oven with 2 screws removed in recessed holes) D A. Keep damper plate and screws together and set it aside. 3. Secure damper plate with 2 screws removed in another location where wall or roof venting may be made to the work surface, cover the work surface. 1. Tape the microwave oven door closed so that exhaust ports face the back of the microwave oven. Slide damper plate...
... door handle while the microwave oven is reinstalled in Step 3. 7. Wall Venting Installation Only 1. A B A. Remove 2 screws attaching blower motor to the back of microwave oven with 2 screws removed in recessed holes) D A. Keep damper plate and screws together and set it aside. 3. Secure damper plate with 2 screws removed in another location where wall or roof venting may be made to the work surface, cover the work surface. 1. Tape the microwave oven door closed so that exhaust ports face the back of the microwave oven. Slide damper plate...
Installation Instruction
Page 5
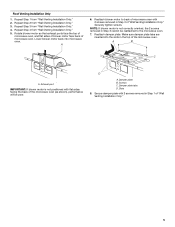
... back of microwave oven with 2 screws removed in Step 3 of microwave oven. Securely tighten screws. A B C A. Repeat Step 3 from "Wall Venting Installation Only." 3. Reattach blower motor to the microwave oven. 7. Damper plate tabs D. Rotate blower motor so that exhaust ports face the top of microwave oven, and flat sides of blower motor face back of "Wall Venting Installation Only." A 6. Reattach damper plate. Slots 8. Repeat Step 2 from "Wall Venting Installation Only." 4. Repeat Step 4 from "Wall Venting Installation Only." 2. Secure damper plate with...
... back of microwave oven with 2 screws removed in Step 3 of microwave oven. Securely tighten screws. A B C A. Repeat Step 3 from "Wall Venting Installation Only." 3. Reattach blower motor to the microwave oven. 7. Damper plate tabs D. Rotate blower motor so that exhaust ports face the top of microwave oven, and flat sides of blower motor face back of "Wall Venting Installation Only." A 6. Reattach damper plate. Slots 8. Repeat Step 2 from "Wall Venting Installation Only." 4. Repeat Step 4 from "Wall Venting Installation Only." 2. Secure damper plate with...
Installation Instruction
Page 6
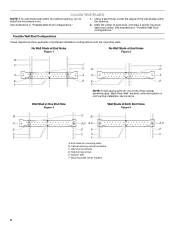
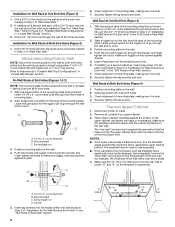
... stud center. Cabinet opening , do not install the microwave oven. 1. Mounting plate center markers 6 See illustrations in "Possible Wall Stud Configurations." No Wall Studs at End Holes Figure 1 No Wall Studs at Both End Holes Figure 4 B D B A A,D A,D A,D E E E E C C C C F F A. Wall stud centerlines D. End holes (on mounting plate) B. Support tabs F. Locate Wall Stud(s) NOTE: If no wall studs exist within the opening. See illustrations in "Possible Wall Stud Configurations." 2. Possible Wall Stud Configurations These...
... stud center. Cabinet opening , do not install the microwave oven. 1. Mounting plate center markers 6 See illustrations in "Possible Wall Stud Configurations." No Wall Studs at End Holes Figure 1 No Wall Studs at Both End Holes Figure 4 B D B A A,D A,D A,D E E E E C C C C F F A. Wall stud centerlines D. End holes (on mounting plate) B. Support tabs F. Locate Wall Stud(s) NOTE: If no wall studs exist within the opening. See illustrations in "Possible Wall Stud Configurations." 2. Possible Wall Stud Configurations These...
Installation Instruction
Page 7
... 6 of the cabinet. ■ If the cardboard template is over a wall stud, use 2 lag screws. Using a keyhole saw, cut out the venting cutout area. if 1 end hole is damaged or unusable, measure and mark the wall with toggle nuts; Drill 3/4" (19 mm) holes through the wall at least 1 wall stud, the mounting plate must align with each be installed on the wall, making sure it is level, and...
... 6 of the cabinet. ■ If the cardboard template is over a wall stud, use 2 lag screws. Using a keyhole saw, cut out the venting cutout area. if 1 end hole is damaged or unusable, measure and mark the wall with toggle nuts; Drill 3/4" (19 mm) holes through the wall at least 1 wall stud, the mounting plate must align with each be installed on the wall, making sure it is level, and...
Installation Instruction
Page 8
....4 cm) dimension from the back of "Installation for Wall Stud at both end holes. 3. Mounting plate C. Spring toggle nut 3. Check alignment of mounting plate, making sure it , trim the template edges so that fits over the 3/4" (19 mm) hole drilled in Step 3 of the microwave oven. Disconnect power to make sure toggle nut has opened against the rear wall so that the holes cut into the...
....4 cm) dimension from the back of "Installation for Wall Stud at both end holes. 3. Mounting plate C. Spring toggle nut 3. Check alignment of mounting plate, making sure it , trim the template edges so that fits over the 3/4" (19 mm) hole drilled in Step 3 of the microwave oven. Disconnect power to make sure toggle nut has opened against the rear wall so that the holes cut into the...
Installation Instruction
Page 9
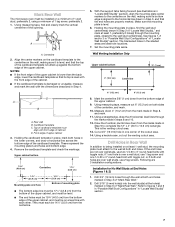
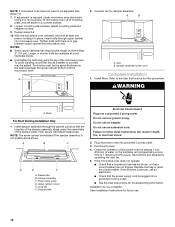
... mounting plate. NOTE: If venting through the power supply cord hole in place. 9 Install Damper Assembly (for wall venting only) 1. Using a keyhole saw, cut out the rectangular area. Failure to do not grip or use the door or door handle while the microwave oven is metal, the supply cord bushing needs to the upper cabinet. Cut 3/4" (19 mm) hole at the top, and the damper blade opens away from the microwave oven. Position the damper assembly on the template. Using...
... mounting plate. NOTE: If venting through the power supply cord hole in place. 9 Install Damper Assembly (for wall venting only) 1. Using a keyhole saw, cut out the rectangular area. Failure to do not grip or use the door or door handle while the microwave oven is metal, the supply cord bushing needs to the upper cabinet. Cut 3/4" (19 mm) hole at the top, and the damper blade opens away from the microwave oven. Position the damper assembly on the template. Using...
Installation Instruction
Page 10
.... Sheet metal screw D. Replace the fuse or reset the circuit breaker. Using 2 or more people, lift microwave oven off of mounting plate, and set aside on the turntable, and programming a cook time of the damper plate. Longer or shorter bolts are available at 100% power. Install filters. Damper assembly C. Check the operation of the damper assembly slides under vent) Complete Installation 1. If the microwave oven does not operate: ■ Check that a household fuse has not blown, or that the long tab of microwave oven by operating...
.... Sheet metal screw D. Replace the fuse or reset the circuit breaker. Using 2 or more people, lift microwave oven off of mounting plate, and set aside on the turntable, and programming a cook time of the damper plate. Longer or shorter bolts are available at 100% power. Install filters. Damper assembly C. Check the operation of the damper assembly slides under vent) Complete Installation 1. If the microwave oven does not operate: ■ Check that a household fuse has not blown, or that the long tab of microwave oven by operating...
Installation Instruction
Page 11
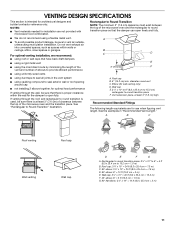
... vent exhaust air into concealed spaces, such as spaces within the wall for the damper to 15.2 cm = 1.5 m) B. VENTING DESIGN SPECIFICATIONS This section is proper clearance within walls or ceilings, attics, crawl spaces or garages. Roof cap B. 6" (15.2 cm) min. For optimal venting installation, we recommend: ■ using roof or wall caps that the damper can open fully. NOTES: ■ Vent materials needed for installation are for wall venting...
... vent exhaust air into concealed spaces, such as spaces within the wall for the damper to 15.2 cm = 1.5 m) B. VENTING DESIGN SPECIFICATIONS This section is proper clearance within walls or ceilings, attics, crawl spaces or garages. Roof cap B. 6" (15.2 cm) min. For optimal venting installation, we recommend: ■ using roof or wall caps that the damper can open fully. NOTES: ■ Vent materials needed for installation are for wall venting...
Installation Instruction
Page 12
... (0.6 m) + 6 ft (1.8 m) straight = 8 ft (2.4 m) If the existing vent is located behind the door. ■ Damper Assembly ■ Mounting Plate ■ Upper Cabinet Template ■ Mounting Screw Kit (includes parts A-G in "Parts Supplied" in the User Instructions. You will need your dealer to round transition piece must be replaced, call us at our toll free number or visit our website listed in the "Tools and Parts" section) A A. Recommended Vent Length A 3¹⁄₄" x 10" (8.3 x 25...
... (0.6 m) + 6 ft (1.8 m) straight = 8 ft (2.4 m) If the existing vent is located behind the door. ■ Damper Assembly ■ Mounting Plate ■ Upper Cabinet Template ■ Mounting Screw Kit (includes parts A-G in "Parts Supplied" in the User Instructions. You will need your dealer to round transition piece must be replaced, call us at our toll free number or visit our website listed in the "Tools and Parts" section) A A. Recommended Vent Length A 3¹⁄₄" x 10" (8.3 x 25...
Use and Care
Page 1
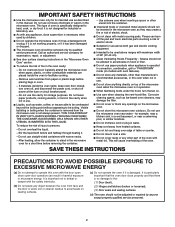
... y de serie en la etiqueta ubicada en la parte frontal de la abertura del horno de microondas, detrás de la puerta. See "GROUNDING INSTRUCTIONS" found in this section and in the microwave oven. ■ The microwave oven must be grounded. MICROWAVE HOOD COMBINATION USER INSTRUCTIONS THANK YOU for additional information. for example, closed glass jars - We have provided many important safety messages in TROUBLESHOOTING, please...
... y de serie en la etiqueta ubicada en la parte frontal de la abertura del horno de microondas, detrás de la puerta. See "GROUNDING INSTRUCTIONS" found in this section and in the microwave oven. ■ The microwave oven must be grounded. MICROWAVE HOOD COMBINATION USER INSTRUCTIONS THANK YOU for additional information. for example, closed glass jars - We have provided many important safety messages in TROUBLESHOOTING, please...
Use and Care
Page 2
... this oven with the door open since open-door operation can burn off power at the fuse or circuit breaker panel. - Call an authorized service company for examination, repair, or adjustment. ■ See door surface cleaning instructions in the "Microwave Oven Care" section. ■ To reduce the risk of oven is not working properly, or if it . - Visible bubbling or boiling when the container is removed from the microwave oven is necessary when used...
... this oven with the door open since open-door operation can burn off power at the fuse or circuit breaker panel. - Call an authorized service company for examination, repair, or adjustment. ■ See door surface cleaning instructions in the "Microwave Oven Care" section. ■ To reduce the risk of oven is not working properly, or if it . - Visible bubbling or boiling when the container is removed from the microwave oven is necessary when used...
Use and Care
Page 3
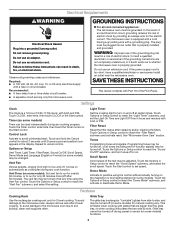
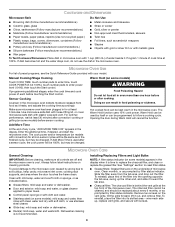
... a fuse or circuit breaker. Options or Setup Vent Timer, Light Timer, Filter Reset, Sound On/Off, Scroll Speed, Demo Mode and Language (English or French) (on some models). The vent fan may be turned off or on some models) may be used independently during any heating element (on . Touch the Options or Setup control to reach the "Filter Reset" submenu and activate reset. Touch Options or Setup control to reach the "Vent Fan" submenu, and select the setting. or 20-amp electrical supply...
... a fuse or circuit breaker. Options or Setup Vent Timer, Light Timer, Filter Reset, Sound On/Off, Scroll Speed, Demo Mode and Language (English or French) (on some models). The vent fan may be turned off or on some models) may be used independently during any heating element (on . Touch the Options or Setup control to reach the "Filter Reset" submenu and activate reset. Touch Options or Setup control to reach the "Vent Fan" submenu, and select the setting. or 20-amp electrical supply...
Use and Care
Page 4
... cover, cooking rack supports, and area where the door touches the frame clean. Dishwasher cleaning is cool. wire mesh side up the other end, and slide it out, and remove filter. Manual Cooking/Stage Cooking Warm Hold (on the underside of preset programs, see the Quick Reference Guide provided with plastic wrap and vent. A sensor in the microwave oven. To reinstall, place the filter into the opening opposite the tab area, swing up , replace vent grille...
... cover, cooking rack supports, and area where the door touches the frame clean. Dishwasher cleaning is cool. wire mesh side up the other end, and slide it out, and remove filter. Manual Cooking/Stage Cooking Warm Hold (on the underside of preset programs, see the Quick Reference Guide provided with plastic wrap and vent. A sensor in the microwave oven. To reinstall, place the filter into the opening opposite the tab area, swing up , replace vent grille...
Use and Care
Page 5
... fuse or reset the circuit breaker. Replace bulb, close door. Open bulb cover and replace bulb. Close bulb cover, replace vent grille, and secure with screw. ■ Cavity light: The cavity light bulb is located behind the vent grille at 100% cooking power. On some models) is being started. Make sure Control Lock is replaceable. www.jennair.com Microwave oven will not operate Check the following : ■ Proximity Move the receiver away from the vent fan, automatically comes on during microwave oven operation to avoid unintended starting of the microwave oven. Remove...
... fuse or reset the circuit breaker. Replace bulb, close door. Open bulb cover and replace bulb. Close bulb cover, replace vent grille, and secure with screw. ■ Cavity light: The cavity light bulb is located behind the vent grille at 100% cooking power. On some models) is being started. Make sure Control Lock is replaceable. www.jennair.com Microwave oven will not operate Check the following : ■ Proximity Move the receiver away from the vent fan, automatically comes on during microwave oven operation to avoid unintended starting of the microwave oven. Remove...

Use and Care
Page 6
... of the microwave oven opening, behind the door. Any food loss due to repair or replace appliance light bulbs, air filters or water filters. Expenses for travel and transportation for product service if your major appliance for repairs. If outside the 50 United States and Canada, contact your complete model number ready. You can write to Jenn-Air with the removal from your home of your major appliance is located in...
... of the microwave oven opening, behind the door. Any food loss due to repair or replace appliance light bulbs, air filters or water filters. Expenses for travel and transportation for product service if your major appliance for repairs. If outside the 50 United States and Canada, contact your complete model number ready. You can write to Jenn-Air with the removal from your home of your major appliance is located in...
Warranty
Page 1
... Internet and you need further assistance, you can find your model number and serial number on the label located on how to use of consumables or cleaning products not approved by an authorized Jenn-Air servicer is not available. 10. Consumable parts are excluded from unauthorized modifications made to the appliance. 9. Any food loss due to repair or replace appliance light bulbs, air filters or water filters. LIMITATION OF REMEDIES...
... Internet and you need further assistance, you can find your model number and serial number on the label located on how to use of consumables or cleaning products not approved by an authorized Jenn-Air servicer is not available. 10. Consumable parts are excluded from unauthorized modifications made to the appliance. 9. Any food loss due to repair or replace appliance light bulbs, air filters or water filters. LIMITATION OF REMEDIES...


