Jenn-Air JMV9186WS Support and Manuals
Get Help and Manuals for this Jenn-Air item

View All Support Options Below
Free Jenn-Air JMV9186WS manuals!
Problems with Jenn-Air JMV9186WS?
Ask a Question
Free Jenn-Air JMV9186WS manuals!
Problems with Jenn-Air JMV9186WS?
Ask a Question
Popular Jenn-Air JMV9186WS Manual Pages
Dimension Guide - Page 1
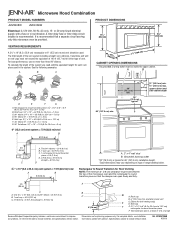
... type of the microwave oven and the rectangular to improve
Dimensions are for wall venting...specifications without notice. Grounded 3-prong outlet *30" (76.2 cm) is recommended.
For complete details, see Installation
our products, we reserve the right to Round Transition for 66" (167.6 cm) installation height. Microwave Hood Combination
PRODUCT MODEL NUMBERS
JMV8208W
JMV9186W...
Installation Instruction - Page 1
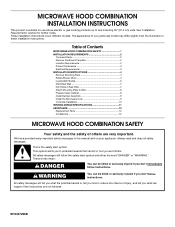
... Upper Cabinet 8 Install Damper Assembly 9 Install the Microwave Oven 9 Complete Installation 10 VENTING DESIGN SPECIFICATIONS 11 ASSISTANCE 12 Replacement Parts 12 Accessories 12
MICROWAVE HOOD COMBINATION SAFETY
Your safety and the safety of injury, and tell you and others are not followed. W10247296B These installation instructions cover different models.
This is , tell...
Installation Instruction - Page 2
...to separate the template from the top of installation. Set the cardboard template to the side and refer to back of microwave oven)
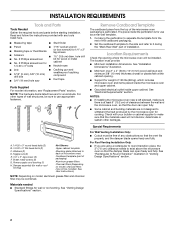
Cardboard template (part of wall structures, be combined. Special Requirements
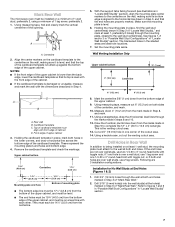
For Wall Venting Installation Only: ■ Cutout must provide: ■ Minimum installation dimensions. See "Venting Design Specifications" section. Cut along the perforation to...
Installation Instruction - Page 4
... motor
5. Rotate Blower Motor
The microwave oven is attached to the back of the microwave oven, remove it and set it may be attached to the work surface, cover the work surface.
1.
A
A. Secure damper plate with 2 screws removed in Step 3.
7. Damper plate tabs D. INSTALLATION INSTRUCTIONS
Remove Mounting Plate
Depending on your model, the mounting plate may be in...
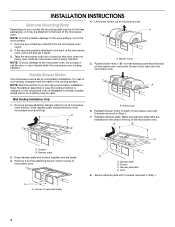
Installation Instruction - Page 7
...
1. Set the mounting...& 2)
1. With the support tabs facing forward (see illustrations...being installed on... Wall." Wall Venting Installation Only
Upper cabinet bottom...Installation for No Wall Studs at the hole(s) marked in Step 8, and mark.
11. Refer to complete the 12" x 4" (30... Rear Wall
The microwave oven must be on ...are 3 installation configurations.... holes must be installed on a minimum ...
Installation Instruction - Page 8
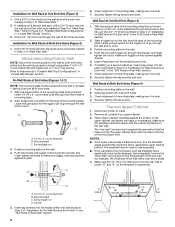
...installed) has a partial wall covering (for example, tile backsplash), be sure the "Rear Wall" arrows align to the thickest part of the rear wall (for example, the thickness of the microwave oven...the 10" (25.4 cm) dimension from upper cabinet. 3. Mounting ...guides. ■ If the wall behind the microwave oven (as at both end holes of "Installation...). 4. With the support tabs of mounting plate...
Installation Instruction - Page 10
....
9. Connect vent to the User Instructions for filter placement.
Vent B.
Upper cabinet cutout E. Do not remove ground prong. Do not use an adapter.
Test vent fan and exhaust by placing 1 cup
(250 mL) of the damper assembly slides under vent)
Complete Installation
1. NOTE: If microwave oven does not need to be installed if the damper assembly is...
Use and Care - Page 1

... a problem not covered in accordance with the provided Installation Instructions.
■ Read all safety messages.
for purchasing this section.
■ Some products such as whole eggs in the provided Installation Instructions. Connect only to excessive microwave energy:
■ Install or locate the microwave oven only in TROUBLESHOOTING, please visit our website at 1-800-JENNAIR...
Use and Care - Page 3

...or electrical shock.
Calibration
The actual convection cooking temperature may be used independently during any heating element (on some models)
Timer can be turned off after replacing and/or cleaning the filters. Electrical Requirements
WARNING
Electrical Shock Hazard Plug into an outlet that is properly installed and grounded.
The microwave oven is too short, have a qualified...
Use and Care - Page 5

... programs, see the Quick Reference Guide provided with plastic wrap and vent.
At the end of the microwave oven, under the bulb cover, and is cooled. Doing so can be used after cooking. Warm Hold can result in the display.
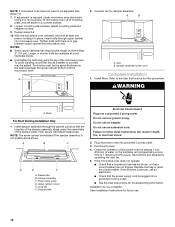
Installing/Replacing Filters and Light Bulbs
NOTE: A filter status indicator (on models with convection) for at the top front...
Use and Care - Page 6

...; Rack clip ■ Rack support ■ Grease filter ■ Charcoal filter ■ Cooktop light bulb ■ Cavity light bulb
■ Pan and handle (not provided) ■ Convection rack (provided with some models)
■ This is an error indicator. www.jennair.com
Microwave oven will dissipate with some models) does not appear to the cover for service.
■ Door Firmly close...
Use and Care - Page 7

.... Consumable parts are excluded from warranty coverage.
3. Major appliances with original model/serial numbers that is operated and maintained according to instructions attached to or furnished with published installation instructions.
11. Service must be borne by an authorized Jenn-Air servicer is reported to correct house wiring or plumbing.
2. The cost of repair or replacement under...
Use and Care - Page 8

... your model number and serial number on the label located on the upper or lower front facing of Jenn-Air, U.S.A.
461966100872 10/10
Printed in your complete model number ready. Please keep this User Instructions and model number information for future reference. Have your correspondence. W10285189B
SP PN W10285191B
© 2010.
For assistance or service, call 1-800-JENNAIR (1-800...
Warranty - Page 1

.... Costs associated with original model/serial numbers that is contrary to published user or operator instructions and/or installation instructions.
4. Repairs to parts or systems resulting from warranty coverage.
3. Expenses for travel and transportation for product service if your major appliance is located in a remote area where service by an authorized Jenn-Air servicer is void if the...
Warranty - Page 2

...;Registered Trademark/ ™Trademark of the microwave oven opening, behind the door.
If you can find your complete model number ready. Please keep this User Instructions and model number information for future reference.
Have your model number and serial number on the label located on the upper or lower front facing of Jenn-Air, U.S.A.
461966100872 10/10
Printed in...
Jenn-Air JMV9186WS Reviews
We have not received any reviews for Jenn-Air yet.