Instructions
Page 6
English Contents Contents 1 Introduction 2 Precautions 2 How to Read This Manual 3 Getting Started 4 Step 1: Unpack 4 Step 2: Prepare the Remote Control 4 Step 3: Hook Up 5 Before Operating the System 7 Daily Operations-Playback 8 Listening to the Radio 9 Playing Back a Disc 10 Playing Back from the USB mass storage class device ... 10 Playing Back ...Random-Random Play 16 Playing Repeatedly-Repeat Play 16 Timer Operations 17 Setting the Timer 17 Additional Information 19 Learning More about This System 19 Troubleshooting 20 Maintenance 20 Specifications 21 Parts Index 22 1
English Contents Contents 1 Introduction 2 Precautions 2 How to Read This Manual 3 Getting Started 4 Step 1: Unpack 4 Step 2: Prepare the Remote Control 4 Step 3: Hook Up 5 Before Operating the System 7 Daily Operations-Playback 8 Listening to the Radio 9 Playing Back a Disc 10 Playing Back from the USB mass storage class device ... 10 Playing Back ...Random-Random Play 16 Playing Repeatedly-Repeat Play 16 Timer Operations 17 Setting the Timer 17 Additional Information 19 Learning More about This System 19 Troubleshooting 20 Maintenance 20 Specifications 21 Parts Index 22 1
Instructions
Page 8
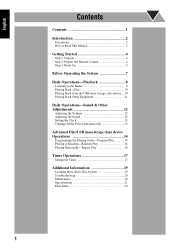
... if they have the same (or similar) name and marks. • Some related tips and notes are explained as possible, we have a doubt about This System" and "Troubleshooting" , but not in the sections "Learning More about the functions, go to -understand as listed in this example, 2 seconds). • ...Remote ONLY Main Unit ONLY Indicates that you can use the buttons and controls on the main unit. 3 English How to Read This Manual To make this manual as simple and easy-to these sections and you want . • Indicates that this operation is only possible using the remote control ...
... if they have the same (or similar) name and marks. • Some related tips and notes are explained as possible, we have a doubt about This System" and "Troubleshooting" , but not in the sections "Learning More about the functions, go to -understand as listed in this example, 2 seconds). • ...Remote ONLY Main Unit ONLY Indicates that you can use the buttons and controls on the main unit. 3 English How to Read This Manual To make this manual as simple and easy-to these sections and you want . • Indicates that this operation is only possible using the remote control ...
Instructions
Page 10
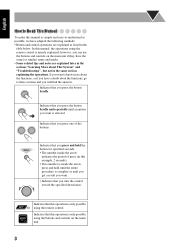
... best reception is obtained. When you connect Digital Audio Player, etc., refer also to all connections are typical examples. Turn the power off to their manuals since the terminal names actually printed on the rear may vary. English Step 3: Hook Up If you need more detailed information, see page 6 Illustrations of...
... best reception is obtained. When you connect Digital Audio Player, etc., refer also to all connections are typical examples. Turn the power off to their manuals since the terminal names actually printed on the rear may vary. English Step 3: Hook Up If you need more detailed information, see page 6 Illustrations of...
Instructions
Page 14
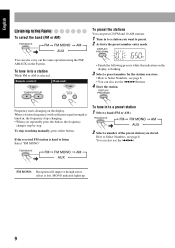
...step. To tune in to a station While FM or AM is lost. Remote control: 1 sec. DISPLAY/ PROG. Main unit: 1 sec. To stop searching manually, press either button. If the received FM station is hard to listen Select "FM MONO" To tune in to a preset station 1 Select a band (FM or... AM). MONO indicator lights up. 9 DISPLAY/ PROGRAM Frequency starts changing on the System. How to Select Numbers, see page 8. • You can also use the 4/¢ . English Listening to the Radio To select the band (FM or AM...
...step. To tune in to a station While FM or AM is lost. Remote control: 1 sec. DISPLAY/ PROG. Main unit: 1 sec. To stop searching manually, press either button. If the received FM station is hard to listen Select "FM MONO" To tune in to a preset station 1 Select a band (FM or... AM). MONO indicator lights up. 9 DISPLAY/ PROGRAM Frequency starts changing on the System. How to Select Numbers, see page 8. • You can also use the 4/¢ . English Listening to the Radio To select the band (FM or AM...
Instructions
Page 15
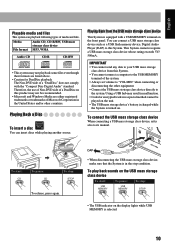
...mass stotrage class device directly to the system. To connect the USB mass storage class...USB mass storage class device This System is selected. 10 Media Audio CD,... CD-R CD-RW • This system may not be recommended. • Microsoft... memory device, Digital Audio Player (DAP) to this System. • You cannot connect a computer to "VOL...either registered trademarks or trademarks of the system. • Always set volume to the...battery is charged while the System is in the stop : USB MEMORY ... storage class device, make sure that the System is turned on the USB mass storage class...
...mass stotrage class device directly to the system. To connect the USB mass storage class...USB mass storage class device This System is selected. 10 Media Audio CD,... CD-R CD-RW • This system may not be recommended. • Microsoft... memory device, Digital Audio Player (DAP) to this System. • You cannot connect a computer to "VOL...either registered trademarks or trademarks of the system. • Always set volume to the...battery is charged while the System is in the stop : USB MEMORY ... storage class device, make sure that the System is turned on the USB mass storage class...
Instructions
Page 16
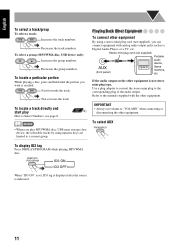
... a stereo mini plug cord (not supplied), you want is indicated. 11 DISPLAY/ PROGRAM ID3 ON ID3 OFF When "ID3 ON" is set volume to the manuals supplied with analog audio output jacks such as a Digital Audio Player, or a TV, etc. If the audio output on the other equipment. IMPORTANT • Always...
... a stereo mini plug cord (not supplied), you want is indicated. 11 DISPLAY/ PROGRAM ID3 ON ID3 OFF When "ID3 ON" is set volume to the manuals supplied with analog audio output jacks such as a Digital Audio Player, or a TV, etc. If the audio output on the other equipment. IMPORTANT • Always...
Instructions
Page 22
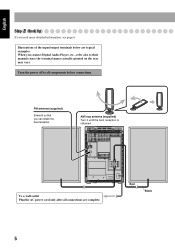
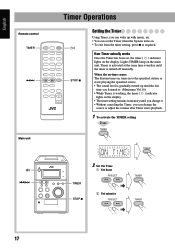
How Timer actually works Once the Timer has been set the Timer when the System turns on. • To exit from the timer setting, press 7 as required. TIMER TIMER STOP 7 2 Set On Time 1 Set ...hour PRESET 2 Set minutes PRESET TIMER MHz TIMER TIMER 17 Lights TIMER lamp on the display. When the on-time comes The System turns on, tunes in to . (Maximum Vol.16) • While Timer is working, the timer ( ) indicator lights on the display. ... Timer, you listened to the specified station or starts playing the specified source. • The sound level is turned off manually.
How Timer actually works Once the Timer has been set the Timer when the System turns on. • To exit from the timer setting, press 7 as required. TIMER TIMER STOP 7 2 Set On Time 1 Set ...hour PRESET 2 Set minutes PRESET TIMER MHz TIMER TIMER 17 Lights TIMER lamp on the display. When the on-time comes The System turns on, tunes in to . (Maximum Vol.16) • While Timer is working, the timer ( ) indicator lights on the display. ... Timer, you listened to the specified station or starts playing the specified source. • The sound level is turned off manually.


