Instruction Manual
Page 1
which are located either on the rear, bottom or side of CA-UXG200 and SP-UXG200 INSTRUCTIONS For Customer Use: Enter below the Model No. LVT1956-005A [J] and Serial No. Retain this information for future reference. MICRO COMPONENT SYSTEM UX-G200-Consists of the cabinet. Serial No. Model No.
which are located either on the rear, bottom or side of CA-UXG200 and SP-UXG200 INSTRUCTIONS For Customer Use: Enter below the Model No. LVT1956-005A [J] and Serial No. Retain this information for future reference. MICRO COMPONENT SYSTEM UX-G200-Consists of the cabinet. Serial No. Model No.
Instruction Manual
Page 2
... between the equipment and receiver. Connect the equipment into an outlet on , the user is provided to call the CATV system installer's attention to section 820-40 of the NEC which provides guidelines for proper grounding and, in particular, specifies that the cable ground shall be connected to the grounding system of important operating and maintenance (servicing) instructions in the literature...
... between the equipment and receiver. Connect the equipment into an outlet on , the user is provided to call the CATV system installer's attention to section 820-40 of the NEC which provides guidelines for proper grounding and, in particular, specifies that the cable ground shall be connected to the grounding system of important operating and maintenance (servicing) instructions in the literature...

Instruction Manual
Page 4
... System. • DO NOT block the ventilation openings or holes. In this example, 2 seconds). • If no user serviceable parts inside the arrow indicates the period of time, unplug the AC power cord from the unit. Precautions Installation • Install in the same section explaining the operations. DO NOT handle the AC power cord with TV. For safety, observe the following methods: • Button...
... System. • DO NOT block the ventilation openings or holes. In this example, 2 seconds). • If no user serviceable parts inside the arrow indicates the period of time, unplug the AC power cord from the unit. Precautions Installation • Install in the same section explaining the operations. DO NOT handle the AC power cord with TV. For safety, observe the following methods: • Button...

Instruction Manual
Page 5
... Troubleshooting 19 Maintenance 20 Specifications 21 Parts Index 22 2 Contents Getting Started 3 Step 1: Unpack 3 Step 2: Prepare the Remote Control 3 Step 3: Hook Up 4 Before Operating the System 6 Daily Operations-Playback 7 Listening to the Radio 8 Playable Media and Files 9 Playing Back a Disc 9 Playing Back a USB Mass Storage Class Device 9 Playing Back Discs/Files 10 Playing Back Other Equipment 10 Daily Operations-Sound & Other Adjustments 11 Adjusting the Volume 11 Adjusting the Sound 11 Setting the Clock 12 Turning Off the Power Automatically-Sleep Timer...
... Troubleshooting 19 Maintenance 20 Specifications 21 Parts Index 22 2 Contents Getting Started 3 Step 1: Unpack 3 Step 2: Prepare the Remote Control 3 Step 3: Hook Up 4 Before Operating the System 6 Daily Operations-Playback 7 Listening to the Radio 8 Playable Media and Files 9 Playing Back a Disc 9 Playing Back a USB Mass Storage Class Device 9 Playing Back Discs/Files 10 Playing Back Other Equipment 10 Daily Operations-Sound & Other Adjustments 11 Adjusting the Volume 11 Adjusting the Sound 11 Setting the Clock 12 Turning Off the Power Automatically-Sleep Timer...

Instruction Manual
Page 7
Right speaker AM loop antenna (supplied) Turn it so that you need more detailed information, see page 5. Red Black 4 Step 3: Hook Up If you can obtain the best reception. FM antenna (supplied) Extend it until the best reception is obtained. Turn the power off to all connections are complete. Main unit Left speaker To a wall outlet Plug the AC power cord only after all components before connections.
Right speaker AM loop antenna (supplied) Turn it so that you need more detailed information, see page 5. Red Black 4 Step 3: Hook Up If you can obtain the best reception. FM antenna (supplied) Extend it until the best reception is obtained. Turn the power off to all connections are complete. Main unit Left speaker To a wall outlet Plug the AC power cord only after all components before connections.

Instruction Manual
Page 8
... System, connecting cords, and the AC power cord. AM loop antenna Keep it horizontally. Insert 1. To connect the AM loop antenna Make sure to an outdoor FM antenna using a 75 Ω wire with the metallic parts of the antenna wire or speaker cords by twisting the vinyl. Lock 2. Hold To connect the speaker cords Make sure the both speakers are covered with vinyl, remove the vinyl to be in touch with coaxial type connector...
... System, connecting cords, and the AC power cord. AM loop antenna Keep it horizontally. Insert 1. To connect the AM loop antenna Make sure to an outdoor FM antenna using a 75 Ω wire with the metallic parts of the antenna wire or speaker cords by twisting the vinyl. Lock 2. Hold To connect the speaker cords Make sure the both speakers are covered with vinyl, remove the vinyl to be in touch with coaxial type connector...

Instruction Manual
Page 9
... Operating the System The indications on standby; e Sound Mode indicators Lights when one of things while you are operating the System. flashes while it is activated. r FM reception indicator • ST: Lights while FM stereo station with when and how the indicator illuminates on the main display Tuner: AUDIO IN: kHz MHz Band Frequency DISC: • While playing a CD: Source name • While stopped: TRACK CD CD Track number Elapsed Total track Total playing playing time number time...
... Operating the System The indications on standby; e Sound Mode indicators Lights when one of things while you are operating the System. flashes while it is activated. r FM reception indicator • ST: Lights while FM stereo station with when and how the indicator illuminates on the main display Tuner: AUDIO IN: kHz MHz Band Frequency DISC: • While playing a CD: Source name • While stopped: TRACK CD CD Track number Elapsed Total track Total playing playing time number time...

Instruction Manual
Page 10
..., the sudden blast of the speakers. The sound will activate the speakers again. To select number 125, press => 10 → 1 → 2 → 5. 7 To turn on the main unit. Number buttons PRESET 1,y, 4,x TUNING/ GROUP K,5 Daily Operations-Playback DISPLAY/ PROGRAM STOP 7 1 Turn on standby. For private listening Connect a pair of power is ready to the PHONES jack on the System or start . • If you turn off (standby) the System The STANDBY lamp on the main unit...
..., the sudden blast of the speakers. The sound will activate the speakers again. To select number 125, press => 10 → 1 → 2 → 5. 7 To turn on the main unit. Number buttons PRESET 1,y, 4,x TUNING/ GROUP K,5 Daily Operations-Playback DISPLAY/ PROGRAM STOP 7 1 Turn on standby. For private listening Connect a pair of power is ready to the PHONES jack on the System or start . • If you turn off (standby) the System The STANDBY lamp on the main unit...
Instruction Manual
Page 11
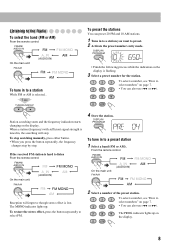
... manually, press either button. • When you want to preset. 2 Activate the preset number entry mode. To restore the stereo effect, press the button repeatedly to a preset station 1 Select a band (FM or AM). If the received FM station is lost. TUNING/GROUP To preset the stations You can preset 20 FM and 10 AM stations. 1 Tune in to a station you press the button repeatedly, the frequency changes step by step. To stop . DISPLAY/ PROGRAM...
... manually, press either button. • When you want to preset. 2 Activate the preset number entry mode. To restore the stereo effect, press the button repeatedly to a preset station 1 Select a band (FM or AM). If the received FM station is lost. TUNING/GROUP To preset the stations You can preset 20 FM and 10 AM stations. 1 Tune in to a station you press the button repeatedly, the frequency changes step by step. To stop . DISPLAY/ PROGRAM...

Instruction Manual
Page 12
... can connect a USB mass storage class device such as a USB flash memory device, Digital Audio Player (DAP) to the USB MEMORY terminal of the System. • When connecting with the "Compact Disc Digital Audio" standard. Playable Media and Files This System can play back following types of discs/files. • Audio CD • MP3/WMA files on a CD-R, CD-RW, or USB mass storage class device Audio CD CD-R CD-RW • This System may not be recommended. Therefore, the use the USB 2.0 cable...
... can connect a USB mass storage class device such as a USB flash memory device, Digital Audio Player (DAP) to the USB MEMORY terminal of the System. • When connecting with the "Compact Disc Digital Audio" standard. Playable Media and Files This System can play back following types of discs/files. • Audio CD • MP3/WMA files on a CD-R, CD-RW, or USB mass storage class device Audio CD CD-R CD-RW • This System may not be recommended. Therefore, the use the USB 2.0 cable...

Instruction Manual
Page 13
... the other equipment By using a stereo mini plug cord (not supplied), you can connect equipment with analog audio output jacks such as a portable audio player. Playing Back Other Equipment To connect other equipment. Playing Back Discs/Files To select a track/group To select a track: PRESET Selects the next tracks. DISPLAY/ PROGRAM ID3 ON ID3 OFF ID3/WMA tag information is reached. To locate a track directly and Remote start play back an MP3/WMA...
... the other equipment By using a stereo mini plug cord (not supplied), you can connect equipment with analog audio output jacks such as a portable audio player. Playing Back Other Equipment To connect other equipment. Playing Back Discs/Files To select a track/group To select a track: PRESET Selects the next tracks. DISPLAY/ PROGRAM ID3 ON ID3 OFF ID3/WMA tag information is reached. To locate a track directly and Remote start play back an MP3/WMA...
Instruction Manual
Page 15
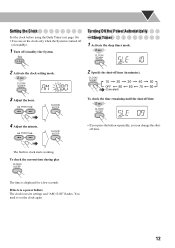
Setting the Clock Set the clock before using the Daily Timer (see page 16). • You can change the shutoff time. Turning Off the Power Automatically -Sleep Timer 1 Activate the sleep timer mode. 2 sec. To check the current time during play CLOCK/ SLEEP The time is a power failure The clock loses its settings and "AM 12:00" flashes. You need to set the clock only when the System is turned off (on standby). 1 Turn off (standby) the System. CLOCK/ SLEEP SLEEP 4 Adjust the...
Setting the Clock Set the clock before using the Daily Timer (see page 16). • You can change the shutoff time. Turning Off the Power Automatically -Sleep Timer 1 Activate the sleep timer mode. 2 sec. To check the current time during play CLOCK/ SLEEP The time is a power failure The clock loses its settings and "AM 12:00" flashes. You need to set the clock only when the System is turned off (on standby). 1 Turn off (standby) the System. CLOCK/ SLEEP SLEEP 4 Adjust the...

Instruction Manual
Page 17
... cannot select the track with the number buttons during Program Play. 14 DISPLAY/ PROGRAM Track number Next program step is USB mass storage class device. • When you start Random Play. • When you change the source. • When you disconnect the USB mass storage class device while the source is indicated. To add step in the program: 1 Press DISPLAY/PROGRAM repeatedly until the program step you have selected are also erased...
... cannot select the track with the number buttons during Program Play. 14 DISPLAY/ PROGRAM Track number Next program step is USB mass storage class device. • When you start Random Play. • When you change the source. • When you disconnect the USB mass storage class device while the source is indicated. To add step in the program: 1 Press DISPLAY/PROGRAM repeatedly until the program step you have selected are also erased...

Instruction Manual
Page 18
...number buttons during Program Play). To skip a track: To pause: CD To stop: STOP or USB MEMORY Playing Repeatedly-Repeat Play Remote ONLY You can also exit from Random Play by pressing STOP 7. 15 To exit from Random Play RANDOM • You can play back all the tracks in the random order. For audio CD...track. Playing at random. 1 Select the source. USB CD MEMORY or STOP 2 Start Random Play. Random Play ends when all the tracks (or the program during Random Play. RANDOM Playback starts in the current group. * The GROUP indicator lights up on the display when ...
...number buttons during Program Play). To skip a track: To pause: CD To stop: STOP or USB MEMORY Playing Repeatedly-Repeat Play Remote ONLY You can also exit from Random Play by pressing STOP 7. 15 To exit from Random Play RANDOM • You can play back all the tracks in the random order. For audio CD...track. Playing at random. 1 Select the source. USB CD MEMORY or STOP 2 Start Random Play. Random Play ends when all the tracks (or the program during Random Play. RANDOM Playback starts in the current group. * The GROUP indicator lights up on the display when ...
Instruction Manual
Page 19
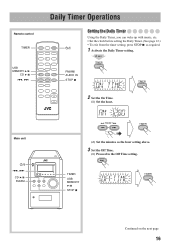
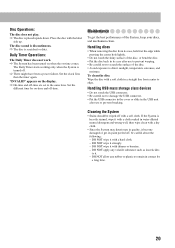
TIMER TIMER 2 Set the On Time. (1) Set the hour. Main unit 4, x CD 6 FM/AM PRESET TIMER (2) Set the minutes as required. 1 Activate the Daily Timer setting. 2 sec. TIMER USB MEMORY 6 STOP 7 TIMER Continued on the next page 16 Remote control TIMER USB MEMORY 6 CD 6 4, x Daily Timer Operations FM/AM/ AUDIO IN STOP 7 Setting the Daily Timer Using the Daily Timer, you can wake up with music, etc. • Set the clock before setting the Daily Timer. (See page 12.) • To exit from...
TIMER TIMER 2 Set the On Time. (1) Set the hour. Main unit 4, x CD 6 FM/AM PRESET TIMER (2) Set the minutes as required. 1 Activate the Daily Timer setting. 2 sec. TIMER USB MEMORY 6 STOP 7 TIMER Continued on the next page 16 Remote control TIMER USB MEMORY 6 CD 6 4, x Daily Timer Operations FM/AM/ AUDIO IN STOP 7 Setting the Daily Timer Using the Daily Timer, you can wake up with music, etc. • Set the clock before setting the Daily Timer. (See page 12.) • To exit from...

Instruction Manual
Page 20
... turned off manually. PRESET TIMER (3) Set the minutes as the hour setting above. "CD," "USB," or "TUNER". The Daily Timer is activated at the earlier off (standby). • The Daily Timer setting remains in to select preset number, then press TIMER. 5 Activate the Daily Timer. When the off-time comes The System stops playback and turns off -time. (2) Select the playback source; USB FM/AM/ CD MEMORY AUDIO IN TIMER When you change the source or adjust the volume after the Daily Timer starts...
... turned off manually. PRESET TIMER (3) Set the minutes as the hour setting above. "CD," "USB," or "TUNER". The Daily Timer is activated at the earlier off (standby). • The Daily Timer setting remains in to select preset number, then press TIMER. 5 Activate the Daily Timer. When the off-time comes The System stops playback and turns off -time. (2) Select the playback source; USB FM/AM/ CD MEMORY AUDIO IN TIMER When you change the source or adjust the volume after the Daily Timer starts...
Instruction Manual
Page 21
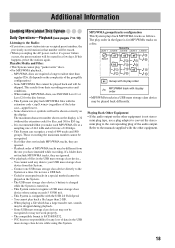
... a longer readout time than 2 GB. - Coded or encrypted tracks in the USB mass storage class device while using this System. The play order in the USB mass storage class device... - Refer to the corresponding plug of the group/file configuration.) - This results from the one USB mass storage class device directly to the Radio: • If you store a new station into an occupied preset number, the previously...
... a longer readout time than 2 GB. - Coded or encrypted tracks in the USB mass storage class device while using this System. The play order in the USB mass storage class device... - Refer to the corresponding plug of the group/file configuration.) - This results from the one USB mass storage class device directly to the Radio: • If you store a new station into an occupied preset number, the previously...
Instruction Manual
Page 22
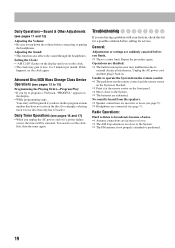
..." flashes on the display. • While programming steps... Advanced Disc/USB Mass Storage Class Device Operations (see pages 13 to 15) Programming the Playing Order-Program Play: • If you try to program a 33rd track, "PROGFUL" appears on the display until you set the clock. • The clock may malfunction due to 2 minutes per month. Daily Timer Operations (see page 7). Troubleshooting If you are exhausted. General: Adjustments or settings are connected (see...
..." flashes on the display. • While programming steps... Advanced Disc/USB Mass Storage Class Device Operations (see pages 13 to 15) Programming the Playing Order-Program Play: • If you try to program a 33rd track, "PROGFUL" appears on the display until you set the clock. • The clock may malfunction due to 2 minutes per month. Daily Timer Operations (see page 7). Troubleshooting If you are exhausted. General: Adjustments or settings are connected (see...
Instruction Manual
Page 23
... best performance of the disc. • Avoid exposure to damage the USB connector. • Put the USB connector in the cover or slide in a straight line from its paint peeled off, be wiped off . ] There might have been a power failure. Daily Timer Operations: The Daily Timer does not work. ] The System has been turned on when the on the display. ] On-time and off -time. Set the clock...
... best performance of the disc. • Avoid exposure to damage the USB connector. • Put the USB connector in the cover or slide in a straight line from its paint peeled off, be wiped off . ] There might have been a power failure. Daily Timer Operations: The Daily Timer does not work. ] The System has been turned on when the on the display. ] On-time and off -time. Set the clock...

Instruction Manual
Page 27
... EACH REFURBISHED PRODUCT. Retain this product is located either repair the TV there or remove and return it if it cannot be sure to any questions concerning your home and either on a carry-in the Owner's Manual, normal maintenance, video and audio head cleaning; 4. Parts used for future reference. JVC Americas Corp. (JVC) warrants this product and all parts thereof, except as listed above. Service locations can...
... EACH REFURBISHED PRODUCT. Retain this product is located either repair the TV there or remove and return it if it cannot be sure to any questions concerning your home and either on a carry-in the Owner's Manual, normal maintenance, video and audio head cleaning; 4. Parts used for future reference. JVC Americas Corp. (JVC) warrants this product and all parts thereof, except as listed above. Service locations can...


