Instruction Manual
Page 5
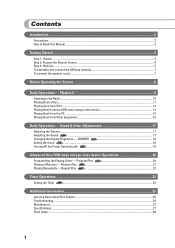
...25 Troubleshooting ...26 Maintenance ...27 Specifications...27 Parts Index...28 1 DIMMER Remote ONLY 18 Setting the Clock Remote ONLY ...18 Turning Off the Power Automatically Remote ONLY 19 Advanced Disc/USB mass storage class device Operations 20 Programming the Playing ...Order - Sound & Other Adjustments 17 Adjusting the Volume ...17 Adjusting the Sound Remote ONLY ...17 Changing the Display Brightness - Random Play Remote ONLY 21 Playing Repeatedly - Contents Introduction ...2 Precautions...2 How to the Radio...10 Playing Back a ...
...25 Troubleshooting ...26 Maintenance ...27 Specifications...27 Parts Index...28 1 DIMMER Remote ONLY 18 Setting the Clock Remote ONLY ...18 Turning Off the Power Automatically Remote ONLY 19 Advanced Disc/USB mass storage class device Operations 20 Programming the Playing ...Order - Sound & Other Adjustments 17 Adjusting the Volume ...17 Adjusting the Sound Remote ONLY ...17 Changing the Display Brightness - Random Play Remote ONLY 21 Playing Repeatedly - Contents Introduction ...2 Precautions...2 How to the Radio...10 Playing Back a ...
Instruction Manual
Page 7
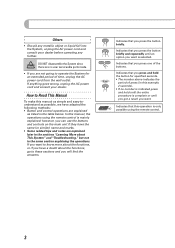
...Troubleshooting," but not in this example, 2 seconds). • If no number is mainly explained; If you want . Remote ONLY Indicates that this manual, the operations using the remote control. 3 Indicates that you want to operate the System for specified seconds. • The number above ... methods: • Button and control operations are explained later in the table below. In this operation is only possible using the remote control is indicated,press and hold the button for an extended period of press (in the same section explaining the operations. Indicates ...
...Troubleshooting," but not in this example, 2 seconds). • If no number is mainly explained; If you want . Remote ONLY Indicates that this manual, the operations using the remote control. 3 Indicates that you want to operate the System for specified seconds. • The number above ... methods: • Button and control operations are explained later in the table below. In this operation is only possible using the remote control is indicated,press and hold the button for an extended period of press (in the same section explaining the operations. Indicates ...
Instruction Manual
Page 8
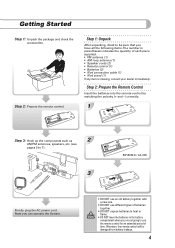
...you can operate the System. • DO NOT use an old battery together with a new one. • DO NOT use the remote control for an extended period of time. Getting Started Step 1: Unpack the package and check the accessories. Step 1: Unpack After unpacking, ... iPod connection cable (1) • iPod stand (1) If any item is missing, consult your dealer immediately. Step 2: Prepare the remote control. Step 2: Prepare the Remote Control Insert the batteries into the remote control by matching the polarity (+ and -) correctly. 1 Step 3: Hook up the components such as 2 AM/FM antennas, ...
...you can operate the System. • DO NOT use an old battery together with a new one. • DO NOT use the remote control for an extended period of time. Getting Started Step 1: Unpack the package and check the accessories. Step 1: Unpack After unpacking, ... iPod connection cable (1) • iPod stand (1) If any item is missing, consult your dealer immediately. Step 2: Prepare the remote control. Step 2: Prepare the Remote Control Insert the batteries into the remote control by matching the polarity (+ and -) correctly. 1 Step 3: Hook up the components such as 2 AM/FM antennas, ...
Instruction Manual
Page 13
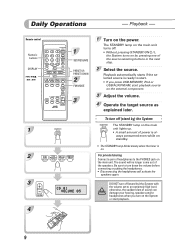
... blinks slowly when the timer is ready to the PHONES jack on the external component. 3 Adjust the volume. 4 Operate the target source as explained later. Remote control Numeric buttons DISPLAY 4,1,7, 33, ¢ 1 2 3 4 STANDBY/ON 1 SET/RESUME PRESET UP, PRESET DOWN 2 FM MODE 3 1 Turn on the main unit lights up. • A small...
... blinks slowly when the timer is ready to the PHONES jack on the external component. 3 Adjust the volume. 4 Operate the target source as explained later. Remote control Numeric buttons DISPLAY 4,1,7, 33, ¢ 1 2 3 4 STANDBY/ON 1 SET/RESUME PRESET UP, PRESET DOWN 2 FM MODE 3 1 Turn on the main unit lights up. • A small...
Instruction Manual
Page 14
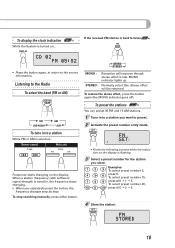
... tune in to a station While FM or AM is tuned in to a station you repeatedly press the button, the frequency changes step by step. Remote control: 1 sec. When a station (frequency) with sufficient signal strength is selected... MONO indicator lights up. Normally select this. To select.... If the received FM station is turned on the display. Examples: To select preset number 5, press 5. To display the clock indication Remote ONLY While the System is hard to listen Remote ONLY • Press the button again, to return to the source information. To preset the stations...
... tune in to a station While FM or AM is tuned in to a station you repeatedly press the button, the frequency changes step by step. Remote control: 1 sec. When a station (frequency) with sufficient signal strength is selected... MONO indicator lights up. Normally select this. To select.... If the received FM station is turned on the display. Examples: To select preset number 5, press 5. To display the clock indication Remote ONLY While the System is hard to listen Remote ONLY • Press the button again, to return to the source information. To preset the stations...

Instruction Manual
Page 15
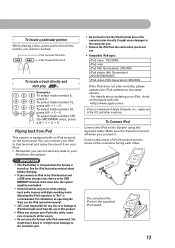
regular CD and CD-R/CD-RW (recorded either in to a preset station Remote ONLY 1 Select a band (FM or AM). To select a track/group* Decrease the track/group* numbers. Media File format Audio CD, CD-R/RW, USB mass storage ... is open, pressing CD 6 closes the cover and the playback starts. To release, press again. To tune in the audio CD, MP3, or WMA format). Remote control: Main unit: Playable media and files This system can set a disc while playing another source. Therefore, the use the PRESET 5/ . 5 To set a disc...
regular CD and CD-R/CD-RW (recorded either in to a preset station Remote ONLY 1 Select a band (FM or AM). To select a track/group* Decrease the track/group* numbers. Media File format Audio CD, CD-R/RW, USB mass storage ... is open, pressing CD 6 closes the cover and the playback starts. To release, press again. To tune in the audio CD, MP3, or WMA format). Remote control: Main unit: Playable media and files This system can set a disc while playing another source. Therefore, the use the PRESET 5/ . 5 To set a disc...
Instruction Manual
Page 16
...(4th Generation) 20G/40G iPod photo (4th Generation) 20G/30G/40G/60G iPod video (5th Generation) 30G/60G If the iPod does not play Remote ONLY Examples: To select track number 5, press 5. You can place the iPod on the supplied iPod stand. 12 Adjusting the iPod's equalizer to the.... ✎ IMPORTANT • The iPod battery is charged while the System is turned on operating the iPod, see the iPod instruction manual. • JVC is recommended. Fast-forwards the track. To locate a particular portion While playing a disc, press and hold until the portion you connect it. To select...
...(4th Generation) 20G/40G iPod photo (4th Generation) 20G/30G/40G/60G iPod video (5th Generation) 30G/60G If the iPod does not play Remote ONLY Examples: To select track number 5, press 5. You can place the iPod on the supplied iPod stand. 12 Adjusting the iPod's equalizer to the.... ✎ IMPORTANT • The iPod battery is charged while the System is turned on operating the iPod, see the iPod instruction manual. • JVC is recommended. Fast-forwards the track. To locate a particular portion While playing a disc, press and hold until the portion you connect it. To select...
Instruction Manual
Page 19
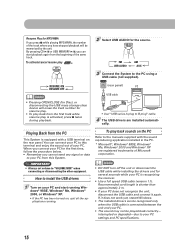
.... • The sound may not be memorized by the unit. To play is connected between the unit and your PC. To activate/cancel resume play Remote ONLY 2 Select USB AUDIO for the source. Resume Play for MP3/WMA If you press 7 while playing MP3/WMA, the number of the track where...
.... • The sound may not be memorized by the unit. To play is connected between the unit and your PC. To activate/cancel resume play Remote ONLY 2 Select USB AUDIO for the source. Resume Play for MP3/WMA If you press 7 while playing MP3/WMA, the number of the track where...
Instruction Manual
Page 21
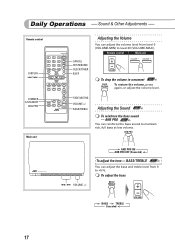
... restore the volume, press again, or adjust the volume level. AHB PRO ON AHB PRO OFF (Canceled) To adjust the tone - BASS/TREBLE Remote ONLY You can adjust the bass and treble level from level 0 (VOLUME-MIN) to +5/-5. Daily Operations - Sound & Other Adjustments - To adjust... the bass BASS TREBLE Canceled 17 Remote control DISPLAY 4 / ¢ DIMMER A.STANDBY AHB PRO Main unit Adjusting the Volume You can reinforce the bass sound to maintain rich, full bass ...
... restore the volume, press again, or adjust the volume level. AHB PRO ON AHB PRO OFF (Canceled) To adjust the tone - BASS/TREBLE Remote ONLY You can adjust the bass and treble level from level 0 (VOLUME-MIN) to +5/-5. Daily Operations - Sound & Other Adjustments - To adjust... the bass BASS TREBLE Canceled 17 Remote control DISPLAY 4 / ¢ DIMMER A.STANDBY AHB PRO Main unit Adjusting the Volume You can reinforce the bass sound to maintain rich, full bass ...
Instruction Manual
Page 22
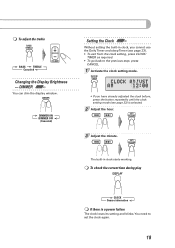
... Timer and sleep Timer (see page 23) is a power failure The clock loses its setting and blinks. DIMMER ON DIMMER OFF (Canceled) Setting the Clock Remote ONLY Without setting the built-in clock starts working. To check the current time during play CLOCK Source information If there is selected. 2 Adjust the.../ TIMER as required. • To go back to set the clock again. 18 To adjust the treble BASS TREBLE Canceled Changing the Display Brightness - DIMMER Remote ONLY You can dim the display window.
... Timer and sleep Timer (see page 23) is a power failure The clock loses its setting and blinks. DIMMER ON DIMMER OFF (Canceled) Setting the Clock Remote ONLY Without setting the built-in clock starts working. To check the current time during play CLOCK Source information If there is selected. 2 Adjust the.../ TIMER as required. • To go back to set the clock again. 18 To adjust the treble BASS TREBLE Canceled Changing the Display Brightness - DIMMER Remote ONLY You can dim the display window.
Instruction Manual
Page 23
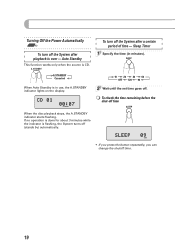
To check the time remaining before the shut-off the System after a certain period of time - Turning Off the Power Automatically Remote ONLY To turn off . To turn off time When the disc playback stops, the A.STANDBY indicator starts flashing. A.STANDBY Canceled When Auto Standby is ...
To check the time remaining before the shut-off the System after a certain period of time - Turning Off the Power Automatically Remote ONLY To turn off . To turn off time When the disc playback stops, the A.STANDBY indicator starts flashing. A.STANDBY Canceled When Auto Standby is ...
Instruction Manual
Page 24
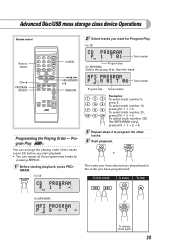
... To skip a track: To pause: To stop: For MP3/WMA or To release, press again. 20 Advanced Disc/USB mass storage class device Operations Remote control 2 Select tracks you start playback. • You can arrange the playing order of the tracks (up to 32) before you want for MP3/... program the other tracks. 4 Start playback. For CD Track number Program step For MP3/WMA Select the group first, then the track. Program Play Remote ONLY You can repeat all the programmed tracks by pressing REPEAT. 1 Before starting playback, press PRO- To select track number 20, press >=10 J 2 J 0....
... To skip a track: To pause: To stop: For MP3/WMA or To release, press again. 20 Advanced Disc/USB mass storage class device Operations Remote control 2 Select tracks you start playback. • You can arrange the playing order of the tracks (up to 32) before you want for MP3/... program the other tracks. 4 Start playback. For CD Track number Program step For MP3/WMA Select the group first, then the track. Program Play Remote ONLY You can repeat all the programmed tracks by pressing REPEAT. 1 Before starting playback, press PRO- To select track number 20, press >=10 J 2 J 0....
Instruction Manual
Page 25
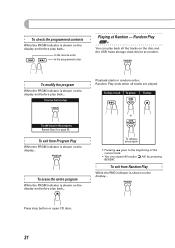
... track. • You can play back all tracks are played. To skip a track: To pause: To stop button or open CD door. 21 Random Play Remote ONLY You can repeat All tracks ( All) by pressing REPEAT. Playback starts in the program: Repeat Step 2 on page 20. To check the programmed contents...
... track. • You can play back all tracks are played. To skip a track: To pause: To stop button or open CD door. 21 Random Play Remote ONLY You can repeat All tracks ( All) by pressing REPEAT. Playback starts in the program: Repeat Step 2 on page 20. To check the programmed contents...
Instruction Manual
Page 26
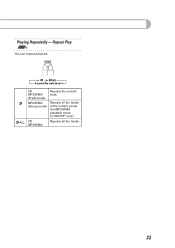
ALL CD MP3/WMA Repeats all the tracks in the current group (for MP3/WMA playback mode in "GROUP" only). ALL Canceld (No indication) CD MP3/WMA (Track mode) MP3/WMA (Group mode) Repeats the current track. Playing Repeatedly - Repeats all the tracks. 22 Repeat Play Remote ONLY You can repeat playback.
ALL CD MP3/WMA Repeats all the tracks in the current group (for MP3/WMA playback mode in "GROUP" only). ALL Canceld (No indication) CD MP3/WMA (Track mode) MP3/WMA (Group mode) Repeats the current track. Playing Repeatedly - Repeats all the tracks. 22 Repeat Play Remote ONLY You can repeat playback.
Instruction Manual
Page 27
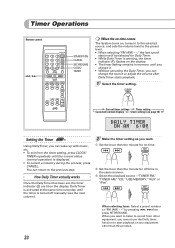
..., the timer indicator are lit on any equipment other equipment, you cannot use the Daily timer function to start playback on the display. Timer Operations Remote control 4 / ¢ STANDBY/ON CANCEL SET/RESUME CLOCK/ TIMER When the on-time comes The System turns on, tunes in to the selected source, ...to the preset level. • When selecting "FM (AM) - -," the last tuned station will be selected for off manually (see page 18) Setting the Timer Remote ONLY Using Daily Timer, you can return to the previous step. When you want . 1 Set the hour then the minute for on-time. 2 Set the...
..., the timer indicator are lit on any equipment other equipment, you cannot use the Daily timer function to start playback on the display. Timer Operations Remote control 4 / ¢ STANDBY/ON CANCEL SET/RESUME CLOCK/ TIMER When the on-time comes The System turns on, tunes in to the selected source, ...to the preset level. • When selecting "FM (AM) - -," the last tuned station will be selected for off manually (see page 18) Setting the Timer Remote ONLY Using Daily Timer, you can return to the previous step. When you want . 1 Set the hour then the minute for on-time. 2 Set the...

Instruction Manual
Page 30
... on the System is blocked. @Point it back in . Unable to operate the System from the remote control. @The path between the remote control and the remote sensor on the font panel. @Signals cannot reach the remote sensor. Close the applications you do not play . @The disc is connected via USB Hub. Connect the...
... on the System is blocked. @Point it back in . Unable to operate the System from the remote control. @The path between the remote control and the remote sensor on the font panel. @Signals cannot reach the remote sensor. Close the applications you do not play . @The disc is connected via USB Hub. Connect the...
Instruction Manual
Page 32
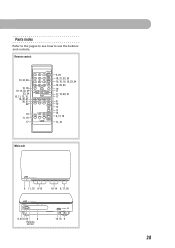
Remote control 10-12, 20 10, 18 10-14, 18, 21 23, 24 10, 11, 13, 15, 16, 20, 21 20, 21 22 19 11, 15 17 9, 24 18, 21, 23, 24 10, 15, 16, 18, 23, 24 18, 23, 24 19 11 11, 13, 20, 21 11 21 10 14 17 18 9, 17, 18 17, 18 Main unit 9 11, 15 9-15 10-14 9, 17, 18 9, 24 1313 8 Rseemnsootre 12 16 9 28 Parts Index Refer to the pages to see how to use the buttons and controls.
Remote control 10-12, 20 10, 18 10-14, 18, 21 23, 24 10, 11, 13, 15, 16, 20, 21 20, 21 22 19 11, 15 17 9, 24 18, 21, 23, 24 10, 15, 16, 18, 23, 24 18, 23, 24 19 11 11, 13, 20, 21 11 21 10 14 17 18 9, 17, 18 17, 18 Main unit 9 11, 15 9-15 10-14 9, 17, 18 9, 24 1313 8 Rseemnsootre 12 16 9 28 Parts Index Refer to the pages to see how to use the buttons and controls.


