
DLA-S15U User instruction manual (2.1MB)
Page 3
... IMPORTANT SAFEGUARDS WARNING : TO PREVENT FIRE OR SHOCK HAZARDS, DO NOT EXPOSE THIS APPLIANCE TO RAIN OR MOISTURE. This projector is operated in of the D-ILA device Do not allow the same still picture to be retained for cleaning. - NOTE: This equipment has been tested and... the FCC Rules. Do not use attachments not recommended by JVC could be required to assure your electrician. There is likely to cause harmful interference in accordance with the limits for its installation, use this projector. This unit has been engineered and manufactured to correct the ...
... IMPORTANT SAFEGUARDS WARNING : TO PREVENT FIRE OR SHOCK HAZARDS, DO NOT EXPOSE THIS APPLIANCE TO RAIN OR MOISTURE. This projector is operated in of the D-ILA device Do not allow the same still picture to be retained for cleaning. - NOTE: This equipment has been tested and... the FCC Rules. Do not use attachments not recommended by JVC could be required to assure your electrician. There is likely to cause harmful interference in accordance with the limits for its installation, use this projector. This unit has been engineered and manufactured to correct the ...

DLA-S15U User instruction manual (2.1MB)
Page 4
.... For safety purpose of your dealer to the ceiling) since special technical knowledge and skills are covered by opening prevent shock. Upon completion of this projector. Exposure of the grounded plug. Power-supply cords should be sure the service technician has used by an unqualified person, it to install the unit...
.... For safety purpose of your dealer to the ceiling) since special technical knowledge and skills are covered by opening prevent shock. Upon completion of this projector. Exposure of the grounded plug. Power-supply cords should be sure the service technician has used by an unqualified person, it to install the unit...

DLA-S15U User instruction manual (2.1MB)
Page 5
... Selecting Screw for Ceiling Mounting 18 Connecting to Various Devices .......... 19 Signals that Can Be Input to the Projector .......... 19 Connecting to Video Devices 20 Connecting to Hi-Vision Devices 20 Connecting to Other Devices 21 Connecting to Devices ...Side 6 Left-hand side 7 Bottom Surface 8 Control Panel 9 Connector Panel 11 Remote Control Unit 13 Installing Batteries 14 Installing the Projector 15 Precautions for installation 15 Projection Distance and Screen Size 16 Relationship between Projection Distances and Projection Screen Sizes 17 Effective Range and Distance...
... Selecting Screw for Ceiling Mounting 18 Connecting to Various Devices .......... 19 Signals that Can Be Input to the Projector .......... 19 Connecting to Video Devices 20 Connecting to Hi-Vision Devices 20 Connecting to Other Devices 21 Connecting to Devices ...Side 6 Left-hand side 7 Bottom Surface 8 Control Panel 9 Connector Panel 11 Remote Control Unit 13 Installing Batteries 14 Installing the Projector 15 Precautions for installation 15 Projection Distance and Screen Size 16 Relationship between Projection Distances and Projection Screen Sizes 17 Effective Range and Distance...

DLA-S15U User instruction manual (2.1MB)
Page 7
... light source lamp is on to prevent the lens becoming dirty when the projector is fixed to the projector when shipped from the factory. CAUTIONS • When carrying the projector, do not touch the vents, or this handle when carrying the projector. Turning to extend the foot allows adjustment up inside, possibly causing a fire...
... light source lamp is on to prevent the lens becoming dirty when the projector is fixed to the projector when shipped from the factory. CAUTIONS • When carrying the projector, do not touch the vents, or this handle when carrying the projector. Turning to extend the foot allows adjustment up inside, possibly causing a fire...
DLA-S15U User instruction manual (2.1MB)
Page 8
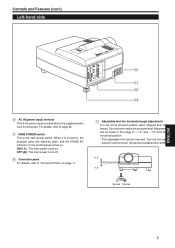
...; and - 1.5° from the factory. w Connector panel For details, refer to page 24. When it until removed. (Screw size available here is turned on, the projector goes into stand-by state, and the STAND BY indicator on the control panel comes on . Turn the foot to make the...
...; and - 1.5° from the factory. w Connector panel For details, refer to page 24. When it until removed. (Screw size available here is turned on, the projector goes into stand-by state, and the STAND BY indicator on the control panel comes on . Turn the foot to make the...
DLA-S15U User instruction manual (2.1MB)
Page 9
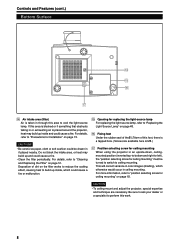
... a tapped hole. (Screw size available here is taken in through this work. 8 CAUTION • To ceiling-mount and adjust the projector, special expertise and technique are necessary. For more information, refer to "position selecting screw for ceiling mounting" on the filter works to ...(cont.) Bottom Surface r t y u r Air intake area (filter) Air is M8.) u Position selecting screw for ceiling mounting When using the projector in an upside-down, ceilingmounted position (inverted top-to-bottom and right-to-left), the "position selecting screw for ceiling mounting" must be drawn in...
... a tapped hole. (Screw size available here is taken in through this work. 8 CAUTION • To ceiling-mount and adjust the projector, special expertise and technique are necessary. For more information, refer to "position selecting screw for ceiling mounting" on the filter works to ...(cont.) Bottom Surface r t y u r Air intake area (filter) Air is M8.) u Position selecting screw for ceiling mounting When using the projector in an upside-down, ceilingmounted position (inverted top-to-bottom and right-to-left), the "position selecting screw for ceiling mounting" must be drawn in...

DLA-S15U User instruction manual (2.1MB)
Page 10
... heated lamp for a fixed period of the lamp. Refer to cool down mode. Source Lamp" on . 9 Also, do not place the projector on (during abnormal temperature), the power is finished. In the emergency mode, projection is automatically interrupted and the cooling fans operate for about 20 ...outlet. Make sure the lamp-replacement cover and the air filter are correctly installed. Blinking : When in the power cord again and operate the projector. Do not turn off the main power switch, unplug the power cord, and call your dealer for more than approx. 900 hours. Blinking...
... heated lamp for a fixed period of the lamp. Refer to cool down mode. Source Lamp" on . 9 Also, do not place the projector on (during abnormal temperature), the power is finished. In the emergency mode, projection is automatically interrupted and the cooling fans operate for about 20 ...outlet. Make sure the lamp-replacement cover and the air filter are correctly installed. Blinking : When in the power cord again and operate the projector. Do not turn off the main power switch, unplug the power cord, and call your dealer for more than approx. 900 hours. Blinking...

DLA-S15U User instruction manual (2.1MB)
Page 11
... on page 31. 10 p -2 7 VIDEO button Use this button to call up the setting menu. For details, refer to the AV IN terminal of the projector. When no menu is shown 4 Press the + 3 button and - 2 button at the same time: 5 QUICK ALIGNMENT is shown, use this button to select a device such...
... on page 31. 10 p -2 7 VIDEO button Use this button to call up the setting menu. For details, refer to the AV IN terminal of the projector. When no menu is shown 4 Press the + 3 button and - 2 button at the same time: 5 QUICK ALIGNMENT is shown, use this button to select a device such...
DLA-S15U User instruction manual (2.1MB)
Page 12
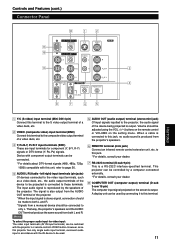
...of a video deck, etc. 2 VIDEO (composite video) input terminal (BNC) Connect this terminal. 11 The input audio signal is output. This projector can be adjusted using the VOL. (+/-) buttons on the remote control or VOLUME on the screen is output. Device with component output terminals can be... terminals, such as a video deck, etc., the audio output terminals of the device to be used by connecting it to this terminal to the projector, the audio signal of the device being projected is reproduced by a computer connected externally. * For details, consult your dealer. 7 RS-232C terminal...
...of a video deck, etc. 2 VIDEO (composite video) input terminal (BNC) Connect this terminal. 11 The input audio signal is output. This projector can be adjusted using the VOL. (+/-) buttons on the remote control or VOLUME on the screen is output. Device with component output terminals can be... terminals, such as a video deck, etc., the audio output terminals of the device to be used by connecting it to this terminal to the projector, the audio signal of the device being projected is reproduced by a computer connected externally. * For details, consult your dealer. 7 RS-232C terminal...

DLA-S15U User instruction manual (2.1MB)
Page 13
... connected to COMPUTER IN (computer input) -2 terminal. * When input to COMPUTER -1 is selected, the audio signal input is reproduced by the projector's speakers. Connect the audio output signal of a device connected to COMPUTER IN (computer input) -1 terminal. * When input to COMPUTER -2 is... selected, the audio signal input is reproduced by the projector's speakers. In that case, use separate sync signals for vertical sync (V) and horizontal sync (H). Connect the display output terminal of H/V signals...
... connected to COMPUTER IN (computer input) -2 terminal. * When input to COMPUTER -1 is selected, the audio signal input is reproduced by the projector's speakers. Connect the audio output signal of a device connected to COMPUTER IN (computer input) -1 terminal. * When input to COMPUTER -2 is... selected, the audio signal input is reproduced by the projector's speakers. In that case, use separate sync signals for vertical sync (V) and horizontal sync (H). Connect the display output terminal of H/V signals...

DLA-S15U User instruction manual (2.1MB)
Page 14
..., the selection changes as follows: COMPUTER 1 COMPUTER 2 3 VIDEO button Use this button to select the devices connected to the projector's COMPUTER IN (computer input) -1 and -2 input terminals. During the automatic adjustment, QUICK ALIGNMENT appears on the screen, and ...VOL. and V. POS. p PAGE BACK button While a details setting is finished. POS. CAUTION • Automatic adjustment with this button to the projector's AV IN (AV input) terminal. POS. Each time you press the button, the selection changes as a video connected to reset the setting of...
..., the selection changes as follows: COMPUTER 1 COMPUTER 2 3 VIDEO button Use this button to select the devices connected to the projector's COMPUTER IN (computer input) -1 and -2 input terminals. During the automatic adjustment, QUICK ALIGNMENT appears on the screen, and ...VOL. and V. POS. p PAGE BACK button While a details setting is finished. POS. CAUTION • Automatic adjustment with this button to the projector's AV IN (AV input) terminal. POS. Each time you press the button, the selection changes as a video connected to reset the setting of...
DLA-S15U User instruction manual (2.1MB)
Page 16
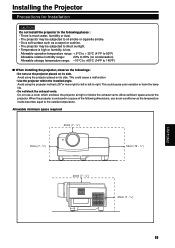
...cigarette smoke. • On a soft surface such as a carpet or cushion. • The projector may be subjected to direct sunlight. • Temperature is high or humidity is low. Allow sufficient space around the projector. Allowable minimum space required 20cm (7 - 7/8") 20cm (7 - 7/8") 50cm (19 - 3/4") ... Do not use an air conditioner so the temperature inside becomes equal to 140°F) s When installing the projector, observe the followings: • Do not use the projector placed on its side. Allowable operation temperature range: + 5°C to + 35°C (41°F ...
...cigarette smoke. • On a soft surface such as a carpet or cushion. • The projector may be subjected to direct sunlight. • Temperature is high or humidity is low. Allow sufficient space around the projector. Allowable minimum space required 20cm (7 - 7/8") 20cm (7 - 7/8") 50cm (19 - 3/4") ... Do not use an air conditioner so the temperature inside becomes equal to 140°F) s When installing the projector, observe the followings: • Do not use the projector placed on its side. Allowable operation temperature range: + 5°C to + 35°C (41°F ...

DLA-S15U User instruction manual (2.1MB)
Page 17
...4 : 3 aspect ratio Screen with 16 : 9 aspect ratio 90° 90° 90° Center line of the lens Install the projector so the center of "Relationship Between Projection Distances and Projection Screen Sizes" on page 17 as a guide or reference. Projection screen size (diagonal ...shield the light. • Trapezoidal distortion may vary within manufacturing tolerances of the lens. Also, the screen must be corrected. Adjust the projector within this range. CAUTIONS and NOTES • Install the screen so the center of the projected picture aligns with the screen). •...
...4 : 3 aspect ratio Screen with 16 : 9 aspect ratio 90° 90° 90° Center line of the lens Install the projector so the center of "Relationship Between Projection Distances and Projection Screen Sizes" on page 17 as a guide or reference. Projection screen size (diagonal ...shield the light. • Trapezoidal distortion may vary within manufacturing tolerances of the lens. Also, the screen must be corrected. Adjust the projector within this range. CAUTIONS and NOTES • Install the screen so the center of the projected picture aligns with the screen). •...
DLA-S15U User instruction manual (2.1MB)
Page 18
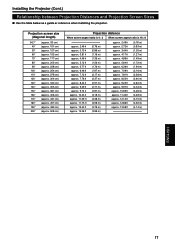
....) Relationship between Projection Distances and Projection Screen Sizes s Use the table below as a guide or reference when installing the projector. Projection screen size (diagonal length) 36.7" 40" 50" 60" 70" 80" 90" 100" 110" 120" 130" 140" 150" 160" 170" 180" 190" 200" (approx. 93 ...
....) Relationship between Projection Distances and Projection Screen Sizes s Use the table below as a guide or reference when installing the projector. Projection screen size (diagonal length) 36.7" 40" 50" 60" 70" 80" 90" 100" 110" 120" 130" 140" 150" 160" 170" 180" 190" 200" (approx. 93 ...

DLA-S15U User instruction manual (2.1MB)
Page 19
...screw is 50° right to left ), the "position selecting screw for ceiling mounting" must be about 10 m (32.8 ft) or less. Screen Projector (DLA-S15U) 50° 50° A 15° 15° B Remote control unit Note • Depending on the type of the screen used by reflecting...the "position selecting screw for ceiling mounting" back to ceiling mounting. The effective range and distance of the remote control unit • Use the projector with a 30-mm or longer shank. To revert to normal desltop setting, turn the "position selecting screw for ceiling mounting", use a Phillips...
...screw is 50° right to left ), the "position selecting screw for ceiling mounting" must be about 10 m (32.8 ft) or less. Screen Projector (DLA-S15U) 50° 50° A 15° 15° B Remote control unit Note • Depending on the type of the screen used by reflecting...the "position selecting screw for ceiling mounting" back to ceiling mounting. The effective range and distance of the remote control unit • Use the projector with a 30-mm or longer shank. To revert to normal desltop setting, turn the "position selecting screw for ceiling mounting", use a Phillips...
DLA-S15U User instruction manual (2.1MB)
Page 20
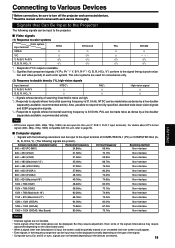
... V ‡ ‡ ‡ *1 : Signals whose horizontal scanning frequency is available. *2 : Signifies that Can Be Input to the Projector The following signals are preset.) Screen resolution (standard name) Horizontal frequency 640 × 400 (PC-9801) 24.8kHz Vertical frequency 56.4Hz ...thoroughly. Even some of COMPUTER IN-1 (PC) or COMPUTER IN-2 (G, B, R, H/Cs, V). (The following signals can be input to the projector: s Video signals (1) Response to color systems Color system Input terminal NTSC NTSC4.43 PAL SECAM VIDEO ‡ ‡ ‡ ‡ Y/C...
... V ‡ ‡ ‡ *1 : Signals whose horizontal scanning frequency is available. *2 : Signifies that Can Be Input to the Projector The following signals are preset.) Screen resolution (standard name) Horizontal frequency 640 × 400 (PC-9801) 24.8kHz Vertical frequency 56.4Hz ...thoroughly. Even some of COMPUTER IN-1 (PC) or COMPUTER IN-2 (G, B, R, H/Cs, V). (The following signals can be input to the projector: s Video signals (1) Response to color systems Color system Input terminal NTSC NTSC4.43 PAL SECAM VIDEO ‡ ‡ ‡ ‡ Y/C...

DLA-S15U User instruction manual (2.1MB)
Page 21
... reproduced on a VCR or specialeffect playback is not supplied. Connecting to Hi-Vision Devices Before connection, be sure to turn off both the projector and Hi-Vision devices. • Read the manual which comes with each Hi-Vision device thoroughly. • Use separately available BNC cables...upper part of an extension cable to be used . 20 Memo • Other devices with the AV device to page 56. However, since this projector has only a single audio input terminal, reconnect audio input in accordance with component signal output terminals (DVD player (NTSC), etc.) can be connected. ...
... reproduced on a VCR or specialeffect playback is not supplied. Connecting to Hi-Vision Devices Before connection, be sure to turn off both the projector and Hi-Vision devices. • Read the manual which comes with each Hi-Vision device thoroughly. • Use separately available BNC cables...upper part of an extension cable to be used . 20 Memo • Other devices with the AV device to page 56. However, since this projector has only a single audio input terminal, reconnect audio input in accordance with component signal output terminals (DVD player (NTSC), etc.) can be connected. ...

DLA-S15U User instruction manual (2.1MB)
Page 22
...built-in amplifier ENGLISH Audio cable (supplied) (or stereo mini-plug) Connecting to Devices which Control the Projector Before connection, be sure to turn off both the projector and other devices to be connected. • Read the manual thoroughly which comes with each device to ...232C terminal, you can make an infrared remote sensor extension unit and connect it to the REMOTE terminal of the projector. * Obtain connection cables as required. * For details, consult a JVC-authorized your dealer or service center. • Desktop type Y/C AUDIO PC To RS-232C connector AUDIO R AUDIO...
...built-in amplifier ENGLISH Audio cable (supplied) (or stereo mini-plug) Connecting to Devices which Control the Projector Before connection, be sure to turn off both the projector and other devices to be connected. • Read the manual thoroughly which comes with each device to ...232C terminal, you can make an infrared remote sensor extension unit and connect it to the REMOTE terminal of the projector. * Obtain connection cables as required. * For details, consult a JVC-authorized your dealer or service center. • Desktop type Y/C AUDIO PC To RS-232C connector AUDIO R AUDIO...

DLA-S15U User instruction manual (2.1MB)
Page 23
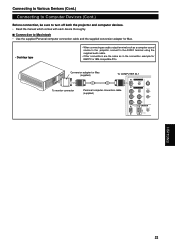
... cables required for connecting the devices connected. • Desktop type When connecting an audio output terminal such as a computer sound source to the projector, connect to an IBM PC or IBM-compatible computer • Use the supplied computer connection cable. Connecting to Various Devices (Cont.) Connecting to...each device thoroughly. With such a note type, the LCD display and external display output need to be sure to turn off both the projector and computer devices. • Read the manual which do not allow the computer's LCD to the COMPUTER OUT terminal, you can view ...
... cables required for connecting the devices connected. • Desktop type When connecting an audio output terminal such as a computer sound source to the projector, connect to an IBM PC or IBM-compatible computer • Use the supplied computer connection cable. Connecting to Various Devices (Cont.) Connecting to...each device thoroughly. With such a note type, the LCD display and external display output need to be sure to turn off both the projector and computer devices. • Read the manual which do not allow the computer's LCD to the COMPUTER OUT terminal, you can view ...
DLA-S15U User instruction manual (2.1MB)
Page 24
Conversion adapter for Mac. • Desktop type • When connecting an audio output terminal such as a computer sound source to the projector, connect to turn off both the projector and computer devices. • Read the manual which comes with each device thoroughly. Connecting to Various Devices (Cont.) Connecting to Computer Devices (Cont.) Before...
Conversion adapter for Mac. • Desktop type • When connecting an audio output terminal such as a computer sound source to the projector, connect to turn off both the projector and computer devices. • Read the manual which comes with each device thoroughly. Connecting to Various Devices (Cont.) Connecting to Computer Devices (Cont.) Before...


