Instruction Manual
Page 1
...SURROUND ON/OFF SURROUND MODE DISC 1 TEST 4 EFFECT 7/P CNTR 2 3 MENU REAR-L 5 6 ENTER REAR-R 8 9 SOUND SEA MODE SUBWOOFER 10 0 +10 RETURN FM MODE/MUTING 100+ MENU EXIT AUDIO/ TV/VCR CATV/DBS SET TEXT DISPLAY TV VOL CHANNEL VOLUME TV/VIDEO VCR TAPE CONTROL /REW DOWN REC PLAY TUNING STOP MUTING FF/ UP PAUSE RM-SRX778J REMOTE CONTROL STANDBY POWER RX-778V AUDIO/VIDEO CONTROL RECEIVER DIGITAL SOURCE FORMAT DOLBY LINEAR DIGITAL PCM DOLBY SURROUND PHONES COMPULINK Remote SPEAKERS 1 2 DSP MODE SEA MODE DIGITAL INPUT FM/AM TUNING TUNER PRESET BALANCE/SURROUND...
...SURROUND ON/OFF SURROUND MODE DISC 1 TEST 4 EFFECT 7/P CNTR 2 3 MENU REAR-L 5 6 ENTER REAR-R 8 9 SOUND SEA MODE SUBWOOFER 10 0 +10 RETURN FM MODE/MUTING 100+ MENU EXIT AUDIO/ TV/VCR CATV/DBS SET TEXT DISPLAY TV VOL CHANNEL VOLUME TV/VIDEO VCR TAPE CONTROL /REW DOWN REC PLAY TUNING STOP MUTING FF/ UP PAUSE RM-SRX778J REMOTE CONTROL STANDBY POWER RX-778V AUDIO/VIDEO CONTROL RECEIVER DIGITAL SOURCE FORMAT DOLBY LINEAR DIGITAL PCM DOLBY SURROUND PHONES COMPULINK Remote SPEAKERS 1 2 DSP MODE SEA MODE DIGITAL INPUT FM/AM TUNING TUNER PRESET BALANCE/SURROUND...
Instruction Manual
Page 3
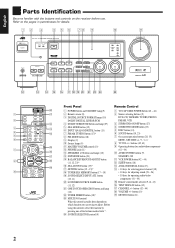
... Troubleshooting 45 Specifications 46 Using the SEA Modes 19 Selecting Your Favorite SEA Mode 19 Creating Your Own SEA Mode 19 1 One Touch Operation 16 Using the Sleep Timer 16 Recording a Source 16 Receiving Radio Broadcasts 17 Tuning in the Remote Control 8 Basic Operations 9 Turning the Power On and Off (Standby 9 Selecting the Source to Play 9 Adjusting the Volume 10 Selecting the Front Speakers 10 Muting the Sound 11 Listening at Low Volume (Loudness 29 Attenuating the Input Signal 29 Adjusting the Subwoofer Output Level...
... Troubleshooting 45 Specifications 46 Using the SEA Modes 19 Selecting Your Favorite SEA Mode 19 Creating Your Own SEA Mode 19 1 One Touch Operation 16 Using the Sleep Timer 16 Recording a Source 16 Receiving Radio Broadcasts 17 Tuning in the Remote Control 8 Basic Operations 9 Turning the Power On and Off (Standby 9 Selecting the Source to Play 9 Adjusting the Volume 10 Selecting the Front Speakers 10 Muting the Sound 11 Listening at Low Volume (Loudness 29 Attenuating the Input Signal 29 Adjusting the Subwoofer Output Level...
Instruction Manual
Page 4
... 12 3 4 5 6 78 9 p STANDBY POWER RX-778V AUDIO/VIDEO CONTROL RECEIVER DIGITAL SOURCE FORMAT DOLBY LINEAR DIGITAL PCM DOLBY SURROUND PHONES COMPULINK Remote SPEAKERS 1 2 DSP MODE SEA MODE INPUT ANALOG/DIGITAL FM/AM TUNING TUNER PRESET BALANCE/SURROUND ADJUST SEA ADJUST SETTING TUNER/SEA MEMORY FM MODE SOUND SELECT LOUDNESS ONETOUCHOPERATION INPUT ATT. button (42 - 44) i VOLUME +/- LOUDNESS/SOURCE NAME button (11, 12) a ONE TOUCH OPERATION button and lamp (16) s TUNER PRESET button (18)* d MULTI JOG control What this control, select the function by pressing one...
... 12 3 4 5 6 78 9 p STANDBY POWER RX-778V AUDIO/VIDEO CONTROL RECEIVER DIGITAL SOURCE FORMAT DOLBY LINEAR DIGITAL PCM DOLBY SURROUND PHONES COMPULINK Remote SPEAKERS 1 2 DSP MODE SEA MODE INPUT ANALOG/DIGITAL FM/AM TUNING TUNER PRESET BALANCE/SURROUND ADJUST SEA ADJUST SETTING TUNER/SEA MEMORY FM MODE SOUND SELECT LOUDNESS ONETOUCHOPERATION INPUT ATT. button (42 - 44) i VOLUME +/- LOUDNESS/SOURCE NAME button (11, 12) a ONE TOUCH OPERATION button and lamp (16) s TUNER PRESET button (18)* d MULTI JOG control What this control, select the function by pressing one...
Instruction Manual
Page 6
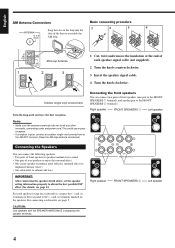
... center speaker to produce more effective surround effect (to emphasize human voices). • One subwoofer to enhance the bass. 1 + 2 RIGHT -- 1 2 LEFT FRONT SPEAKERS + IMPORTANT: After connecting the speakers listed above, set the speaker setting information properly to obtain the best possible DSP effect. Right speaker FRONT SPEAKERS 2 Left speaker For each speaker signal cable (not supplied). 2 Turn the knob counterclockwise. 3 Insert the speaker signal cable. 4 Turn the knob clockwise. Outdoor single vinyl-covered wire Turn...
... center speaker to produce more effective surround effect (to emphasize human voices). • One subwoofer to enhance the bass. 1 + 2 RIGHT -- 1 2 LEFT FRONT SPEAKERS + IMPORTANT: After connecting the speakers listed above, set the speaker setting information properly to obtain the best possible DSP effect. Right speaker FRONT SPEAKERS 2 Left speaker For each speaker signal cable (not supplied). 2 Turn the knob counterclockwise. 3 Insert the speaker signal cable. 4 Turn the knob clockwise. Outdoor single vinyl-covered wire Turn...

Instruction Manual
Page 7
...: Use speakers with RCA pin plugs (not supplied). Connect the input jack of front speakers Front speaker 1 Front speaker 2 Front speaker 2 Front speaker 1 Connecting the subwoofer speaker You can enhance the bass by the speaker terminals. 5 English About the speaker impedance The required speaker impedance of the front speakers does differ depending on the rear panel, using a cable with the SPEAKER IMPEDANCE indicated by connecting a subwoofer. CASE 1 When you connect two sets of a powered subwoofer to the CENTER SPEAKER terminals. Powered subwoofer SUBWOOFER OUT Use...
...: Use speakers with RCA pin plugs (not supplied). Connect the input jack of front speakers Front speaker 1 Front speaker 2 Front speaker 2 Front speaker 1 Connecting the subwoofer speaker You can enhance the bass by the speaker terminals. 5 English About the speaker impedance The required speaker impedance of the front speakers does differ depending on the rear panel, using a cable with the SPEAKER IMPEDANCE indicated by connecting a subwoofer. CASE 1 When you connect two sets of a powered subwoofer to the CENTER SPEAKER terminals. Powered subwoofer SUBWOOFER OUT Use...
Instruction Manual
Page 9
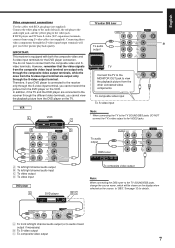
... receiver is connected to the TV SOUND/DBS jacks, change the source name, which will give you better picture playback quality. Therefore, if your DVD player is equipped with RCA pin plugs (not supplied). B AUDIO RIGHT LEFT VIDEO D VIDEO S-VIDEO DVD TV SOUND /DBS OUT (REC) VCR IN (PLAY) Å To left/right channel audio output ı To left/right channel audio input Ç To video output Î To video input DVD player A DVD player DVD BC To audio output RAIUGDHIOT RIGHT LEFT VIDEO VIDEO S-VIDEO DVD TV SOUND...
... receiver is connected to the TV SOUND/DBS jacks, change the source name, which will give you better picture playback quality. Therefore, if your DVD player is equipped with RCA pin plugs (not supplied). B AUDIO RIGHT LEFT VIDEO D VIDEO S-VIDEO DVD TV SOUND /DBS OUT (REC) VCR IN (PLAY) Å To left/right channel audio output ı To left/right channel audio input Ç To video output Î To video input DVD player A DVD player DVD BC To audio output RAIUGDHIOT RIGHT LEFT VIDEO VIDEO S-VIDEO DVD TV SOUND...

Instruction Manual
Page 10
... use a coaxial cable to operate the DVD player using digital optical cables (not supplied). Select the digital input mode correctly. Set the digital input (DIGITAL IN) terminal setting correctly. Plug the power cord into an AC outlet, make sure that you want to connect the antenna, since it to heat or flame. 8 When unplugging the cord, always grasp the plug so as described in voltage. • Always replace both batteries at the remote sensor on the receiver. 1 2 3 DIGITAL IN PCM/DOLBY DIGITAL DIGITAL 1 (DVD) DIGITAL 2 (CD) 1. Use...
... use a coaxial cable to operate the DVD player using digital optical cables (not supplied). Select the digital input mode correctly. Set the digital input (DIGITAL IN) terminal setting correctly. Plug the power cord into an AC outlet, make sure that you want to connect the antenna, since it to heat or flame. 8 When unplugging the cord, always grasp the plug so as described in voltage. • Always replace both batteries at the remote sensor on the receiver. 1 2 3 DIGITAL IN PCM/DOLBY DIGITAL DIGITAL 1 (DVD) DIGITAL 2 (CD) 1. Use...

Instruction Manual
Page 11
... the current source (or station frequency) appears on the power, press AUDIO POWER ON. Current source name appears STANDBY POWER 100 1k 10k VOLUME Current volume level is shown here To turn the power off completely, unplug the AC power cord. To turn off the power (into standby mode), press POWER again. Select the turntable. Select the video component connected to "CATV/DBS." AM 9 To operate a CATV converter and DBS tuner, set it to Play On the front panel: Turn SOURCE SELECTOR until...
... the current source (or station frequency) appears on the power, press AUDIO POWER ON. Current source name appears STANDBY POWER 100 1k 10k VOLUME Current volume level is shown here To turn the power off completely, unplug the AC power cord. To turn off the power (into standby mode), press POWER again. Select the turntable. Select the video component connected to "CATV/DBS." AM 9 To operate a CATV converter and DBS tuner, set it to Play On the front panel: Turn SOURCE SELECTOR until...
Instruction Manual
Page 12
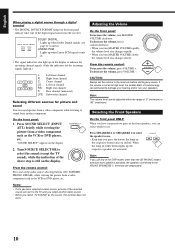
... the volume, press VOLUME -. On the front panel: 1. When the lamp on the display. Press SPEAKERS 1 or SPEAKERS 2 to select the speaker to use . DIGITAL SOURCE FORMAT DOLBY LINEAR DIGITAL PCM DOLBY DIGITAL: Lights up , the respective speakers are deactivated. If the volume is still on either button lights up when Dolby Digital signals (see page 21) come in . Notes: • Once you select "TV SOUND" as the VCR or DVD player, etc. English When playing a digital source through a digital terminal • The DIGITAL SOURCE FORMAT...
... the volume, press VOLUME -. On the front panel: 1. When the lamp on the display. Press SPEAKERS 1 or SPEAKERS 2 to select the speaker to use . DIGITAL SOURCE FORMAT DOLBY LINEAR DIGITAL PCM DOLBY DIGITAL: Lights up , the respective speakers are deactivated. If the volume is still on either button lights up when Dolby Digital signals (see page 21) come in . Notes: • Once you select "TV SOUND" as the VCR or DVD player, etc. English When playing a digital source through a digital terminal • The DIGITAL SOURCE FORMAT...
Instruction Manual
Page 13
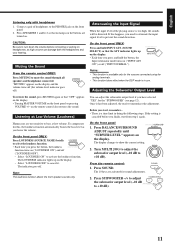
... input signal level to the PHONES jack on ("INPUT ATT ON") or off ("LOUDNESS OFF"). - Select "LOUDNESS ON" to mute the sound through all speakers and headphones connected. On the front panel: 1. The display changes to +10 dB). 11 Press SOUND. The 10 keys are not sensitive to turn down the volume before you have selected "YES" for this happens, you press the button, the loudness SOURCENAME function turns...
... input signal level to the PHONES jack on ("INPUT ATT ON") or off ("LOUDNESS OFF"). - Select "LOUDNESS ON" to mute the sound through all speakers and headphones connected. On the front panel: 1. The display changes to +10 dB). 11 Press SOUND. The 10 keys are not sensitive to turn down the volume before you have selected "YES" for this happens, you press the button, the loudness SOURCENAME function turns...

Instruction Manual
Page 14
... left channel output. • Turning it , the subwoofer setting alternates between "YES" or "NO." On the front panel ONLY: 1. The display changes to the correct position: To operate this when no subwoofer is canceled before you finish, start from step 1 again. Select this receiver, set to show the current setting. 2. AUDIO/ TV/VCR CATV/DBS Adjusting the Front Speaker Output Balance If the sounds you can still use the digital input (see...
... left channel output. • Turning it , the subwoofer setting alternates between "YES" or "NO." On the front panel ONLY: 1. The display changes to the correct position: To operate this when no subwoofer is canceled before you finish, start from step 1 again. Select this receiver, set to show the current setting. 2. AUDIO/ TV/VCR CATV/DBS Adjusting the Front Speaker Output Balance If the sounds you can still use the digital input (see...

Instruction Manual
Page 18
... Touch Operation function is canceled, the recalled sound effects remain active.) Note: If the source is used to music and know the receiver will be stored for the newly selected source are memorized. To cancel the Sleep Timer Press SLEEP repeatedly until the shut-off by itself rather than play all night. IMPORTANT: • Before recording a digital source, turn off time Press SLEEP once. Surround mode settings...
... Touch Operation function is canceled, the recalled sound effects remain active.) Note: If the source is used to music and know the receiver will be stored for the newly selected source are memorized. To cancel the Sleep Timer Press SLEEP repeatedly until the shut-off by itself rather than play all night. IMPORTANT: • Before recording a digital source, turn off time Press SLEEP once. Surround mode settings...

Instruction Manual
Page 19
... the channel number position starts flashing on the remote control to a particular station. English Receiving Radio Broadcasts You can browse through all the stations you hold the button, the frequency keeps changing until a station is received, the STEREO indicator also lights up on the display. Note: You can use the preset function to go immediately to select the preset number. EON TA NEWS INFO VOLUME 100 1k 10k 5. IMPORTANT: When using the 10 keys, be quickly tuned. AUDIO...
... the channel number position starts flashing on the remote control to a particular station. English Receiving Radio Broadcasts You can browse through all the stations you hold the button, the frequency keeps changing until a station is received, the STEREO indicator also lights up on the display. Note: You can use the preset function to go immediately to select the preset number. EON TA NEWS INFO VOLUME 100 1k 10k 5. IMPORTANT: When using the 10 keys, be quickly tuned. AUDIO...

Instruction Manual
Page 22
... or Linear PCM (digital) source. • You can be used when the front speakers are delayed by the distances of the acoustic surround effects. early reflections and reflections from behind . This mode can select either 3D DIGITAL or 3D THEATER to "LARGE," sound comes out only if the subwoofer channel signals come into this receiver and "REAR SPK" and "CENTER SPK" is fast and explosive. 3D DIGITAL: Reproduces multi-sound source encoded...
... or Linear PCM (digital) source. • You can be used when the front speakers are delayed by the distances of the acoustic surround effects. early reflections and reflections from behind . This mode can select either 3D DIGITAL or 3D THEATER to "LARGE," sound comes out only if the subwoofer channel signals come into this receiver and "REAR SPK" and "CENTER SPK" is fast and explosive. 3D DIGITAL: Reproduces multi-sound source encoded...

Instruction Manual
Page 30
... SURROUND MODE DISC 1 TEST 4 EFFECT 7/P CNTR 2 3 MENU REAR-L 5 6 ENTER REAR-R 8 9 SOUND SEA MODE SUBWOOFER 10 0 +10 RETURN FM MODE/MUTING 100+ MENU EXIT AUDIO/ TV/VCR CATV/DBS SET TEXT DISPLAY TV VOL CHANNEL VOLUME MENU EXIT SET 2. The menu disappears from the TV. The MAIN MENU appears on the TV. In this function, you can use the Menus on the rear panel (see page 7), and set the item. Press % / fi to move to "SOURCE." 3. Press @ / # to select, adjust...
... SURROUND MODE DISC 1 TEST 4 EFFECT 7/P CNTR 2 3 MENU REAR-L 5 6 ENTER REAR-R 8 9 SOUND SEA MODE SUBWOOFER 10 0 +10 RETURN FM MODE/MUTING 100+ MENU EXIT AUDIO/ TV/VCR CATV/DBS SET TEXT DISPLAY TV VOL CHANNEL VOLUME MENU EXIT SET 2. The menu disappears from the TV. The MAIN MENU appears on the TV. In this function, you can use the Menus on the rear panel (see page 7), and set the item. Press % / fi to move to "SOURCE." 3. Press @ / # to select, adjust...

Instruction Manual
Page 42
... TV, DVD player, and VCR Using This Remote Control See page 42 for the first time after changing the TV's input mode to "DVD DIGITAL." Note: When you select "TV SOUND" as the source on the receiver, you can get the same result. Connect the audio input/output jacks on VCR, DVD player, TV, and this receiver (and digital input is selected), the receiver automatically turns on the DVD player, you cannot see the menu on automatically. One-Touch Video Play Simply...
... TV, DVD player, and VCR Using This Remote Control See page 42 for the first time after changing the TV's input mode to "DVD DIGITAL." Note: When you select "TV SOUND" as the source on the receiver, you can get the same result. Connect the audio input/output jacks on VCR, DVD player, TV, and this receiver (and digital input is selected), the receiver automatically turns on the DVD player, you cannot see the menu on automatically. One-Touch Video Play Simply...
Instruction Manual
Page 43
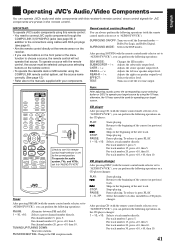
...: Selects a track number directly. Adjusts the left rear speaker output level. Turns on the CD player: PLAY: 4: ¢: STOP: PAUSE: 1 - 10, +10: Starts playing. DVD TV/DBS VCR STANDBY ON TV/CATV/DBS VCR POWER POWER CD TAPE/MD PHONO FM/AM ANALOG/DIGITAL SLEEP SURROUND ON/OFF SURROUND MODE DISC 1 TEST 4 EFFECT 7/P CNTR 2 3 MENU REAR•L 5 6 ENTER REAR•R 8 9 SOUND SEA MODE SUBWOOFER 10 0 +10 RETURN FM MODE/MUTING 100+ MENU EXIT AUDIO/ TV/VCR CATV/DBS SET TEXT DISPLAY TV VOL CHANNEL VOLUME...
...: Selects a track number directly. Adjusts the left rear speaker output level. Turns on the CD player: PLAY: 4: ¢: STOP: PAUSE: 1 - 10, +10: Starts playing. DVD TV/DBS VCR STANDBY ON TV/CATV/DBS VCR POWER POWER CD TAPE/MD PHONO FM/AM ANALOG/DIGITAL SLEEP SURROUND ON/OFF SURROUND MODE DISC 1 TEST 4 EFFECT 7/P CNTR 2 3 MENU REAR•L 5 6 ENTER REAR•R 8 9 SOUND SEA MODE SUBWOOFER 10 0 +10 RETURN FM MODE/MUTING 100+ MENU EXIT AUDIO/ TV/VCR CATV/DBS SET TEXT DISPLAY TV VOL CHANNEL VOLUME...
Instruction Manual
Page 44
... used for the DVD menu operations. Press this remote control, make sure that the remote control code of the control signals - Press this button with the PLAY button to start recording. IMPORTANT: To operate JVC's video components using cables with RCA pin plugs (see page 7). • Some JVC VCRs can perform the following operations on VCR. STOP: Stops operations. CHANNEL +/-: Changes the TV channels on the receiver. - Stops playing temporarily. Stops playing. After pressing VCR or VCR CONTROL (with the remote control mode selector set to "AUDIO...
... used for the DVD menu operations. Press this remote control, make sure that the remote control code of the control signals - Press this button with the PLAY button to start recording. IMPORTANT: To operate JVC's video components using cables with RCA pin plugs (see page 7). • Some JVC VCRs can perform the following operations on VCR. STOP: Stops operations. CHANNEL +/-: Changes the TV channels on the receiver. - Stops playing temporarily. Stops playing. After pressing VCR or VCR CONTROL (with the remote control mode selector set to "AUDIO...

Instruction Manual
Page 45
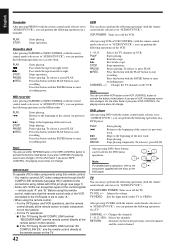
... remote control mode selector is entered. DVD TV/DBS VCR STANDBY ON TV/CATV/DBS VCR POWER POWER CD TAPE/MD PHONO FM/AM ANALOG/DIGITAL SLEEP SURROUND ON/OFF 1 SURROUND MODE TEST 4 DISC EFFECT 7/P CNTR 2 3 MENU REAR-L 5 6 ENTER REAR-R 8 9 SOUND SEA MODE SUBWOOFER 10 0 +10 RETURN FM MODE/MUTING 100+ MENU EXIT AUDIO/ TV/VCR CATV/DBS SET TEXT DISPLAY TV VOL CHANNEL VOLUME TV/VIDEO VCR TAPE CONTROL /REW DOWN REC PLAY TUNING STOP MUTING FF/ UP PAUSE AUDIO...
... remote control mode selector is entered. DVD TV/DBS VCR STANDBY ON TV/CATV/DBS VCR POWER POWER CD TAPE/MD PHONO FM/AM ANALOG/DIGITAL SLEEP SURROUND ON/OFF 1 SURROUND MODE TEST 4 DISC EFFECT 7/P CNTR 2 3 MENU REAR-L 5 6 ENTER REAR-R 8 9 SOUND SEA MODE SUBWOOFER 10 0 +10 RETURN FM MODE/MUTING 100+ MENU EXIT AUDIO/ TV/VCR CATV/DBS SET TEXT DISPLAY TV VOL CHANNEL VOLUME TV/VIDEO VCR TAPE CONTROL /REW DOWN REC PLAY TUNING STOP MUTING FF/ UP PAUSE AUDIO...
Instruction Manual
Page 47
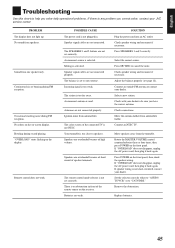
... light up. "OVERLOAD" starts flashing on the front panel, then check the speaker wiring. Incoming signal is any problem you cannot solve, contact your dealer. Adjust the balance properly (see page 12). Sound from one extreme. Speaker signal cables are not connected properly. Press MUTING to be sure you have the correct antenna. Check with your dealer. English Troubleshooting Use this chart to help you solve daily operational problems...
... light up. "OVERLOAD" starts flashing on the front panel, then check the speaker wiring. Incoming signal is any problem you cannot solve, contact your dealer. Adjust the balance properly (see page 12). Sound from one extreme. Speaker signal cables are not connected properly. Press MUTING to be sure you have the correct antenna. Check with your dealer. English Troubleshooting Use this chart to help you solve daily operational problems...


