Instructions
Page 1
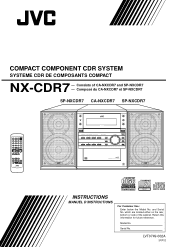
Retain this information for future reference. and Serial No. Model No. Serial No. Composé du CA-NXCDR7 et SP-NXCDR7 SP-NXCDR7 CA-NXCDR7 SP-NXCDR7 STANDBY/ON 1 2 3 DISPLAY 4 5 6 CANCEL 7 8 9 SET 10 AUTO PRESET +10 ENTER MENU A.P.off CLOCK /TIMER SLEEP FM/PLAY BASS MODE PITCH REPEAT SOUND VOLUME RM-SNXCDR7J REMOTE CONTROL STANDBY SOURCE OPEN/CLOSE CDR COMPACT COMPONENT CDR SYSTEM N X - Consists of the cabinet. LVT0749-002A [J(C)] yyyyyyyyyyyyyyyyyyyyyyyyyyyyyyyyyyyyyyyyyyyyyyyyyyyyyyyyyyyyy ...
Retain this information for future reference. and Serial No. Model No. Serial No. Composé du CA-NXCDR7 et SP-NXCDR7 SP-NXCDR7 CA-NXCDR7 SP-NXCDR7 STANDBY/ON 1 2 3 DISPLAY 4 5 6 CANCEL 7 8 9 SET 10 AUTO PRESET +10 ENTER MENU A.P.off CLOCK /TIMER SLEEP FM/PLAY BASS MODE PITCH REPEAT SOUND VOLUME RM-SNXCDR7J REMOTE CONTROL STANDBY SOURCE OPEN/CLOSE CDR COMPACT COMPONENT CDR SYSTEM N X - Consists of the cabinet. LVT0749-002A [J(C)] yyyyyyyyyyyyyyyyyyyyyyyyyyyyyyyyyyyyyyyyyyyyyyyyyyyyyyyyyyyyy ...
Instructions
Page 4
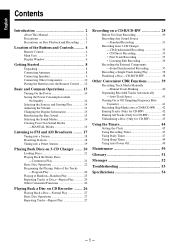
... 8 Connecting Antennas 8 Connecting Speakers 9 Connecting Other Components 10 Putting the Batteries into the Remote Control ..... 12 Basic and Common Operations 13 Turning On the Power 14 Saving the Power Consumption while On Standby 14 Selecting the Sources and Starting Play 14 Adjusting the Volume 15 Changing the Display Information 15 Reinforcing the Bass Sound 15 Selecting the Sound Modes 16 Creating Your Own Sound Modes -MANUAL Modes 16 Listening to FM and AM Broadcasts .......... 17 Tuning into a Station 18 Presetting Stations 18 Tuning into a Preset Station...
... 8 Connecting Antennas 8 Connecting Speakers 9 Connecting Other Components 10 Putting the Batteries into the Remote Control ..... 12 Basic and Common Operations 13 Turning On the Power 14 Saving the Power Consumption while On Standby 14 Selecting the Sources and Starting Play 14 Adjusting the Volume 15 Changing the Display Information 15 Reinforcing the Bass Sound 15 Selecting the Sound Modes 16 Creating Your Own Sound Modes -MANUAL Modes 16 Listening to FM and AM Broadcasts .......... 17 Tuning into a Station 18 Presetting Stations 18 Tuning into a Preset Station...
Instructions
Page 5
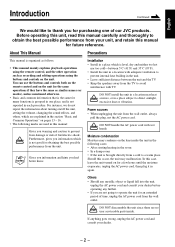
... editing operations using the buttons and controls on for many functions is grouped in this manual carefully and thoroughly to prevent from the unit. DO NOT disassemble the unit since there are no user serviceable parts inside the unit in the following marks are not going to operate the unit for an extended period of time, unplug the AC power cord from...
... editing operations using the buttons and controls on for many functions is grouped in this manual carefully and thoroughly to prevent from the unit. DO NOT disassemble the unit since there are no user serviceable parts inside the unit in the following marks are not going to operate the unit for an extended period of time, unplug the AC power cord from...
Instructions
Page 7
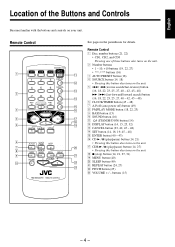
...off (auto power off CLOCK /TIMER SLEEP 7 ; 8 FM/PLAY BASS MODE PITCH REPEAT 9 a SOUND VOLUME p s d RM-SNXCDR7J REMOTE CONTROL See pages in the parentheses for details. Remote Control 1 Disc number buttons (21, 22) • CD1, CD2, and CD3 Pressing one of the Buttons and Controls Become familiar with the buttons and controls on the unit. Remote Control STANDBY/ON 1 q 1 2 3 DISPLAY w 4 5 6 CANCEL e 2 7 8 9 SET r 10 AUTO PRESET +10 ENTER t 3 y 4 u i 5 o MENU 6 A.P.off ) button (49) 8 FM/PLAY MODE button (18, 22, 23) 9 BASS button (15...
...off (auto power off CLOCK /TIMER SLEEP 7 ; 8 FM/PLAY BASS MODE PITCH REPEAT 9 a SOUND VOLUME p s d RM-SNXCDR7J REMOTE CONTROL See pages in the parentheses for details. Remote Control 1 Disc number buttons (21, 22) • CD1, CD2, and CD3 Pressing one of the Buttons and Controls Become familiar with the buttons and controls on the unit. Remote Control STANDBY/ON 1 q 1 2 3 DISPLAY w 4 5 6 CANCEL e 2 7 8 9 SET r 10 AUTO PRESET +10 ENTER t 3 y 4 u i 5 o MENU 6 A.P.off ) button (49) 8 FM/PLAY MODE button (18, 22, 23) 9 BASS button (15...

Instructions
Page 8
... CD1 COMPACT DIGITAL AUDIO TEXT 3CD 3CD Changer System, Play & Exchange PHONES w e r t y u i o ; a s d f g h j k l / LINE REC SELECT REC SPEED REC MODE SET CANCEL REC START COMPACT COMPONENT CDR SYSTEM N X - English Main Unit 1 2 3 4 5 6 7 8 9 p q STANDBY SOURCE 123 UNFINALIZE DISC MONO STEREO CD TEXT PITCH A . o f f BASS SOUND AUTO TRACK DIGITAL CDR DAILY REC SLEEP PROGRAM RANDOM 1CD ALL SKIP ON RDSEON [ TA News Info ] NORMAL HIGH SPEED ANALOG OVER REC LEVEL CD-RW dB REC UNFINALIZE DISC OPEN/CLOSE CDR COMPACT COMPONENT CDR SYSTEM...
... CD1 COMPACT DIGITAL AUDIO TEXT 3CD 3CD Changer System, Play & Exchange PHONES w e r t y u i o ; a s d f g h j k l / LINE REC SELECT REC SPEED REC MODE SET CANCEL REC START COMPACT COMPONENT CDR SYSTEM N X - English Main Unit 1 2 3 4 5 6 7 8 9 p q STANDBY SOURCE 123 UNFINALIZE DISC MONO STEREO CD TEXT PITCH A . o f f BASS SOUND AUTO TRACK DIGITAL CDR DAILY REC SLEEP PROGRAM RANDOM 1CD ALL SKIP ON RDSEON [ TA News Info ] NORMAL HIGH SPEED ANALOG OVER REC LEVEL CD-RW dB REC UNFINALIZE DISC OPEN/CLOSE CDR COMPACT COMPONENT CDR SYSTEM...

Instructions
Page 13
... EXT ANTENNA OPTICAL LINE DIGITAL IN 3CD DIGITAL OUT Ex.: cassette deck To input (REC) To output (PLAY) By using audio cords (not supplied), connect: • Between the audio input jacks on the cassette deck and the LINE OUT jacks. • Between the audio output jacks on the other components while the power is on the rear of the speaker grille, pull towards you. Connecting Other Components When you . Holes Projections Speaker grille To remove the speaker grille...
... EXT ANTENNA OPTICAL LINE DIGITAL IN 3CD DIGITAL OUT Ex.: cassette deck To input (REC) To output (PLAY) By using audio cords (not supplied), connect: • Between the audio input jacks on the cassette deck and the LINE OUT jacks. • Between the audio output jacks on the other components while the power is on the rear of the speaker grille, pull towards you. Connecting Other Components When you . Holes Projections Speaker grille To remove the speaker grille...

Instructions
Page 14
To optical digital output Audio component with optical digital output To output (PLAY) Protective cap Before connecting the other component, remove the protective cap from the terminal. By using an optical digital cord (not supplied) and an audio cord (not supplied), connect: • Between the optical digital output terminal on the other component and the LINE DIGITAL IN terminal. • Between the audio output jacks on the other component and the 3CD DIGITAL OUT terminal. SPEAKERS R L R L CAUTION : SPEAKER IMPEDANCE 6 16 LINE IN R L R L LINE OUT FM...
To optical digital output Audio component with optical digital output To output (PLAY) Protective cap Before connecting the other component, remove the protective cap from the terminal. By using an optical digital cord (not supplied) and an audio cord (not supplied), connect: • Between the optical digital output terminal on the other component and the LINE DIGITAL IN terminal. • Between the audio output jacks on the other component and the 3CD DIGITAL OUT terminal. SPEAKERS R L R L CAUTION : SPEAKER IMPEDANCE 6 16 LINE IN R L R L LINE OUT FM...

Instructions
Page 15
... period of time. When the remote control can no longer operate the unit, replace both batteries at the remote sensor on the battery compartment. markings on the front panel. C D R7 DISC CD CDR FINALIZE REC PAUSE FADE IN/OUT DIRECT REC REC MUTE VOLUME COMPACT DIGITAL AUDIO Recordable ReWriteble CD3 CD2 CD1 COMPACT DIGITAL AUDIO TEXT 3CD 3CD Changer System, Play & Exchange PHONES 2 R6(UM-3)/AA(15F) 3 - 12 - Remote sensor STANDBY SOURCE OPEN/CLOSE CDR COMPACT COMPONENT CDR SYSTEM N X - Otherwise...
... period of time. When the remote control can no longer operate the unit, replace both batteries at the remote sensor on the battery compartment. markings on the front panel. C D R7 DISC CD CDR FINALIZE REC PAUSE FADE IN/OUT DIRECT REC REC MUTE VOLUME COMPACT DIGITAL AUDIO Recordable ReWriteble CD3 CD2 CD1 COMPACT DIGITAL AUDIO TEXT 3CD 3CD Changer System, Play & Exchange PHONES 2 R6(UM-3)/AA(15F) 3 - 12 - Remote sensor STANDBY SOURCE OPEN/CLOSE CDR COMPACT COMPONENT CDR SYSTEM N X - Otherwise...

Instructions
Page 16
.../Info CLOCK A.P.off /TIMER SLEEP RDS DISPLAY FM/PLAY BASS MODE PITCH REPEAT SOUND VOLUME VOLUME Main unit STANDBY SOURCE CD CDR STANDBY SOURCE OPEN/CLOSE CDR LINE REC SELECT REC SPEED REC MODE SET CANCEL REC START COMPACT COMPONENT CDR SYSTEM N X - C D R7 DIRECT REC REC MUTE DISC CD CDR FINALIZE REC PAUSE VOLUME FADE IN/OUT DIRECT REC REC MUTE COMPACT DIGITAL AUDIO Recordable ReWriteble CD3 CCOMDP2ACT DIGITAL AUDIO Recordable ReWriteble CD1 CD3 CD2 CD1 COMPACT DIGITAL AUDIO TEXT 3CD 3CD Changer System, Play & Exchange PHONES SET VOLUME Press OPEN...
.../Info CLOCK A.P.off /TIMER SLEEP RDS DISPLAY FM/PLAY BASS MODE PITCH REPEAT SOUND VOLUME VOLUME Main unit STANDBY SOURCE CD CDR STANDBY SOURCE OPEN/CLOSE CDR LINE REC SELECT REC SPEED REC MODE SET CANCEL REC START COMPACT COMPONENT CDR SYSTEM N X - C D R7 DIRECT REC REC MUTE DISC CD CDR FINALIZE REC PAUSE VOLUME FADE IN/OUT DIRECT REC REC MUTE COMPACT DIGITAL AUDIO Recordable ReWriteble CD3 CCOMDP2ACT DIGITAL AUDIO Recordable ReWriteble CD1 CD3 CD2 CD1 COMPACT DIGITAL AUDIO TEXT 3CD 3CD Changer System, Play & Exchange PHONES SET VOLUME Press OPEN...
Instructions
Page 17
... power consumption while on standby, press DISPLAY on the remote control while the unit is turned off (on . • Each time you can change the input level through the LINE IN jacks If the sound from the component connected to the LINE IN jacks is too loud or is not loud enough when changing the source to "LINE" from another source (without playing, press so that the STANDBY lamp lights red...
... power consumption while on standby, press DISPLAY on the remote control while the unit is turned off (on . • Each time you can change the input level through the LINE IN jacks If the sound from the component connected to the LINE IN jacks is too loud or is not loud enough when changing the source to "LINE" from another source (without playing, press so that the STANDBY lamp lights red...
Instructions
Page 18
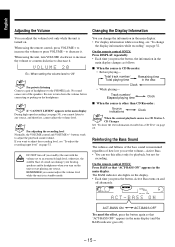
... Connect a pair of the speakers. You can adjust the volume level only while the unit is in standby mode. For adjusting the recording level Normally, the VOLUME control and VOLUME +/- On the remote control ONLY: Press BASS so that "ACT-BASS OFF" appears in the main display (and the BASS indicator goes off alternately. When using the unit, turn on the unit or start playing any source, and therefore, cannot adjust the volume...
... Connect a pair of the speakers. You can adjust the volume level only while the unit is in standby mode. For adjusting the recording level Normally, the VOLUME control and VOLUME +/- On the remote control ONLY: Press BASS so that "ACT-BASS OFF" appears in the main display (and the BASS indicator goes off alternately. When using the unit, turn on the unit or start playing any source, and therefore, cannot adjust the volume...
Instructions
Page 20
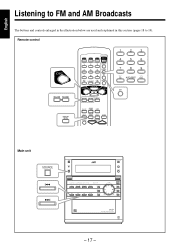
... R7 DISC CD CDR FINALIZE REC PAUSE FADE IN/OUT DIRECT REC REC MUTE VOLUME COMPACT DIGITAL AUDIO Recordable ReWriteble CD3 CD2 CD1 COMPACT DIGITAL AUDIO TEXT 3CD 3CD Changer System, Play & Exchange PHONES - 17 - Remote control PTY SELECT- PTY SEARCH SELPETCYT+ STANDBY/ON 1 2 3 DISPLAY 4 5 6 CANCEL 7 8 9 SET 10 AUTO PRESET +10 ENTER MENU 1 2 3 4 5 6 7 8 9 10 AUTO PRESET +10 SET FM/PLAY MODE CLOCK A.P.off /TIMER SLEEP RDS DISPLAY FM/PLAY BASS MODE PITCH REPEAT SOUND VOLUME Main unit SOURCE STANDBY SOURCE OPEN/CLOSE CDR COMPACT COMPONENT...
... R7 DISC CD CDR FINALIZE REC PAUSE FADE IN/OUT DIRECT REC REC MUTE VOLUME COMPACT DIGITAL AUDIO Recordable ReWriteble CD3 CD2 CD1 COMPACT DIGITAL AUDIO TEXT 3CD 3CD Changer System, Play & Exchange PHONES - 17 - Remote control PTY SELECT- PTY SEARCH SELPETCYT+ STANDBY/ON 1 2 3 DISPLAY 4 5 6 CANCEL 7 8 9 SET 10 AUTO PRESET +10 ENTER MENU 1 2 3 4 5 6 7 8 9 10 AUTO PRESET +10 SET FM/PLAY MODE CLOCK A.P.off /TIMER SLEEP RDS DISPLAY FM/PLAY BASS MODE PITCH REPEAT SOUND VOLUME Main unit SOURCE STANDBY SOURCE OPEN/CLOSE CDR COMPACT COMPONENT...
Instructions
Page 23
...DISC CD CDR FINALIZE REC PAUSE VOLUME COMPACT COMPONENT CDR SYSTEM FADE IN/OUT N X - Remote control 1 2 3 4 5 6 7 8 9 10 +10 FM/PLAY MODE STANDBY/ON 1 2 3 DISPLAY 4 5 6 CANCEL 7 8 9 SET 10 AUTO PRESET +10 ENTER DISPLAY CANCEL MENU A.P.off CLOCK /TIMER SLEEP FM/PLAY BASS MODE PITCH REPEAT SOUND VOLUME PITCH REPEAT Main unit DISC CD STANDBY SOURCE OPEN/CLOSE CDR LINE REC SELECT REC SPEED REC MODE SET CANCEL REC START COMPACT COMPONENT CDR SYSTEM N X - C D R7 DIRECT REC REC MUTE DISC CD CDR FINALIZE REC PAUSE VOLUME FADE IN/OUT DIRECT...
...DISC CD CDR FINALIZE REC PAUSE VOLUME COMPACT COMPONENT CDR SYSTEM FADE IN/OUT N X - Remote control 1 2 3 4 5 6 7 8 9 10 +10 FM/PLAY MODE STANDBY/ON 1 2 3 DISPLAY 4 5 6 CANCEL 7 8 9 SET 10 AUTO PRESET +10 ENTER DISPLAY CANCEL MENU A.P.off CLOCK /TIMER SLEEP FM/PLAY BASS MODE PITCH REPEAT SOUND VOLUME PITCH REPEAT Main unit DISC CD STANDBY SOURCE OPEN/CLOSE CDR LINE REC SELECT REC SPEED REC MODE SET CANCEL REC START COMPACT COMPONENT CDR SYSTEM N X - C D R7 DIRECT REC REC MUTE DISC CD CDR FINALIZE REC PAUSE VOLUME FADE IN/OUT DIRECT...

Instructions
Page 29
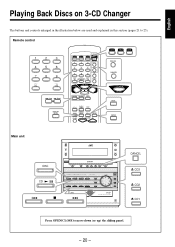
... used and explained in this section (page 27). C D R7 DISC CD CDR FINALIZE REC PAUSE FADE IN/OUT DIRECT REC REC MUTE VOLUME COMPACT DIGITAL AUDIO Recordable ReWriteble CD3 CD2 CD1 CDR FINALIZE COMPACT DIGITAL AUDIO TEXT 3CD 3CD Changer System, Play & Exchange PHONES - 26 - Remote control 1 2 3 4 5 6 7 8 9 10 +10 STANDBY/ON 1 2 3 DISPLAY 4 5 6 CANCEL 7 8 9 SET 10 AUTO PRESET +10 ENTER MENU A.P.off CLOCK /TIMER SLEEP BASS FM/PLAY MODE PITCH REPEAT SOUND VOLUME REPEAT Main unit CDR STANDBY SOURCE OPEN/CLOSE CDR COMPACT COMPONENT CDR SYSTEM...
... used and explained in this section (page 27). C D R7 DISC CD CDR FINALIZE REC PAUSE FADE IN/OUT DIRECT REC REC MUTE VOLUME COMPACT DIGITAL AUDIO Recordable ReWriteble CD3 CD2 CD1 CDR FINALIZE COMPACT DIGITAL AUDIO TEXT 3CD 3CD Changer System, Play & Exchange PHONES - 26 - Remote control 1 2 3 4 5 6 7 8 9 10 +10 STANDBY/ON 1 2 3 DISPLAY 4 5 6 CANCEL 7 8 9 SET 10 AUTO PRESET +10 ENTER MENU A.P.off CLOCK /TIMER SLEEP BASS FM/PLAY MODE PITCH REPEAT SOUND VOLUME REPEAT Main unit CDR STANDBY SOURCE OPEN/CLOSE CDR COMPACT COMPONENT CDR SYSTEM...

Instructions
Page 31
...). Remote control STANDBY/ON 1 2 3 DISPLAY 4 5 6 CANCEL 7 8 9 SET 10 AUTO PRESET +10 ENTER DISPLAY SET ENTER MENU A.P.off CLOCK /TIMER SLEEP FM/PLAY BASS MODE PITCH REPEAT SOUND VOLUME - 28 - Main unit REC MODE SET SOURCE OPEN/CLOSE OPEN/CLOSE CDR STANDBY SOURCE CANCEL REC START REC LEVEL CDR REC PAUSE DISC LINE REC SELECT REC SPEED LINE REC SELECT REC SPEED REC MODE SET CANCEL REC START COMPACT COMPONENT CDR SYSTEM N X - For recording operations, you mainly use the buttons and controls on a CD-R/CD-RW The buttons and controls enlarged...
...). Remote control STANDBY/ON 1 2 3 DISPLAY 4 5 6 CANCEL 7 8 9 SET 10 AUTO PRESET +10 ENTER DISPLAY SET ENTER MENU A.P.off CLOCK /TIMER SLEEP FM/PLAY BASS MODE PITCH REPEAT SOUND VOLUME - 28 - Main unit REC MODE SET SOURCE OPEN/CLOSE OPEN/CLOSE CDR STANDBY SOURCE CANCEL REC START REC LEVEL CDR REC PAUSE DISC LINE REC SELECT REC SPEED LINE REC SELECT REC SPEED REC MODE SET CANCEL REC START COMPACT COMPONENT CDR SYSTEM N X - For recording operations, you mainly use the buttons and controls on a CD-R/CD-RW The buttons and controls enlarged...

Instructions
Page 34
..., then tune into a station you want . • When recording from the external component: Start playback. • For details, see page 29) is in the main display. Recording starts. 123 AUTO TRACK OVER REC LEVEL ANALOG CD-RW REC dB UNFINALIZE DISC STEREO 6 When recording from 3-CD Changer: Press CD 3 / 8. • Recording stops when a selected disc is either Program Play or Random Play, press FM/PLAY MODE on the display, and...
..., then tune into a station you want . • When recording from the external component: Start playback. • For details, see page 29) is in the main display. Recording starts. 123 AUTO TRACK OVER REC LEVEL ANALOG CD-RW REC dB UNFINALIZE DISC STEREO 6 When recording from 3-CD Changer: Press CD 3 / 8. • Recording stops when a selected disc is either Program Play or Random Play, press FM/PLAY MODE on the display, and...

Instructions
Page 35
... in CD-R/CD-RW Clock CD track number & CDR track number Playback source * (see below) indication When you unplug the AC power cord or if a power failure occurs Input level adjustment will be recalled when you press CDR 3 / 8, standard recording (see "Changing the Display Information" on the remote) works to finish the adjustment. on page 15. CD 123 AUTO TRACK CDR ANALOG CD-RW REC LEVEL REC dB UNFINALIZE DISC 2 Turn the VOLUME control...
... in CD-R/CD-RW Clock CD track number & CDR track number Playback source * (see below) indication When you unplug the AC power cord or if a power failure occurs Input level adjustment will be recalled when you press CDR 3 / 8, standard recording (see "Changing the Display Information" on the remote) works to finish the adjustment. on page 15. CD 123 AUTO TRACK CDR ANALOG CD-RW REC LEVEL REC dB UNFINALIZE DISC 2 Turn the VOLUME control...

Instructions
Page 48
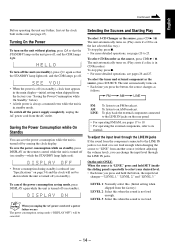
... the main display. If not, insert a recordable CD-R or CD-RW. • When you want to use Auto Power Off to the beginning) * "AM 12:00" is turned off (on -time setting screen appears in about 3 minutes before timer recording starts, then turns off (on the CDR disc tray. To adjust the clock again Once you have activated the power consumption saving mode ("DISPLAY OFF"), you need to set Recording Timer whether the...
... the main display. If not, insert a recordable CD-R or CD-RW. • When you want to use Auto Power Off to the beginning) * "AM 12:00" is turned off (on -time setting screen appears in about 3 minutes before timer recording starts, then turns off (on the CDR disc tray. To adjust the clock again Once you have activated the power consumption saving mode ("DISPLAY OFF"), you need to set Recording Timer whether the...

Instructions
Page 50
... SET. - 47 - How Daily Timer actually works The unit automatically turns on about 3 minutes before Daily Timer playback starts, then starts playing the specified source when the timer on -time setting screen appears in CD Recorder. = Prepare a disc, then go to select a preset station. The volume level increases to select the disc number. Tunes into an AM station. = go to step 7 to the preset level step by ). • Daily Timer works every day, and the timer settings...
... SET. - 47 - How Daily Timer actually works The unit automatically turns on about 3 minutes before Daily Timer playback starts, then starts playing the specified source when the timer on -time setting screen appears in CD Recorder. = Prepare a disc, then go to select a preset station. The volume level increases to select the disc number. Tunes into an AM station. = go to step 7 to the preset level step by ). • Daily Timer works every day, and the timer settings...
Instructions
Page 56
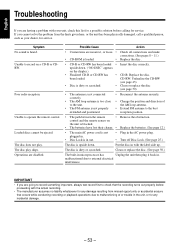
... antenna securely. • Change the position and direction of or trouble in the AC power plug. • Turn off Disc Lock. (See page 25.) The disc is upside down . ("NO DISC" appears on a CD-R or CDRW. Poor radio reception. English Troubleshooting If you are incorrect, or loose. • Check all connections and make corrections. (See pages 8 - 11.) • CD-ROM is loaded. • Replace the disc . • CD-R or CD...
... antenna securely. • Change the position and direction of or trouble in the AC power plug. • Turn off Disc Lock. (See page 25.) The disc is upside down . ("NO DISC" appears on a CD-R or CDRW. Poor radio reception. English Troubleshooting If you are incorrect, or loose. • Check all connections and make corrections. (See pages 8 - 11.) • CD-ROM is loaded. • Replace the disc . • CD-R or CD...


