Operation Manual
Page 1
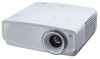
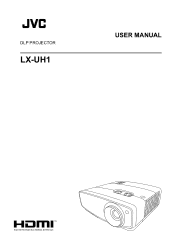
DLP PROJECTOR LX-UH1 USER MANUAL
DLP PROJECTOR LX-UH1 USER MANUAL
Operation Manual
Page 2
... control 10 Installation 12 Choosing a location 12 Obtaining a preferred projected image size 13 Connection 15 Operation 16 Starting up the projector 16 Shutting down the projector....... 16 Selecting an input source .......... 17 Adjusting the projected image ... 18 Adjusting the projection angle .........18 Fine-tuning the ...: Basic menu ........25 SYSTEM SETUP: Advanced menu 26 INFORMATION menu 27 OSD menu structure 28 Maintenance 30 Care of the projector 30 Lamp information 31 Getting to know the lamp hour......... 31 Extending lamp life 31 Timing of replacing the lamp 32 ...
... control 10 Installation 12 Choosing a location 12 Obtaining a preferred projected image size 13 Connection 15 Operation 16 Starting up the projector 16 Shutting down the projector....... 16 Selecting an input source .......... 17 Adjusting the projected image ... 18 Adjusting the projection angle .........18 Fine-tuning the ...: Basic menu ........25 SYSTEM SETUP: Advanced menu 26 INFORMATION menu 27 OSD menu structure 28 Maintenance 30 Care of the projector 30 Lamp information 31 Getting to know the lamp hour......... 31 Extending lamp life 31 Timing of replacing the lamp 32 ...
Operation Manual
Page 4
... operation. - Locations where excessive humidity, dust, or cigarette smoke may fall over, causing injury or resulting in "Projector specifications". 5. If you follow the instructions mentioned in any other soft surface. 6. European representative of JVC KENWOOD Corporation is: JVCKENWOOD Deutschland GmbH Konrad-Adenauer-Allee 1-11, 61118 Bad Vilbel, GERMANY Information for Users on...
... operation. - Locations where excessive humidity, dust, or cigarette smoke may fall over, causing injury or resulting in "Projector specifications". 5. If you follow the instructions mentioned in any other soft surface. 6. European representative of JVC KENWOOD Corporation is: JVCKENWOOD Deutschland GmbH Konrad-Adenauer-Allee 1-11, 61118 Bad Vilbel, GERMANY Information for Users on...
Operation Manual
Page 5
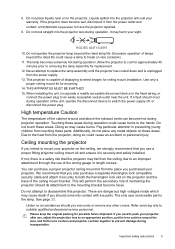
... temperature of the wrong gauge or length screws. Pay particular attention in the fixed wiring, or connect the power plug to mount your projector on the ceiling, we strongly recommend that you purchased your warranty. The only user serviceable part is unplugged from the ceiling due to...need to pack your sight. Please keep the original packing for mounting. 14. THIS APPARATUS MUST BE EARTHED. 15. Ceiling mounting the projector If you intend to an easily accessible socket-outlet near or on rare occasions. 11. Refer servicing only to removing the lamp assembly for...
... temperature of the wrong gauge or length screws. Pay particular attention in the fixed wiring, or connect the power plug to mount your projector on the ceiling, we strongly recommend that you purchased your warranty. The only user serviceable part is unplugged from the ceiling due to...need to pack your sight. Please keep the original packing for mounting. 14. THIS APPARATUS MUST BE EARTHED. 15. Ceiling mounting the projector If you intend to an easily accessible socket-outlet near or on rare occasions. 11. Refer servicing only to removing the lamp assembly for...
Operation Manual
Page 6
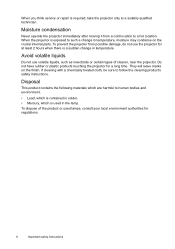
... at least 2 hours when there is a sudden change in temperature. Do not have rubber or plastic products touching the projector for regulations. 6 Important safety instructions Disposal This product contains the following materials which are harmful to such a change in ...treated cloth, be sure to a suitably qualified technician. They will leave marks on the crucial internal parts. Moisture condensation Never operate the projector immediately after moving it from possible damage, do not use volatile liquids, such as insecticide or certain types of the product or used ...
... at least 2 hours when there is a sudden change in temperature. Do not have rubber or plastic products touching the projector for regulations. 6 Important safety instructions Disposal This product contains the following materials which are harmful to such a change in ...treated cloth, be sure to a suitably qualified technician. They will leave marks on the crucial internal parts. Moisture condensation Never operate the projector immediately after moving it from possible damage, do not use volatile liquids, such as insecticide or certain types of the product or used ...
Operation Manual
Page 7
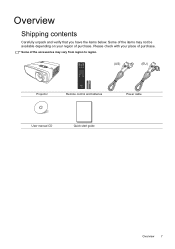
Please check with your region of purchase. Some of purchase. Some of the items may not be available depending on your place of the accessories may vary from region to region. (US) (EU) Projector Remote control and batteries Power cable User manual CD Quick start guide Overview 7 Overview Shipping contents Carefully unpack and verify that you have the items below.
Please check with your region of purchase. Some of purchase. Some of the items may not be available depending on your place of the accessories may vary from region to region. (US) (EU) Projector Remote control and batteries Power cable User manual CD Quick start guide Overview 7 Overview Shipping contents Carefully unpack and verify that you have the items below.

Operation Manual
Page 8
Projector exterior view Front and upper side view 1 2 3 4 Rear/bottom view 11 12 13 14 15 16 17 20 21 21 20 1. Control panel (See "Control ...
Projector exterior view Front and upper side view 1 2 3 4 Rear/bottom view 11 12 13 14 15 16 17 20 21 21 20 1. Control panel (See "Control ...

Operation Manual
Page 9
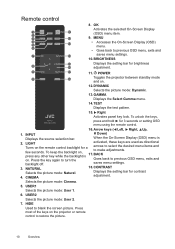
...menus, exits and saves any changes made using the remote control. 11. POWER indicator light Lights up or flashes when the projector is activated, these keys are used as directional arrows to select the desired menu items and to blank the screen picture. ...selected On-Screen Display (OSD) menu item. 12. Controls and functions Control panel 1 2 3 8 4 9 5 10 11 6 12 8 7 13 1. Lights up red if the projector's temperature becomes too high. 3. Arrow keys ( , , , ) When the On-Screen Display (OSD) menu is under operation. 2. Keystone keys ( , ) Launches the Keystone window. ...
...menus, exits and saves any changes made using the remote control. 11. POWER indicator light Lights up or flashes when the projector is activated, these keys are used as directional arrows to select the desired menu items and to blank the screen picture. ...selected On-Screen Display (OSD) menu item. 12. Controls and functions Control panel 1 2 3 8 4 9 5 10 11 6 12 8 7 13 1. Lights up red if the projector's temperature becomes too high. 3. Arrow keys ( , , , ) When the On-Screen Display (OSD) menu is under operation. 2. Keystone keys ( , ) Launches the Keystone window. ...
Operation Manual
Page 10
...) menu item. 2 3 12 9. Press the key again to make adjustments. CINEMA Displays the setting bar for a few seconds. POWER Toggles the projector between standby mode 10 18 and on the projector or remote control to previous OSD menu, exits and saves menu settings. 3. activated, these keys are used as directional arrows to...
...) menu item. 2 3 12 9. Press the key again to make adjustments. CINEMA Displays the setting bar for a few seconds. POWER Toggles the projector between standby mode 10 18 and on the projector or remote control to previous OSD menu, exits and saves menu settings. 3. activated, these keys are used as directional arrows to...
Operation Manual
Page 11
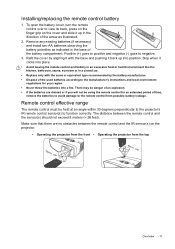
... extended period of time, remove the batteries to avoid damage to view its back, press on the finger grip on the projector. • Operating the projector from the front • Operating the projector from possible battery leakage. Stop when it clicks into place. • Avoid leaving the remote control and battery in an... polarities as illustrated. 2. Make sure that there are drained or if you will not be held at an angle within 30 degrees perpendicular to the projector's IR remote control sensor(s) to negative. 3.
... extended period of time, remove the batteries to avoid damage to view its back, press on the finger grip on the projector. • Operating the projector from the front • Operating the projector from possible battery leakage. Stop when it clicks into place. • Avoid leaving the remote control and battery in an... polarities as illustrated. 2. Make sure that there are drained or if you will not be held at an angle within 30 degrees perpendicular to the projector's IR remote control sensor(s) to negative. 3.
Operation Manual
Page 12
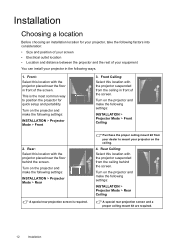
... location • Location and distance between the projector and the rest of your equipment You can install your projector on the ceiling. 4. Turn on the projector and make the following settings: INSTALLATION > Projector Mode > Rear A special rear projection screen ...proper ceiling mount kit are required. 12 Installation Turn on the projector and make the following settings: INSTALLATION > Projector Mode > Front Ceiling 2. Turn on the projector and make the following settings: INSTALLATION > Projector Mode > Front 3. Installation Choosing a location Before choosing an ...
... location • Location and distance between the projector and the rest of your equipment You can install your projector on the ceiling. 4. Turn on the projector and make the following settings: INSTALLATION > Projector Mode > Rear A special rear projection screen ...proper ceiling mount kit are required. 12 Installation Turn on the projector and make the following settings: INSTALLATION > Projector Mode > Front Ceiling 2. Turn on the projector and make the following settings: INSTALLATION > Projector Mode > Front 3. Installation Choosing a location Before choosing an ...
Operation Manual
Page 13
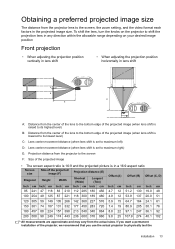
... to the screen, the zoom setting, and the video format each factors in a 16:9 aspect ratio Screen size Diagonal Size of the projector, we recommend that you want a permanent installation of the projected image (F) Height Width Projection distance (E) Shortest (Wide) Longest (Tele) Offset (A) Offset (B) Offset (C, D)...200 508 98 249 174 443 236 600 378 960 9.8 25 107.9 274 40.1 102 All measurements are approximate and may vary from the projector to the screen F: Size of the projected image • The screen aspect ratio is 16:9 and the projected picture is in the projected image...
... to the screen, the zoom setting, and the video format each factors in a 16:9 aspect ratio Screen size Diagonal Size of the projector, we recommend that you want a permanent installation of the projected image (F) Height Width Projection distance (E) Shortest (Wide) Longest (Tele) Offset (A) Offset (B) Offset (C, D)...200 508 98 249 174 443 236 600 378 960 9.8 25 107.9 274 40.1 102 All measurements are approximate and may vary from the projector to the screen F: Size of the projected image • The screen aspect ratio is 16:9 and the projected picture is in the projected image...
Operation Manual
Page 14
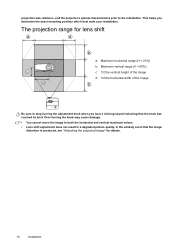
The projection range for details. 14 Installation In the unlikely event that the knob has reached its limit. projection size, distance, and the projector's optical characteristics prior to both the horizontal and vertical maximum values. • Lens shift adjustment does not result in a degraded picture quality. Over-turning the ...
The projection range for details. 14 Installation In the unlikely event that the knob has reached its limit. projection size, distance, and the projector's optical characteristics prior to both the horizontal and vertical maximum values. • Lens shift adjustment does not result in a degraded picture quality. Over-turning the ...
Operation Manual
Page 15
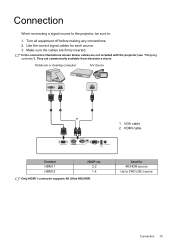
Make sure the cables are not included with the projector (see "Shipping contents"). VGA cable 2. Use the correct signal cables for 4K/HDR source Up to : 1. Notebook or desktop computer A/V device 1 2 2 or 1. In the connection ... cable Terminal HDMI 1 HDMI 2 HDCP ver. 2.2 1.4 Only HDMI 1 connector supports 4K (Ultra HD)/HDR. Used for each source. 3. Connection When connecting a signal source to the projector, be sure to FHD (2K) source Connection 15
Make sure the cables are not included with the projector (see "Shipping contents"). VGA cable 2. Use the correct signal cables for 4K/HDR source Up to : 1. Notebook or desktop computer A/V device 1 2 2 or 1. In the connection ... cable Terminal HDMI 1 HDMI 2 HDCP ver. 2.2 1.4 Only HDMI 1 connector supports 4K (Ultra HD)/HDR. Used for each source. 3. Connection When connecting a signal source to the projector, be sure to FHD (2K) source Connection 15
Operation Manual
Page 16
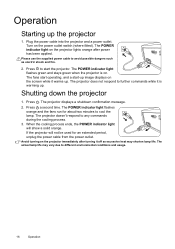
...such as excessive heat may vary due to different environmental conditions and usage. 16 Operation The fans start operating, and a start the projector. Press . The projector doesn't respond to cool the lamp. Avoid turning on . Operation Starting up . Press a second time. Turn on the screen...shock and fire. 2. Plug the power cable into the projector and a power outlet. The POWER indicator light on the projector lights orange after turning it is on the projector immediately after power has been applied. The projector does not respond to start -up image displays on ...
...such as excessive heat may vary due to different environmental conditions and usage. 16 Operation The fans start operating, and a start the projector. Press . The projector doesn't respond to cool the lamp. Avoid turning on . Operation Starting up . Press a second time. Turn on the screen...shock and fire. 2. Plug the power cable into the projector and a power outlet. The POWER indicator light on the projector lights orange after turning it is on the projector immediately after power has been applied. The projector does not respond to start -up image displays on ...
Operation Manual
Page 17
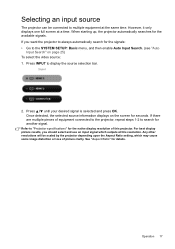
... and use an input signal which may cause some image distortion or loss of picture clarity. For best display picture results, you want the projector to always automatically search for the signals: • Go to display the source selection bar. 2. See "Aspect Ratio" for the available ...at a time. Once detected, the selected source information displays on page 25) To select the video source: 1. Operation 17 Refer to "Projector specifications" for seconds. Any other resolutions will be connected to search for another signal. However, it only displays one full screen at this...
... and use an input signal which may cause some image distortion or loss of picture clarity. For best display picture results, you want the projector to always automatically search for the signals: • Go to display the source selection bar. 2. See "Aspect Ratio" for the available ...at a time. Once detected, the selected source information displays on page 25) To select the video source: 1. Operation 17 Refer to "Projector specifications" for seconds. Any other resolutions will be connected to search for another signal. However, it only displays one full screen at this...
Operation Manual
Page 18
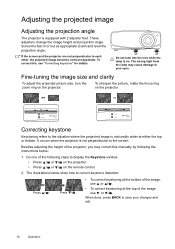
...These adjusters change the image height and projection angle. To correct this manually by following steps to the screen. Besides adjusting the height of the projector, you may cause damage to save your eyes. Press / . • To correct keystoning at the bottom of the image, use or ... The illustrations below : 1. Fine-tuning the image size and clarity To adjust the projected picture size, turn the zoom ring on the projector. Correcting keystone Keystoning refers to aim and level the projection angle. Screw the feet in or out as appropriate to the situation where the...
...These adjusters change the image height and projection angle. To correct this manually by following steps to the screen. Besides adjusting the height of the projector, you may cause damage to save your eyes. Press / . • To correct keystoning at the bottom of the image, use or ... The illustrations below : 1. Fine-tuning the image size and clarity To adjust the projected picture size, turn the zoom ring on the projector. Correcting keystone Keystoning refers to aim and level the projection angle. Screw the feet in or out as appropriate to the situation where the...
Operation Manual
Page 19
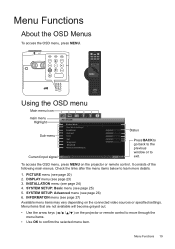
... (see page 23) 3. Menu Functions About the OSD Menus To access the OSD menu, press MENU. To access the OSD menu, press MENU on the projector or remote control to move through the menu items. • Use OK to confirm the selected menu item. It consists of the following main menus... after the menu items below to Exit exit. Menu items that are not available will become grayed out. • Use the arrow keys ( / / / ) on the projector or remote control.
... (see page 23) 3. Menu Functions About the OSD Menus To access the OSD menu, press MENU. To access the OSD menu, press MENU on the projector or remote control to move through the menu items. • Use OK to confirm the selected menu item. It consists of the following main menus... after the menu items below to Exit exit. Menu items that are not available will become grayed out. • Use the arrow keys ( / / / ) on the projector or remote control.
Operation Manual
Page 20
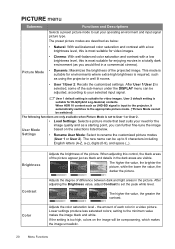
... If the setting is set the peak white level. User 2 default setting is suitable for the image quality and as using the projector in the picture. Brightness Contrast Color Adjusts the brightness of each color in a video picture. setting to rename the customized picture modes ...to suit your selected input signal. User 1 default setting is suitable for environments where extra-high brightness is input to the projector, it automatically switches to the appropriate picture mode. (*Picture Mode cannot be adjusted, according to your operating environment and input signal picture...
... If the setting is set the peak white level. User 2 default setting is suitable for the image quality and as using the projector in the picture. Brightness Contrast Color Adjusts the brightness of each color in a video picture. setting to rename the customized picture modes ...to suit your selected input signal. User 1 default setting is suitable for environments where extra-high brightness is input to the projector, it automatically switches to the appropriate picture mode. (*Picture Mode cannot be adjusted, according to your operating environment and input signal picture...

Operation Manual
Page 23
...Displays the Image Position window. This function is only available when the PC signal is selected. Adjusts the clock phase to fit the projector's native resolution in the center of the screen with a 16:9 aspect ratio. Menu Functions 23 Submenu Functions and Descriptions Reset Current Returns...User 2) to the factory preset values. Size • 16:10 Scales a picture so that it is 100% displayed. The values shown on the projector or remote control to adjust the position of a picture. • 4:3 Scales the picture so that it is displayed in its horizontal or vertical ...
...Displays the Image Position window. This function is only available when the PC signal is selected. Adjusts the clock phase to fit the projector's native resolution in the center of the screen with a 16:9 aspect ratio. Menu Functions 23 Submenu Functions and Descriptions Reset Current Returns...User 2) to the factory preset values. Size • 16:10 Scales a picture so that it is 100% displayed. The values shown on the projector or remote control to adjust the position of a picture. • 4:3 Scales the picture so that it is displayed in its horizontal or vertical ...


