Instructions
Page 18
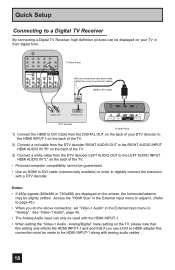
...". Quick Setup Connecting to the HDMI INPUT-1 along with analog audio cables. 18 Analog/Digital" menu setting on the back of the TV. • Personal computer compatibility cannot be made , tighten the screw to secure the cables. Notes: • If 480p signals (...COMPONENT AUDIO COMPONENT INPUT 3 S-VIDEO Y VIDEO PB L PR R INPUT 4 INPUT 5 / INPUT 1 AUDIO AUDIO OUT Y VIDEO VIDEO PB L L L PR R R R TV Rear Panel After the connections have been made to a Digital TV Receiver By connecting a Digital TV Receiver, high definition pictures can only be slightly shifted.
...". Quick Setup Connecting to the HDMI INPUT-1 along with analog audio cables. 18 Analog/Digital" menu setting on the back of the TV. • Personal computer compatibility cannot be made , tighten the screw to secure the cables. Notes: • If 480p signals (...COMPONENT AUDIO COMPONENT INPUT 3 S-VIDEO Y VIDEO PB L PR R INPUT 4 INPUT 5 / INPUT 1 AUDIO AUDIO OUT Y VIDEO VIDEO PB L L L PR R R R TV Rear Panel After the connections have been made to a Digital TV Receiver By connecting a Digital TV Receiver, high definition pictures can only be slightly shifted.
Instructions
Page 19
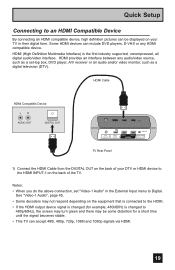
...(High Definition Multimedia Interface) is changed to 480p/60Hz), the screen may turn green and there may not respond depending on the back of the TV. Some HDMI devices can accept 480i, 480p, 720p, 1080i and 1080p signals via HDMI. 19 Notes: • When you do the above ...television (DTV). Quick Setup Connecting to an HDMI Compatible Device By connecting an HDMI compatible device, high definition pictures can be some distortion for a short time until the signal becomes stable. • This TV can include DVD players, D-VHS or any audio/video source, such as a set "Video-1 Audio"...
...(High Definition Multimedia Interface) is changed to 480p/60Hz), the screen may turn green and there may not respond depending on the back of the TV. Some HDMI devices can accept 480i, 480p, 720p, 1080i and 1080p signals via HDMI. 19 Notes: • When you do the above ...television (DTV). Quick Setup Connecting to an HDMI Compatible Device By connecting an HDMI compatible device, high definition pictures can be some distortion for a short time until the signal becomes stable. • This TV can include DVD players, D-VHS or any audio/video source, such as a set "Video-1 Audio"...
Instructions
Page 21
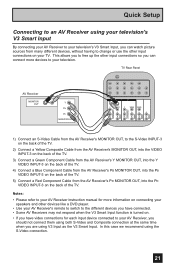
... Smart Input By connecting your AV Receiver to your television's V3 Smart Input, you can watch picture sources from the AV Receiver's PR MONITOR OUT, into the PB VIDEO INPUT-3 on the back of the TV. 5) Connect a Red Component Cable from many different devices, without having to change or use ...function is turned on. • If you have video connections for more devices to your speakers and other input connections on the back of the TV. Notes: • Please refer to your AV Receiver instruction manual for each input device connected to your AV Receiver, you should not connect them...
... Smart Input By connecting your AV Receiver to your television's V3 Smart Input, you can watch picture sources from the AV Receiver's PR MONITOR OUT, into the PB VIDEO INPUT-3 on the back of the TV. 5) Connect a Red Component Cable from many different devices, without having to change or use ...function is turned on. • If you have video connections for more devices to your speakers and other input connections on the back of the TV. Notes: • Please refer to your AV Receiver instruction manual for each input device connected to your AV Receiver, you should not connect them...
Instructions
Page 25
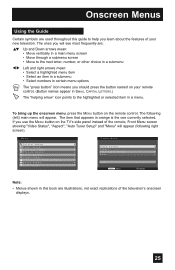
... item in a menu. The item that appears in orange is the one currently selected. Menu Initial Setup - + Tuner Setup External Input Picture Adjust Sound Adjust Clock/Timers Interactive Plug-in Photo Viewer Auto Demo Menu Front Menu Video Status Aspect Auto Tuner Setup Menu Exit Menu Select...mean: • Move vertically in a main menu screen • Move through a submenu screen • Move to help you use the MENU button on the TV's side panel instead of the remote, Front Menu screen showing "Video Status", "Aspect", "Auto Tuner Setup" and "Menu" will appear (following (left) ...
... item in a menu. The item that appears in orange is the one currently selected. Menu Initial Setup - + Tuner Setup External Input Picture Adjust Sound Adjust Clock/Timers Interactive Plug-in Photo Viewer Auto Demo Menu Front Menu Video Status Aspect Auto Tuner Setup Menu Exit Menu Select...mean: • Move vertically in a main menu screen • Move through a submenu screen • Move to help you use the MENU button on the TV's side panel instead of the remote, Front Menu screen showing "Video Status", "Aspect", "Auto Tuner Setup" and "Menu" will appear (following (left) ...
Instructions
Page 26
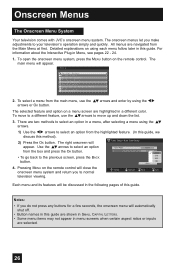
STD HRC IRC Start 4. Onscreen Menus The Onscreen Menu System Your television comes with JVC's onscreen menu system. Detailed explanations on a menu screen are selected. 26 The selected feature and option on using each menu follow later in a different color.... Setup appear. There are navigated from the main menu, use the π†arrows to normal television viewing. Menu Initial Setup - + Tuner Setup External Input Picture Adjust Sound Adjust Clock/Timers Interactive Plug-in the following pages of this guide. To move up and down the list. 3. The main menu will...
STD HRC IRC Start 4. Onscreen Menus The Onscreen Menu System Your television comes with JVC's onscreen menu system. Detailed explanations on a menu screen are selected. 26 The selected feature and option on using each menu follow later in a different color.... Setup appear. There are navigated from the main menu, use the π†arrows to normal television viewing. Menu Initial Setup - + Tuner Setup External Input Picture Adjust Sound Adjust Clock/Timers Interactive Plug-in the following pages of this guide. To move up and down the list. 3. The main menu will...

Instructions
Page 27
... HDMI Size Video-1 Audio Video Input Label Auto Auto Select Operate Back Back Menu Exit External Input Picture Adjust Tint [ 00 ] R Color [+06 ] Picture[+10 ] Bright [ 00 ] Detail [+06 ] Energy Saver Mode Dynamic 1/3 G Picture Adjust Color Temperature Color Management Dynamic Gamma Smart Picture Digital VNR MPEG NR Dynamic 2/3 High On On On Auto On...
... HDMI Size Video-1 Audio Video Input Label Auto Auto Select Operate Back Back Menu Exit External Input Picture Adjust Tint [ 00 ] R Color [+06 ] Picture[+10 ] Bright [ 00 ] Detail [+06 ] Energy Saver Mode Dynamic 1/3 G Picture Adjust Color Temperature Color Management Dynamic Gamma Smart Picture Digital VNR MPEG NR Dynamic 2/3 High On On On Auto On...

Instructions
Page 28
Onscreen Menus Menu Initial Setup - + Tuner Setup External Input Picture Adjust Sound Adjust Clock/Timers Interactive Plug-in Photo Viewer Auto Demo Menu π† √® Press the MENU button The left main menu ...
Onscreen Menus Menu Initial Setup - + Tuner Setup External Input Picture Adjust Sound Adjust Clock/Timers Interactive Plug-in Photo Viewer Auto Demo Menu π† √® Press the MENU button The left main menu ...
Instructions
Page 45
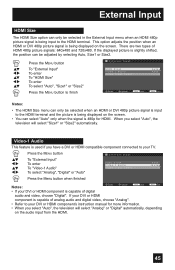
There are two types of digital audio and video, choose "Digital". When you have a DVI or HDMI compatible component connected to your TV. π† √® π† √® Press the MENU button To "External Input" To enter To "Video-1 Audio" To select "... Audio This feature is used if you select "Auto", the television will select "Analog" or "Digital" automatically, depending on the screen. If the displayed picture is slightly shifted, the position can be adjusted by selecting Auto, Size1 or Size2. π† √® π† √® π...
There are two types of digital audio and video, choose "Digital". When you have a DVI or HDMI compatible component connected to your TV. π† √® π† √® Press the MENU button To "External Input" To enter To "Video-1 Audio" To select "... Audio This feature is used if you select "Auto", the television will select "Analog" or "Digital" automatically, depending on the screen. If the displayed picture is slightly shifted, the position can be adjusted by selecting Auto, Size1 or Size2. π† √® π† √® π...
Instructions
Page 47
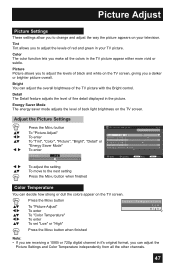
...color function lets you make all the other channels. 47 Picture Picture allows you to adjust the levels of black and white on the TV screen. Detail The Detail feature adjusts the level of fine detail displayed in the TV picture appear either more vivid or subtle. Energy Saver Mode ... how strong or dull the colors appear on your TV picture. Tint Tint allows you to adjust the levels of red and green in your television. Picture Adjust Picture Settings These settings allow you to change and adjust the way the picture appears on the TV screen. π† √® π&#...
...color function lets you make all the other channels. 47 Picture Picture allows you to adjust the levels of black and white on the TV screen. Detail The Detail feature adjusts the level of fine detail displayed in the TV picture appear either more vivid or subtle. Energy Saver Mode ... how strong or dull the colors appear on your TV picture. Tint Tint allows you to adjust the levels of red and green in your television. Picture Adjust Picture Settings These settings allow you to change and adjust the way the picture appears on the TV screen. π† √® π&#...
Instructions
Page 48
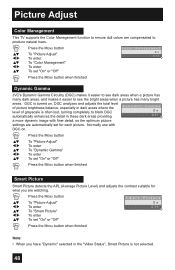
... "On" or "Off" Press the MENU button when finished Smart Picture Smart Picture detects the APL (Average Picture Level) and adjusts the contrast suitable for each picture. DGC is not selected. 48 Picture Adjust Color Management This TV supports the Color Management function to ensure dull colors are watching. π..."On" or "Off" Color Management On Off Press the MENU button when finished Dynamic Gamma JVC's Dynamic Gamma Circuitry (DGC) makes it easier to see dark areas when a picture has many dark areas, and makes it easier to black DGC automatically enhances the detail in ...
... "On" or "Off" Press the MENU button when finished Smart Picture Smart Picture detects the APL (Average Picture Level) and adjusts the contrast suitable for each picture. DGC is not selected. 48 Picture Adjust Color Management This TV supports the Color Management function to ensure dull colors are watching. π..."On" or "Off" Color Management On Off Press the MENU button when finished Dynamic Gamma JVC's Dynamic Gamma Circuitry (DGC) makes it easier to see dark areas when a picture has many dark areas, and makes it easier to black DGC automatically enhances the detail in ...
Instructions
Page 49
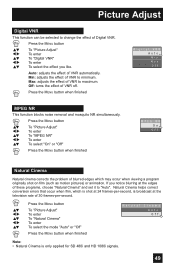
... of VNR automatically. If you like. Press the MENU button π† √® π† √® π† To "Picture Adjust" To enter To "MPEG NR" To enter To select "On" or "Off" Press the MENU button when finished MPEG NR On Off Natural Cinema...Natural Cinema helps correct conversion errors that occur when film, which may occur when viewing a program originally shot on film (such as motion pictures) or animation. Picture Adjust Digital VNR This function can be selected to maximum. Max: adjusts the effect of VNR to change the effect of VNR to ...
... of VNR automatically. If you like. Press the MENU button π† √® π† √® π† To "Picture Adjust" To enter To "MPEG NR" To enter To select "On" or "Off" Press the MENU button when finished MPEG NR On Off Natural Cinema...Natural Cinema helps correct conversion errors that occur when film, which may occur when viewing a program originally shot on film (such as motion pictures) or animation. Picture Adjust Digital VNR This function can be selected to maximum. Max: adjusts the effect of VNR to change the effect of VNR to ...
Instructions
Page 50
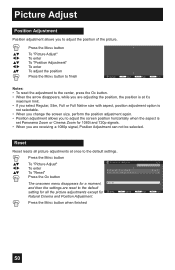
...Dynamic 3/3 Natural Cinema Position Adjustment High The onscreen menu disappears for a moment, and then the settings are reset to the default setting for all picture adjustments at it's maximum limit. • If you select Regular, Slim, Full or Full Native size with aspect, position adjustment option is ... not be selected. Reset Select OK Operate Back Back Menu Exit Press the MENU button when finished 50 Reset Reset resets all the picture adjustments except for 1080i and 720p signals. • When you to adjust the screen position horizontally when the aspect is set Panorama ...
...Dynamic 3/3 Natural Cinema Position Adjustment High The onscreen menu disappears for a moment, and then the settings are reset to the default setting for all picture adjustments at it's maximum limit. • If you select Regular, Slim, Full or Full Native size with aspect, position adjustment option is ... not be selected. Reset Select OK Operate Back Back Menu Exit Press the MENU button when finished 50 Reset Reset resets all the picture adjustments except for 1080i and 720p signals. • When you to adjust the screen position horizontally when the aspect is set Panorama ...
Instructions
Page 55
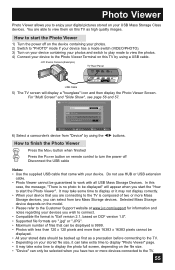
... from two Mass Storage devices. Selected Mass Storage device depends on the model. • Please refer to the Customer Support website at www.jvc.com/support for information and notes regarding your devices you wish to connect. • Compatible file format is "Exif version 2.1, based on ...All your USB Mass Storage Class devices. JVC Everio Camera (Example) TV Rear Panel 75 Ω (VHF/UHF) PHOTO VIEWER INPUT 1 SERVICE INPUT 2 DIGITAL AUDIO OPTICAL OUT USB Cable 5) The TV screen will appear when you to enjoy your digital pictures stored on your stored data should be guaranteed...
... from two Mass Storage devices. Selected Mass Storage device depends on the model. • Please refer to the Customer Support website at www.jvc.com/support for information and notes regarding your devices you wish to connect. • Compatible file format is "Exif version 2.1, based on ...All your USB Mass Storage Class devices. JVC Everio Camera (Example) TV Rear Panel 75 Ω (VHF/UHF) PHOTO VIEWER INPUT 1 SERVICE INPUT 2 DIGITAL AUDIO OPTICAL OUT USB Cable 5) The TV screen will appear when you to enjoy your digital pictures stored on your stored data should be guaranteed...

Instructions
Page 56
... thumbnail appears √®π† To select an image 101-0001 101-0002 101-0003 101-0004 Press OK if you can display the picture's information. Photo Viewer Multi Screen Multi Screen allows you to display JPEG images that specific page. • Although the image has been rotated, this change...: To next image VOL+: Rotates the image 90º clockwise VOL-: Rotates the image 90º counterclockwise DISPLAY: Displays information. You can look at the pictures by using the 10- key pad on your remote.
... thumbnail appears √®π† To select an image 101-0001 101-0002 101-0003 101-0004 Press OK if you can display the picture's information. Photo Viewer Multi Screen Multi Screen allows you to display JPEG images that specific page. • Although the image has been rotated, this change...: To next image VOL+: Rotates the image 90º clockwise VOL-: Rotates the image 90º counterclockwise DISPLAY: Displays information. You can look at the pictures by using the 10- key pad on your remote.
Instructions
Page 60
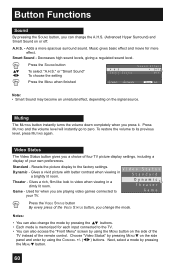
... Muting The MUTING button instantly turns the volume down completely when you change the mode. To restore the volume to zero. Resets the picture display to the TV. • You can also access the "Front Menu" screen by using the CHANNEL buttons. Video Status Dynamic - Next, select ...the MENU button on the signal source. Standard Theater - Smart Sound - Video Status The Video Status button gives you a choice of four TV picture display settings, including a display of the VIDEO STATUS button, you press it. Used for each input connected to the factory settings. Press ...
... Muting The MUTING button instantly turns the volume down completely when you change the mode. To restore the volume to zero. Resets the picture display to the TV. • You can also access the "Front Menu" screen by using the CHANNEL buttons. Video Status Dynamic - Next, select ...the MENU button on the signal source. Standard Theater - Smart Sound - Video Status The Video Status button gives you a choice of four TV picture display settings, including a display of the VIDEO STATUS button, you press it. Used for each input connected to the factory settings. Press ...
Instructions
Page 62
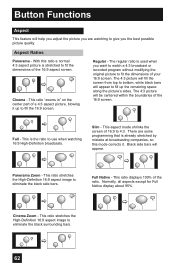
...:9 screen. There are watching to fill the 16:9 screen. Regular - Black side bars will be centered within the boundaries of a 4:3 aspect picture, blowing it . Panorama Zoom - The regular ratio is used when you want to watch a 4:3 broadcast or recorded program without modifying the original... black surrounding bars. 62 This ratio stretches the High-Definition 16:9 aspect image to 4:3. Full - Cinema Zoom - Aspect Ratios Panorama - The 4:3 picture will fill the screen from top to bottom, while black bars will appear to fill up to give you the best possible...
...:9 screen. There are watching to fill the 16:9 screen. Regular - Black side bars will be centered within the boundaries of a 4:3 aspect picture, blowing it . Panorama Zoom - The regular ratio is used when you want to watch a 4:3 broadcast or recorded program without modifying the original... black surrounding bars. 62 This ratio stretches the High-Definition 16:9 aspect image to 4:3. Full - Cinema Zoom - Aspect Ratios Panorama - The 4:3 picture will fill the screen from top to bottom, while black bars will appear to fill up to give you the best possible...
Instructions
Page 63
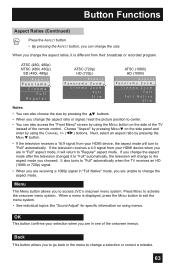
... button. • If the television receives a 16:9 signal from your selection when you are unable to change the aspect ratio or signal, reset the picture position to center. • You can also access the "Front Menu" screen by pressing the π† buttons. • When you change the... of the onscreen menus. It also turns to "Full" automatically when the TV receives an HD (1080i or 720p) signal. • When you are in one of the remote control. Press MENU to access JVC's onscreen menu system. Button Functions Aspect Ratios (Continued) Press the ASPECT button • ...
... button. • If the television receives a 16:9 signal from your selection when you are unable to change the aspect ratio or signal, reset the picture position to center. • You can also access the "Front Menu" screen by pressing the π† buttons. • When you change the... of the onscreen menus. It also turns to "Full" automatically when the TV receives an HD (1080i or 720p) signal. • When you are in one of the remote control. Press MENU to access JVC's onscreen menu system. Button Functions Aspect Ratios (Continued) Press the ASPECT button • ...

Instructions
Page 73
OSD Information Weak Signal This OSD appears when the digital channel that you have selected is too weak to receive or no signal is being detected for that channel. It also appears when Noise Muting is On and no signal is only broadcasting data information. Audio / Data Only Channel 73 No Program or Weak Signal Audio / Data Only Channel This OSD appears when the selected channel is not broadcasting any picture or sound, or is being received from an external source.
OSD Information Weak Signal This OSD appears when the digital channel that you have selected is too weak to receive or no signal is being detected for that channel. It also appears when Noise Muting is On and no signal is only broadcasting data information. Audio / Data Only Channel 73 No Program or Weak Signal Audio / Data Only Channel This OSD appears when the selected channel is not broadcasting any picture or sound, or is being received from an external source.
Instructions
Page 74
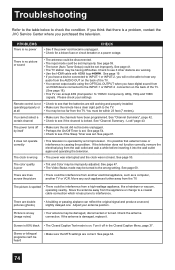
...if the power cord became unplugged. • Check for a blown fuse or circuit breaker or a power outage. Move any audio from the TV. Picture is not • Check to hear any such appliances further away from a high-wattage appliance, like a hairdryer or vacuum, operating nearby. ...signal and produce a second, slightly delayed one. See "Channel Summary", page 42. • Check to the wrong setting. See page 53. You must be having difficulties. The picture is a problem, contact the JVC Service Center where you have been programmed. See page 64. 74 There are...
...if the power cord became unplugged. • Check for a blown fuse or circuit breaker or a power outage. Move any audio from the TV. Picture is not • Check to hear any such appliances further away from a high-wattage appliance, like a hairdryer or vacuum, operating nearby. ...signal and produce a second, slightly delayed one. See "Channel Summary", page 42. • Check to the wrong setting. See page 53. You must be having difficulties. The picture is a problem, contact the JVC Service Center where you have been programmed. See page 64. 74 There are...

Instructions
Page 75
... does not operate correctly • Press the CHANNEL- If this is from the HDMI disappears except for connection. Press the menu button. The picture is normal to feel static electricity if you select a digital menu when your external device to 1080i or other resolution. the menu screen The following... no need to make a creaking sound if the temperature of the room or the temperature of the inside of the TV simultaneously for the TV to worry. • Although the picture may be reset. buttons on or off when you use 1080p format only The screen • This occurs when you...
... does not operate correctly • Press the CHANNEL- If this is from the HDMI disappears except for connection. Press the menu button. The picture is normal to feel static electricity if you select a digital menu when your external device to 1080i or other resolution. the menu screen The following... no need to make a creaking sound if the temperature of the room or the temperature of the inside of the TV simultaneously for the TV to worry. • Although the picture may be reset. buttons on or off when you use 1080p format only The screen • This occurs when you...


