
Instructions
Page 12
... television on the remote's back cover to remove. The four arrow keys OK are turning on the TV, the interactive plug-in menu appears. • At first, to watch your TV, select the TV mode by pressing the POWER button at the top right corner of this is the first time you are used... only for details regarding the remote control buttons. Raise the latch on and off by pressing the MODE button on the remote control before you turn the TV power on any of these steps, please consult other sections of the remote. VCR, DVD) may have questions, or for more detailed information on...
... television on the remote's back cover to remove. The four arrow keys OK are turning on the TV, the interactive plug-in menu appears. • At first, to watch your TV, select the TV mode by pressing the POWER button at the top right corner of this is the first time you are used... only for details regarding the remote control buttons. Raise the latch on and off by pressing the MODE button on the remote control before you turn the TV power on any of these steps, please consult other sections of the remote. VCR, DVD) may have questions, or for more detailed information on...
Instructions
Page 13
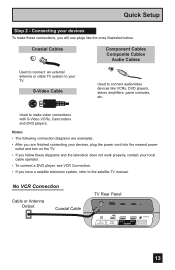
... Coaxial Cables Component Cables Composite Cables Audio Cables Used to connect an external antenna or cable TV system to the satellite TV manual. No VCR Connection Cable or Antenna Output Coaxial Cable TV Rear Panel 75 Ω (VHF/UHF) PHOTO VIEWER INPUT 1 SERVICE INPUT 2 DIGITAL AUDIO... connection diagrams are examples. • After you are finished connecting your devices, plug the power cord into the nearest power outlet and turn on the TV. • If you follow these connections, you have a satellite television system, refer to your local cable operator. • To ...
... Coaxial Cables Component Cables Composite Cables Audio Cables Used to connect an external antenna or cable TV system to the satellite TV manual. No VCR Connection Cable or Antenna Output Coaxial Cable TV Rear Panel 75 Ω (VHF/UHF) PHOTO VIEWER INPUT 1 SERVICE INPUT 2 DIGITAL AUDIO... connection diagrams are examples. • After you are finished connecting your devices, plug the power cord into the nearest power outlet and turn on the TV. • If you follow these connections, you have a satellite television system, refer to your local cable operator. • To ...
Instructions
Page 19
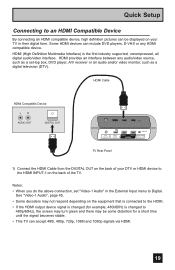
...interface between any HDMI compatible device. See "Video-1 Audio", page 45. • Some decoders may be displayed on your TV in the External Input menu to 480p/60Hz), the screen may turn green and there may not respond depending on the equipment that is connected to the HDMI. • If the HDMI... output device signal is changed (for a short time until the signal becomes stable. • This TV can accept 480i, 480p, 720p, 1080i ...
...interface between any HDMI compatible device. See "Video-1 Audio", page 45. • Some decoders may be displayed on your TV in the External Input menu to 480p/60Hz), the screen may turn green and there may not respond depending on the equipment that is connected to the HDMI. • If the HDMI... output device signal is changed (for a short time until the signal becomes stable. • This TV can accept 480i, 480p, 720p, 1080i ...
Instructions
Page 21
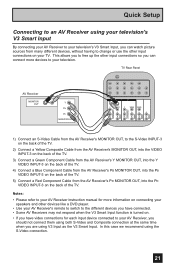
... remote to switch to the different devices you have connected. • Some AV Receivers may not respond when the V3 Smart Input function is turned on. • If you have video connections for each input device connected to the S-Video INPUT-3 on the back of the... free up the other input connections so you can connect more information on connecting your speakers and other input connections on the back of the TV. TV Rear Panel AV Receiver MONITOR OUT Y PB PR MONITOR OUT INPUT 3 S-VIDEO Y VIDEO INPUT 4 Y VIDEO VIDEO PB L PB L L L PR R PR R R R AUDIO AUDIO AUDIO ...
... remote to switch to the different devices you have connected. • Some AV Receivers may not respond when the V3 Smart Input function is turned on. • If you have video connections for each input device connected to the S-Video INPUT-3 on the back of the... free up the other input connections so you can connect more information on connecting your speakers and other input connections on the back of the TV. TV Rear Panel AV Receiver MONITOR OUT Y PB PR MONITOR OUT INPUT 3 S-VIDEO Y VIDEO INPUT 4 Y VIDEO VIDEO PB L PB L L L PR R PR R R R AUDIO AUDIO AUDIO ...
Instructions
Page 22
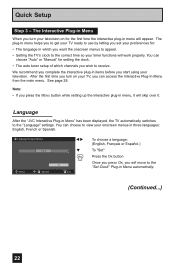
... or "Manual" for the first time the interactive plug-in Menu" has been displayed, the TV automatically switches to view your timer functions will appear. Language After the "JVC Interactive Plug-in menu will work properly. We recommend you complete the interactive plug-in Menu automatically.... (Continued...) 22 Note: • If you turn your television on your television. You can access the ...
... or "Manual" for the first time the interactive plug-in Menu" has been displayed, the TV automatically switches to view your timer functions will appear. Language After the "JVC Interactive Plug-in menu will work properly. We recommend you complete the interactive plug-in Menu automatically.... (Continued...) 22 Note: • If you turn your television on your television. You can access the ...
Instructions
Page 23
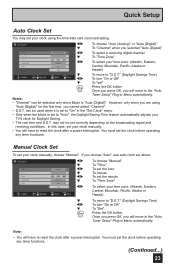
..." menu. • Only when the Mode is "Auto (Digital)". Quick Setup Auto Clock Set You may not be selected only when Mode is set your TV's clock for the first time, you cannot select "Channel". • D.S.T. You must set " Press the OK button Once you press OK, you will ...move to "D.S.T." (Daylight Savings Time) Select Operate Back Exit √® To turn "On or Off" To "Set" Press the OK button Once you press OK, you will have to the "Auto Tuner Setup" Plug-in Menu automatically...
..." menu. • Only when the Mode is "Auto (Digital)". Quick Setup Auto Clock Set You may not be selected only when Mode is set your TV's clock for the first time, you cannot select "Channel". • D.S.T. You must set " Press the OK button Once you press OK, you will ...move to "D.S.T." (Daylight Savings Time) Select Operate Back Exit √® To turn "On or Off" To "Set" Press the OK button Once you press OK, you will have to the "Auto Tuner Setup" Plug-in Menu automatically...

Instructions
Page 28
... button to return to the previous menu screen Note: • For Auto Demo, see page 57. 28 Sound Adjust Bass [ 00 ] Treble [ 00 ] Balance[ 00 ] Turn On Volume Volume Limit Reset Current 50 Select Operate Back Back Menu Exit Sound Adjust Clock/Timers Set Clock On / Off Timer Select OK BACK...
... button to return to the previous menu screen Note: • For Auto Demo, see page 57. 28 Sound Adjust Bass [ 00 ] Treble [ 00 ] Balance[ 00 ] Turn On Volume Volume Limit Reset Current 50 Select Operate Back Back Menu Exit Sound Adjust Clock/Timers Set Clock On / Off Timer Select OK BACK...
Instructions
Page 29
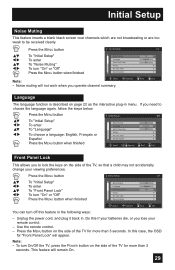
.... π† √® π† √® Press the MENU button To "Initial Setup" To enter To "Front Panel Lock" To turn "On" or "Off" Press the MENU button when finished Initial Setup 1/2 Noise Muting Language Front Panel Lock V-Chip Set Lock Code Closed Caption On English...π† √® π† √® To "Initial Setup" To enter To "Noise Muting" To turn On/Off the TV, press the POWER button on the side of the TV for more than 3 seconds. Initial Setup Noise Muting This feature inserts a blank black screen over channels which are not...
.... π† √® π† √® Press the MENU button To "Initial Setup" To enter To "Front Panel Lock" To turn "On" or "Off" Press the MENU button when finished Initial Setup 1/2 Noise Muting Language Front Panel Lock V-Chip Set Lock Code Closed Caption On English...π† √® π† √® To "Initial Setup" To enter To "Noise Muting" To turn On/Off the TV, press the POWER button on the side of the TV for more than 3 seconds. Initial Setup Noise Muting This feature inserts a blank black screen over channels which are not...
Instructions
Page 30
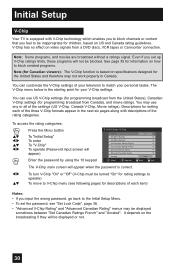
...To operate (Password input screen will appear) Enter the password by using the 10 keypad Initial Setup > V-Chip V-Chip On Set US TV Ratings Set Movie Ratings Set Canadian Ratings English Set Canadian Ratings French Advanced V-Chip Rating Advanced Canadian Rating Unrated Select Operate View BACK Back ...V-Chip main screen will not be inappropriate for rating settings to operate) To move to match your V-Chip settings. To turn V-Chip "On" or "Off" (V-Chip must be turned "On" for children, based on video signals from Canada), and movie ratings. V-Chip has no effect on US and...
...To operate (Password input screen will appear) Enter the password by using the 10 keypad Initial Setup > V-Chip V-Chip On Set US TV Ratings Set Movie Ratings Set Canadian Ratings English Set Canadian Ratings French Advanced V-Chip Rating Advanced Canadian Rating Unrated Select Operate View BACK Back ...V-Chip main screen will not be inappropriate for rating settings to operate) To move to match your V-Chip settings. To turn V-Chip "On" or "Off" (V-Chip must be turned "On" for children, based on video signals from Canada), and movie ratings. V-Chip has no effect on US and...
Instructions
Page 32
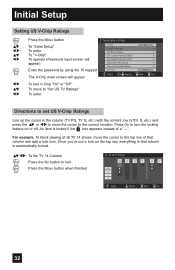
...screen will appear) Enter the password by using the 10 keypad The V-Chip main screen will appear To turn the locking feature on the top row, everything in the column (TV PG, TV G, etc.) with the content row (V/FV, S, etc.) and press the π† or √...MENU button when finished Set US TV Ratings V/FV S L D TV TV TV TV MA 14 PG G - - - - - - - - - - - - - - - Once you've put a lock on or off. Select OK Operate BACK Back MENU Exit 32 TV TV Y7 Y - - - Press OK to turn V-Chip "On" or "Off" To move to "Set US TV Ratings" To enter Initial Setup >...
...screen will appear) Enter the password by using the 10 keypad The V-Chip main screen will appear To turn the locking feature on the top row, everything in the column (TV PG, TV G, etc.) with the content row (V/FV, S, etc.) and press the π† or √...MENU button when finished Set US TV Ratings V/FV S L D TV TV TV TV MA 14 PG G - - - - - - - - - - - - - - - Once you've put a lock on or off. Select OK Operate BACK Back MENU Exit 32 TV TV Y7 Y - - - Press OK to turn V-Chip "On" or "Off" To move to "Set US TV Ratings" To enter Initial Setup >...
Instructions
Page 33
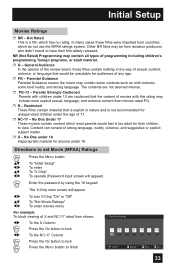
... input screen will appear) Enter the password by using the 10 keypad √® π† √® The V-Chip main screen will appear To turn V-Chip "On" or "Off" To "Set Movie Ratings" To enter movies menu For example: To block viewing of the review board, these films were imported...
... input screen will appear) Enter the password by using the 10 keypad √® π† √® The V-Chip main screen will appear To turn V-Chip "On" or "Off" To "Set Movie Ratings" To enter movies menu For example: To block viewing of the review board, these films were imported...
Instructions
Page 34
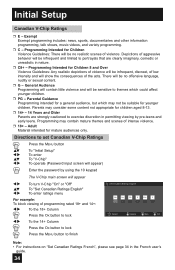
... button to exercise discretion in permitting viewing by using the 10 keypad The V-Chip main screen will appear √® π† √® To turn V-Chip "On" or "Off" To "Set Canadian Ratings English" To enter ratings menu For example: To block viewing of violence will be no realistic scenes...
... button to exercise discretion in permitting viewing by using the 10 keypad The V-Chip main screen will appear √® π† √® To turn V-Chip "On" or "Off" To "Set Canadian Ratings English" To enter ratings menu For example: To block viewing of violence will be no realistic scenes...
Instructions
Page 35
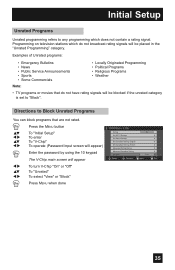
... block programs that do not broadcast rating signals will appear To turn V-Chip "On" or "Off" To "Unrated" To select "View" or "Block" Press MENU when done Initial Setup > V-Chip V-Chip On Set US TV Ratings Set Movie Ratings Set Canadian Ratings English Set Canadian Ratings ... Service Announcements • Sports • Some Commercials Note: • Locally Originated Programming • Political Programs • Religious Programs • Weather • TV programs or movies that are not rated. Initial Setup Unrated Programs Unrated programming refers to "Block".
... block programs that do not broadcast rating signals will appear To turn V-Chip "On" or "Off" To "Unrated" To select "View" or "Block" Press MENU when done Initial Setup > V-Chip V-Chip On Set US TV Ratings Set Movie Ratings Set Canadian Ratings English Set Canadian Ratings ... Service Announcements • Sports • Some Commercials Note: • Locally Originated Programming • Political Programs • Religious Programs • Weather • TV programs or movies that are not rated. Initial Setup Unrated Programs Unrated programming refers to "Block".
Instructions
Page 36
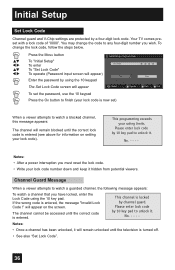
... you have locked, enter the Lock Code using the 10 keypad The Set Lock Code screen will remain blocked until the correct lock code is turned off. • See also "Set Lock Code". 36 If the wrong code is locked by a four-digit lock code. Initial Setup Set Lock Code ... unlocked, it hidden from potential viewers. The channel cannot be accessed until the television is entered (see above for information on the screen. Your TV comes preset with a lock code of "0000". Notes: • After a power interruption you must reset the lock code. • Write your rating limits...
... you have locked, enter the Lock Code using the 10 keypad The Set Lock Code screen will remain blocked until the correct lock code is turned off. • See also "Set Lock Code". 36 If the wrong code is locked by a four-digit lock code. Initial Setup Set Lock Code ... unlocked, it hidden from potential viewers. The channel cannot be accessed until the television is entered (see above for information on the screen. Your TV comes preset with a lock code of "0000". Notes: • After a power interruption you must reset the lock code. • Write your rating limits...

Instructions
Page 39
...; √® Press the MENU button To "Initial Setup" To enter To "Auto Shut Off" To turn the power off. • If you set a timer on the TV, the power indicator will light even if the TV is on the screen, and starts the countdown. Press the MENU button π† √®... stand by. 39 Select OK BACK MENU Operate Back Exit • When the On Timer turns On, the LED is lit as "Low" when there is no TV signal. The LED is lit as "Low" when you turn "On" or "Off" Press the MENU button when finished Initial Setup Auto Shut Off Software...
...; √® Press the MENU button To "Initial Setup" To enter To "Auto Shut Off" To turn the power off. • If you set a timer on the TV, the power indicator will light even if the TV is on the screen, and starts the countdown. Press the MENU button π† √®... stand by. 39 Select OK BACK MENU Operate Back Exit • When the On Timer turns On, the LED is lit as "Low" when there is no TV signal. The LED is lit as "Low" when you turn "On" or "Off" Press the MENU button when finished Initial Setup Auto Shut Off Software...

Instructions
Page 40
...Off High PCM Off Select Operate BACK Back MENU Exit 40 Manufactured under license from your HDMI device. Quick Start-up Quick Start-up " To turn "On" or "Off" Press the MENU button when finished Note: • Standby power consumption is higher when you can select the optical ...digital sound output, either PCM or DOLBY DIGITAL when your TV is from your Optical Output connection if the audio source is connected to turn on . "Dolby", and the double-D symbol are trademarks of Dolby Laboratories. This only effects digital channels...
...Off High PCM Off Select Operate BACK Back MENU Exit 40 Manufactured under license from your HDMI device. Quick Start-up Quick Start-up " To turn "On" or "Off" Press the MENU button when finished Note: • Standby power consumption is higher when you can select the optical ...digital sound output, either PCM or DOLBY DIGITAL when your TV is from your Optical Output connection if the audio source is connected to turn on . "Dolby", and the double-D symbol are trademarks of Dolby Laboratories. This only effects digital channels...
Instructions
Page 48
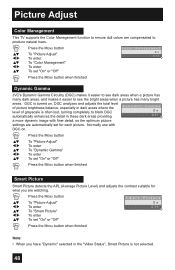
... finished Smart Picture Smart Picture detects the APL (Average Picture Level) and adjusts the contrast suitable for each picture. DGC is turned on . Picture Adjust Color Management This TV supports the Color Management function to ensure dull colors are watching. π† √® π† √®... To "Smart Picture" To enter To set "On" or "Off" Color Management On Off Press the MENU button when finished Dynamic Gamma JVC's Dynamic Gamma Circuitry (DGC) makes it easier to see dark areas when a picture has many dark areas, and makes it easier to produce...
... finished Smart Picture Smart Picture detects the APL (Average Picture Level) and adjusts the contrast suitable for each picture. DGC is turned on . Picture Adjust Color Management This TV supports the Color Management function to ensure dull colors are watching. π† √® π† √®... To "Smart Picture" To enter To set "On" or "Off" Color Management On Off Press the MENU button when finished Dynamic Gamma JVC's Dynamic Gamma Circuitry (DGC) makes it easier to see dark areas when a picture has many dark areas, and makes it easier to produce...
Instructions
Page 49
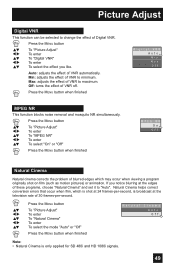
... helps correct conversion errors that occur when film, which may occur when viewing a program originally shot on film (such as motion pictures) or animation. Off: turns the effect of VNR automatically. Press the MENU button when finished Digital VNR Auto Min Max Off MPEG NR This function blocks noise removal and...
... helps correct conversion errors that occur when film, which may occur when viewing a program originally shot on film (such as motion pictures) or animation. Off: turns the effect of VNR automatically. Press the MENU button when finished Digital VNR Auto Min Max Off MPEG NR This function blocks noise removal and...
Instructions
Page 51
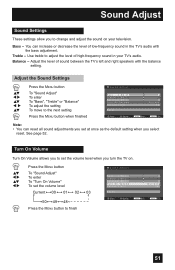
... Adjust Bass [ 00 ] Treble [ 00 ] B a l a n c e[ 0 0 ] Turn On Volume Volume Limit Reset Select Operate Current 50 Back Back Menu Exit 51 Balance - Adjust the level of sound between the TV's left and right speakers with the bass adjustment. Turn On Volume Turn On Volume allows you to set the volume level... when you turn the TV on your TV's audio. You can reset all sound adjustments you set the volume ...
... Adjust Bass [ 00 ] Treble [ 00 ] B a l a n c e[ 0 0 ] Turn On Volume Volume Limit Reset Select Operate Current 50 Back Back Menu Exit 51 Balance - Adjust the level of sound between the TV's left and right speakers with the bass adjustment. Turn On Volume Turn On Volume allows you to set the volume level... when you turn the TV on your TV's audio. You can reset all sound adjustments you set the volume ...

Instructions
Page 52
... Sound Adjust To "Sound Adjust" To enter To "Volume Limit" To set the maximum volume level Bass [ 00 ] Treble [ 00 ] Balance[ 00 ] Turn On Volume Volume Limit 00 01 02 Reset 48 49 50 Press the MENU button to finish Select Operate Current 50 Back Back Menu Exit...174; π† Press the MENU button To "Sound Adjust" To enter To "Reset" Press the OK button Sound Adjust Bass [ 00 ] Treble [ 00 ] B a l a n c e[ 0 0 ] Turn On Volume Volume Limit The onscreen menu disappears for a moment, and then the settings are reset to the default setting for all the sound adjustments...
... Sound Adjust To "Sound Adjust" To enter To "Volume Limit" To set the maximum volume level Bass [ 00 ] Treble [ 00 ] Balance[ 00 ] Turn On Volume Volume Limit 00 01 02 Reset 48 49 50 Press the MENU button to finish Select Operate Current 50 Back Back Menu Exit...174; π† Press the MENU button To "Sound Adjust" To enter To "Reset" Press the OK button Sound Adjust Bass [ 00 ] Treble [ 00 ] B a l a n c e[ 0 0 ] Turn On Volume Volume Limit The onscreen menu disappears for a moment, and then the settings are reset to the default setting for all the sound adjustments...


