User Guide
Page 5
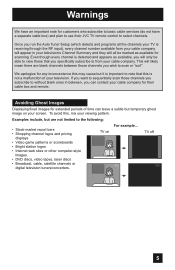
... services (do not have a separate cable box) and plan to use their cable box and remote. Even though every channel is not a malfunction of time can contact your television. This will all the channels your TV is receiving through the RF input), every channel number available from your television's Channel Summary and... you want to sequentially scan those channels you subscribe to without blank ones in your cable company. Warnings We have an important note for their JVC TV remote control to select channels. To avoid this is detected and appears as available for scanning.
... services (do not have a separate cable box) and plan to use their cable box and remote. Even though every channel is not a malfunction of time can contact your television. This will all the channels your TV is receiving through the RF input), every channel number available from your television's Channel Summary and... you want to sequentially scan those channels you subscribe to without blank ones in your cable company. Warnings We have an important note for their JVC TV remote control to select channels. To avoid this is detected and appears as available for scanning.
User Guide
Page 9
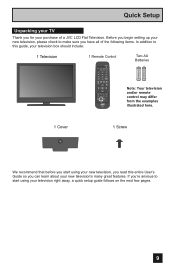
... start using your new television, you read this guide, your purchase of a JVC LCD Flat Television. L FAV. Quick Setup Unpacking your TV Thank you for your television box should include: 1 Television POWER 1 Remote Control POWER SLEEP SUB CH V.STATUS SOUND 1 2 3 4 5 6 7 8 9 TUNE RETURN+/TV 0 V1 V2 V3 V4 MUTING CH+ V5 VO- Before you begin setting...
... start using your new television, you read this guide, your purchase of a JVC LCD Flat Television. L FAV. Quick Setup Unpacking your TV Thank you for your television box should include: 1 Television POWER 1 Remote Control POWER SLEEP SUB CH V.STATUS SOUND 1 2 3 4 5 6 7 8 9 TUNE RETURN+/TV 0 V1 V2 V3 V4 MUTING CH+ V5 VO- Before you begin setting...
User Guide
Page 10
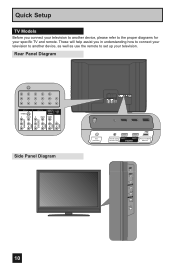
... INPUT MENU + CHANNEL - OK + VOLUME - These will help assist you connect your television to another device, as well as use the remote to the proper diagrams for your television. Quick Setup TV Models Before you in understanding how to connect your television to another device, please refer to set up your specific...
... INPUT MENU + CHANNEL - OK + VOLUME - These will help assist you connect your television to another device, as well as use the remote to the proper diagrams for your television. Quick Setup TV Models Before you in understanding how to connect your television to another device, please refer to set up your specific...
User Guide
Page 11
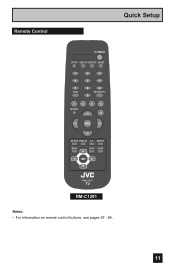
ASPECT MENU BACK GUIDE OK RM-C1291 TV RM-C1291 Notes: • For information on remote control buttons, see pages 57 - 64. 11 Remote Control Quick Setup POWER SLEEP SUB CH V.STATUS SOUND 1 2 3 4 5 6 7 8 9 TUNE RETURN+/TV 0 V1 V2 V3 V4 MUTING CH+ V5 VO- VOL + CH- ML/MTS DISPLAY C.C. L FAV.
ASPECT MENU BACK GUIDE OK RM-C1291 TV RM-C1291 Notes: • For information on remote control buttons, see pages 57 - 64. 11 Remote Control Quick Setup POWER SLEEP SUB CH V.STATUS SOUND 1 2 3 4 5 6 7 8 9 TUNE RETURN+/TV 0 V1 V2 V3 V4 MUTING CH+ V5 VO- VOL + CH- ML/MTS DISPLAY C.C. L FAV.
User Guide
Page 12
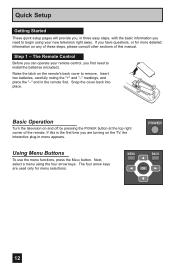
The Remote Control Before you can operate your new television right away. Raise the latch on and off by pressing the POWER button at the top right corner of this is the first time you are used only for more detailed information on the TV, the interactive plug-in menu appears.... Insert two batteries, carefully noting the "+" and "-" markings, and place the "-" end in the remote first. If you have questions, or for menu selections. If this manual. MENU...
The Remote Control Before you can operate your new television right away. Raise the latch on and off by pressing the POWER button at the top right corner of this is the first time you are used only for more detailed information on the TV, the interactive plug-in menu appears.... Insert two batteries, carefully noting the "+" and "-" markings, and place the "-" end in the remote first. If you have questions, or for menu selections. If this manual. MENU...
User Guide
Page 23
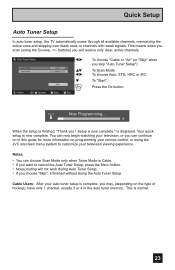
...MENU Exit To choose "Cable or "Air" (or "Skip" when you want to customize your remote control, or using the CHANNEL +/- Quick Setup Auto Tuner Setup In auto tuner setup, the TV automatically scans through all available channels, memorizing the active ones and skipping over blank ones or channels...when Tuner Mode is normal. 23 Your quick setup is displayed. Cable Users: After your auto tuner setup is complete, you scan (using the JVC onscreen menu system to cancel the Auto Tuner Setup, press the MENU button. • Noise muting will receive only clear, active channels. This...
...MENU Exit To choose "Cable or "Air" (or "Skip" when you want to customize your remote control, or using the CHANNEL +/- Quick Setup Auto Tuner Setup In auto tuner setup, the TV automatically scans through all available channels, memorizing the active ones and skipping over blank ones or channels...when Tuner Mode is normal. 23 Your quick setup is displayed. Cable Users: After your auto tuner setup is complete, you scan (using the JVC onscreen menu system to cancel the Auto Tuner Setup, press the MENU button. • Noise muting will receive only clear, active channels. This...
User Guide
Page 24
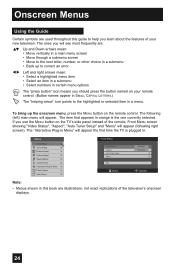
...Move to the next letter, number, or other choice in a submenu • Back up the onscreen menu, press the MENU button on the TV's side panel instead of the remote, Front Menu screen showing "Video Status", "Aspect", "Auto Tuner Setup" and "Menu" will appear (following (left) main menu will appear ...the first time the TV is the one currently selected. The item that appears in orange is plugged in. If you learn about the ...
...Move to the next letter, number, or other choice in a submenu • Back up the onscreen menu, press the MENU button on the TV's side panel instead of the remote, Front Menu screen showing "Video Status", "Aspect", "Auto Tuner Setup" and "Menu" will appear (following (left) main menu will appear ...the first time the TV is the one currently selected. The item that appears in orange is plugged in. If you learn about the ...

User Guide
Page 25
... a menu using each menu follow later in this method). 2) Press the OK button. To open the onscreen menu system, press the MENU button on the remote control will close the onscreen menu system and return you do not press any buttons for a few seconds, the onscreen menu will be discussed in... Tuner Setup appear. Tuner Mode Scan Mode Cable Auto Auto • To go back to move up and down the list. 3. Pressing MENU on the remote control. Notes: • If you to select an option from the box and press the OK button. There are highlighted in the following pages of...
... a menu using each menu follow later in this method). 2) Press the OK button. To open the onscreen menu system, press the MENU button on the remote control will close the onscreen menu system and return you do not press any buttons for a few seconds, the onscreen menu will be discussed in... Tuner Setup appear. Tuner Mode Scan Mode Cable Auto Auto • To go back to move up and down the list. 3. Pressing MENU on the remote control. Notes: • If you to select an option from the box and press the OK button. There are highlighted in the following pages of...
User Guide
Page 28
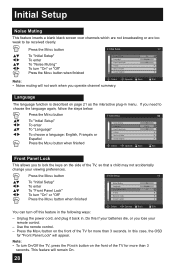
Do this feature in the following ways: - Use the remote control. - Press the MENU button Initial Setup 1/2 π† √® π† √® To "Initial Setup" To ... feature inserts a blank black screen over channels which are not broadcasting or are too weak to lock the keys on the front of the TV, so that a child may not accidentally change your viewing preferences. π† √® π† √® Press ... Closed Caption 1/2 On English Off Select BACK Operate Back MENU Exit You can turn off this if your remote control. -
Do this feature in the following ways: - Use the remote control. - Press the MENU button Initial Setup 1/2 π† √® π† √® To "Initial Setup" To ... feature inserts a blank black screen over channels which are not broadcasting or are too weak to lock the keys on the front of the TV, so that a child may not accidentally change your viewing preferences. π† √® π† √® Press ... Closed Caption 1/2 On English Off Select BACK Operate Back MENU Exit You can turn off this if your remote control. -

User Guide
Page 40
... the OK button (Programming will take serveral minutes) Air Auto Start BACK Back MENU Exit The auto tuner is described on the side of the TV instead of the remote control.
... the OK button (Programming will take serveral minutes) Air Auto Start BACK Back MENU Exit The auto tuner is described on the side of the TV instead of the remote control.
User Guide
Page 54
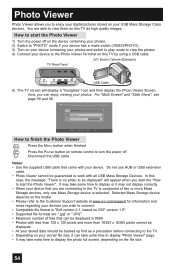
... of files that can be backed up first as high quality images. Photo Viewer Photo Viewer allows you to enjoy your digital pictures stored on remote control to turn the power off on the device containing your photos. 2) Switch to "PHOTO" mode if your device has a mode switch (VIDEO/PHOTO... off Disconnect the USB cable Notes: • Use the supplied USB cable that you are connecting to the TV is no photo to be guaranteed to work with your device. JVC Everio Camera (Example) TV Rear Panel 75 Ω (VHF/UHF) DIGITAL AUDIO INPUT 1 OPTICAL OUT INPUT 2 PHOTO VIEWER / SERVICE USB ...
... of files that can be backed up first as high quality images. Photo Viewer Photo Viewer allows you to enjoy your digital pictures stored on remote control to turn the power off on the device containing your photos. 2) Switch to "PHOTO" mode if your device has a mode switch (VIDEO/PHOTO... off Disconnect the USB cable Notes: • Use the supplied USB cable that you are connecting to the TV is no photo to be guaranteed to work with your device. JVC Everio Camera (Example) TV Rear Panel 75 Ω (VHF/UHF) DIGITAL AUDIO INPUT 1 OPTICAL OUT INPUT 2 PHOTO VIEWER / SERVICE USB ...

User Guide
Page 55
...-0004 Press OK if you will skip to that are in all directions using the 10-key pad on your remote control buttons. 123 456 789 Prev. + Next - key pad on your remote † button: Zooms out the image √ button: To previous image ® button: To next image VOL+: Rotates the...: Returns to the thumbnail screen MENU: Exit Notes: • When Multi Screen has more than one screen, if you press the page number using your remote, you want to the USB memory. 55 VOLUME - + Rotate BACK MENU Back Exit π button: Zooms in the image When the image is not saved...
...-0004 Press OK if you will skip to that are in all directions using the 10-key pad on your remote control buttons. 123 456 789 Prev. + Next - key pad on your remote † button: Zooms out the image √ button: To previous image ® button: To next image VOL+: Rotates the...: Returns to the thumbnail screen MENU: Exit Notes: • When Multi Screen has more than one screen, if you press the page number using your remote, you want to the USB memory. 55 VOLUME - + Rotate BACK MENU Back Exit π button: Zooms in the image When the image is not saved...
User Guide
Page 56
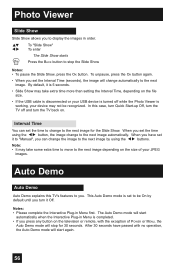
... seconds have set it Off. To unpause, press the OK button again. • When you set the time using the √® buttons. In this TV's features to the next image. When you have passed with the exception of your USB device is disconnected or your JPEG images. Notes: • Please... Menu first. Note: • It may take some extra time to move to the next image by default until you turn the TV back on the television or remote, with no operation, the Auto Demo mode will start again. 56 The Auto Demo mode will start automatically when the Interactive Plug-in...
... seconds have set it Off. To unpause, press the OK button again. • When you set the time using the √® buttons. In this TV's features to the next image. When you have passed with the exception of your USB device is disconnected or your JPEG images. Notes: • Please... Menu first. Note: • It may take some extra time to move to the next image by default until you turn the TV back on the television or remote, with no operation, the Auto Demo mode will start again. 56 The Auto Demo mode will start automatically when the Interactive Plug-in...

User Guide
Page 57
... 12: 1 (ONE) 2 (TWO) Tune Lets you press the number buttons on the side of the TV instead of the remote. Use these buttons to move up or down all the available channels your TV is able to a specific channel. After you decide the input channel and select it. To move to...TUNE button. Press the POWER button Number Buttons - 10Key Pad Use the number buttons on or off. Channel +/- Button Functions Power Turns the TV on the remote control to move directly to receive. For example, to move rapidly through the channels using JVC's Hyperscan feature, press and hold CH+ or CH-. 57
... 12: 1 (ONE) 2 (TWO) Tune Lets you press the number buttons on the side of the TV instead of the remote. Use these buttons to move up or down all the available channels your TV is able to a specific channel. After you decide the input channel and select it. To move to...TUNE button. Press the POWER button Number Buttons - 10Key Pad Use the number buttons on or off. Channel +/- Button Functions Power Turns the TV on the remote control to move directly to receive. For example, to move rapidly through the channels using JVC's Hyperscan feature, press and hold CH+ or CH-. 57

User Guide
Page 59
...] button to the factory settings. Program it to work for when you a choice of four TV picture display settings, including a display of the SLEEP button, you fall asleep. Sleep Timer Press the...minutes. STATUS button, you press the SLEEP button once, the rest of the remote control. Note: • You can turn the TV off for you after you select the time for the timer to shut off 0...; buttons. • You can also select the timer by pressing MENU† on the side of the TV instead of the time will appear: Good Night ! Resets the picture display to extend. 60 min. 90 ...
...] button to the factory settings. Program it to work for when you a choice of four TV picture display settings, including a display of the SLEEP button, you fall asleep. Sleep Timer Press the...minutes. STATUS button, you press the SLEEP button once, the rest of the remote control. Note: • You can turn the TV off for you after you select the time for the timer to shut off 0...; buttons. • You can also select the timer by pressing MENU† on the side of the TV instead of the time will appear: Good Night ! Resets the picture display to extend. 60 min. 90 ...

User Guide
Page 62
... on the side of the TV instead of the onscreen menus. Button Functions Aspect Ratios (Continued) Press the ASPECT button • By pressing the ASPECT button, you change the aspect ratio or signal, reset the picture position to access JVC's onscreen menu system. If ...the television receives a 4:3 signal from your HDMI device when you are in the menu to "Regular" aspect mode. Back This button allows you change the aspect ratios, it to "Full" automatically, the televison will change the size. When you to go back in one of the remote...
... on the side of the TV instead of the onscreen menus. Button Functions Aspect Ratios (Continued) Press the ASPECT button • By pressing the ASPECT button, you change the aspect ratio or signal, reset the picture position to access JVC's onscreen menu system. If ...the television receives a 4:3 signal from your HDMI device when you are in the menu to "Regular" aspect mode. Back This button allows you change the aspect ratios, it to "Full" automatically, the televison will change the size. When you to go back in one of the remote...
User Guide
Page 66
...became unplugged. • Check for a blown fuse or circuit breaker or a power outage. See page 63. 66 Remote control is causing the problem. Adjust your TV. (See page 18). • This TV can accept 480i (Composite / S / HDMI / Component), 480p, 720p and 1080i signals. Turn it . It ...Sleep Timer was not reset. Move the antenna away from another electrical appliance, such as a computer, another TV or VCR. PROBLEMS There is a problem, contact the JVC Service Center where you think that external noise or interference is not • Check to see if other...
...became unplugged. • Check for a blown fuse or circuit breaker or a power outage. See page 63. 66 Remote control is causing the problem. Adjust your TV. (See page 18). • This TV can accept 480i (Composite / S / HDMI / Component), 480p, 720p and 1080i signals. Turn it . It ...Sleep Timer was not reset. Move the antenna away from another electrical appliance, such as a computer, another TV or VCR. PROBLEMS There is a problem, contact the JVC Service Center where you think that external noise or interference is not • Check to see if other...


